Kurt
New Member
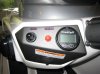
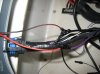
This is a procedure for installing a HAWKEYE depth finder on a 2007 Speedster. 1) mount the display on the left side control panel where the 12 volt charger outlet is. Remove the DESS, starter button and 12 volt outlet from panel. Remove panel from dashboard ( it is attached with double faced tape). Drill at SLOW SPEED a 2" hole where the 12 volt outlet was (PLEASE USE A HOLE SAW AND CAREFULLY CENTER THE HOLE & USE A PIECE OF WOOD CLAMPED TIGHTLY AGAINST THE PANEL then drill a 1"1/4 hole below the starter button to reinstall the 12 volt outlet. See photo. 2) Wire the unit to the back of the seadoo digital display by disconnecting the plug from the display ( it has a tab you pull down on to disconnect the plug) Attach the red wire from the depth finder to the purple wire from the display cable and the black wire to the black. ( You will have to skin a small portion of the insulation on the wire to expose the copper wire. Please solder the connections, I tried an automotive squeeze connector and it did not work. By wiring this way, DESS on, depth finder on, DESS OFF, DEPTH FINDER OFF-NO BATTERY WORRIES) Reconnect the plug to the digital display (Please do all work with BATTERY SWITCH IN OFF POSITION!!!)
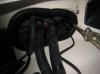
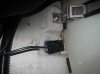
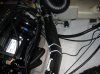
3) Put the transducer in the engine compartment and run the cable from it through the drivers side of the boat and come out inside the compartment where the radio is. Connect THE TRANSDUCER CABLE to depth finder display cable and tighten connnector. 4. You are ready to mount the transducer in the engine compartment. 5) I mounted the unit on the drivers side in a depression below the black box on the engine wall- See Photo. I mounted with silicon and it worked the first time I went out on the boat. Now that the silicon dried the transducer is problematic. I think the location is good but the silicon is not ok to use (it blocks the sound) I will now try the transducer in a plastic bag filled with water. If that works on my next outing I will epoxy the transducer in place. I purchased the D10DX.01T-B Hawkeye unit for $89.99 for a refurbished unit with 90 day warranty. The unit has air temp, water temp, high and low depth alarms,green back lighting and red warning back light on alarm activation in addition to noise alarm. I like the unit!
3) Put the transducer in the engine compartment and run the cable from it through the drivers side of the boat and come out inside the compartment where the radio is. Connect THE TRANSDUCER CABLE to depth finder display cable and tighten connnector. 4. You are ready to mount the transducer in the engine compartment. 5) I mounted the unit on the drivers side in a depression below the black box on the engine wall- See Photo. I mounted with silicon and it worked the first time I went out on the boat. Now that the silicon dried the transducer is problematic. I think the location is good but the silicon is not ok to use (it blocks the sound) I will now try the transducer in a plastic bag filled with water. If that works on my next outing I will epoxy the transducer in place. I purchased the D10DX.01T-B Hawkeye unit for $89.99 for a refurbished unit with 90 day warranty. The unit has air temp, water temp, high and low depth alarms,green back lighting and red warning back light on alarm activation in addition to noise alarm. I like the unit!