


-
This site contains eBay affiliate links for which Sea-Doo Forum may be compensated.
You are using an out of date browser. It may not display this or other websites correctly.
You should upgrade or use an alternative browser.
You should upgrade or use an alternative browser.
Help Installing New LCD Display Gauge (99 GSX Limited)
- Thread starter Fish1
- Start date
- Status
- Not open for further replies.
68ragtop
Well-Known Member
Sorry to bring this up again, I was wondering in post #20 if you opened up the hood & pluged your "new" info center into the speedo? The info center gets its power from the speedometer. Its a two wire connector with a purple/black If you are only pluging in the large harness to the MPEM, & you have the two wire cord hanging, its not going to turn on.
")
Thanks 68ragtop (and everyone that has helped)!
I was planning on removing the hood and trying this weekend, but wasn't feeling very confident it would make a difference as it seemed most were under the impression the power came from the large connector alone. The person I purchased this from also said it needs to connect with the speedometer so I'm optimistic it will work when I complete the installation and connect the smaller connections.
Now, how do I do this")
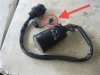
I assume it will be simple to remove the hood backing to gain access to the speedometer, but how will I then connect the wires through the hood so I can plug the large connector to the MPEM? Right now, the older gauge goes through a narrow gap that neither the gauge or the large connector can fit through. Will I need to remove the large connector from the wires and reconnect after I put the wires through that smaller gap?
If so, how do I remove one end and reattach it after?
Will I also have to use something to seal and secure the gauge in place after installing it?
I've attached a picture of the gap the wires for the gauge need to go through from above to below the hood:
I was planning on removing the hood and trying this weekend, but wasn't feeling very confident it would make a difference as it seemed most were under the impression the power came from the large connector alone. The person I purchased this from also said it needs to connect with the speedometer so I'm optimistic it will work when I complete the installation and connect the smaller connections.
Now, how do I do this
I assume it will be simple to remove the hood backing to gain access to the speedometer, but how will I then connect the wires through the hood so I can plug the large connector to the MPEM? Right now, the older gauge goes through a narrow gap that neither the gauge or the large connector can fit through. Will I need to remove the large connector from the wires and reconnect after I put the wires through that smaller gap?
If so, how do I remove one end and reattach it after?
Will I also have to use something to seal and secure the gauge in place after installing it?
I've attached a picture of the gap the wires for the gauge need to go through from above to below the hood:
Attachments
Last edited by a moderator:
Ok, this will show what little I know about this stuff
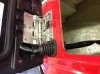
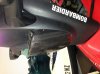
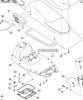
In order to replace the gauge, do I remove the black carbon hood piece on the outside that covers the gauge (1st pic attached) with the Philip Screws? Or do I remove the inside of the hood (2nd pic attached) with the hex bolts?
In order to replace the gauge, do I remove the black carbon hood piece on the outside that covers the gauge (1st pic attached) with the Philip Screws? Or do I remove the inside of the hood (2nd pic attached) with the hex bolts?
Attachments
68ragtop
Well-Known Member
It almost looks like yours has a removable access cover in the center of the bottom, but I am not sure as I am only familiar with the earlier GSX covers. Worse case you remove the small screws around the perimeter. (looks like a few are already missing?) I think they are 5.5mm The gauge itself is just pushed into the rubber grommet. Shouldn't be any fasteners holding the gauge itself.
Jetskigoodies
Well-Known Member
Those screws on the outer deflector should not be there. The phillips head scres were added buy the last guy who owned it. I bet the inner tabs broke so he just screwed it in from the outside.
Jetskigoodies
Well-Known Member
You can replace that gauge without taking off the hood. You just need to gently place a flat head screw driver between the gauge and the rubber boot and gently pry use the side of the hood for leverage but be gentle. The gauge will start to come out, just pull it out disconnect the wires and plug in the new one and push it back in. It looks like you have a access panel under the hood too. Open the access panel and see if you are able to get your hand in there. I have not had a 99 but all the other gs body seadoos we have had we could take out gauges without taking apart the hood.
Seadooguy10
New Member
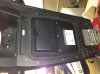
What you are going to want to do is unplug the wire going to the mpem(black box in the hull) then you are going to want to pull the rubber boot and wire out that hole you took a picture of, it will fit through there because thats how they got it in. After that you are going to want to unscrew the hex bolts with a 5.5 mm rachet. Once you get them all unscrewed that piece will just come right off. You will see the connection you need to make after you pull the inside hood off. Hope that helps
Everything is good! Thanks you ALL so much for all the help!
I got the Gauge in the ski and once I had all three connectors plugged in, it turned right on.
Two parts of the project I had a problem with.
1) Not sure the Gauge is actually secure enough. I just popped the new gauge in the open space and closed everything back up. We'll see when I take it out for a ride. Is there some special way to make sure the gauge is in there securely?
2) I couldn't figure out how to get that rubber boot sleeve (picture in post #29...the rubber piece that helps seal the square opening the wiring goes through from the hood to the hull) off the old gauge and onto the new gauge. I ended up cutting down one side of the sleeve and gluing it back together around the new gauge wiring. No big deal, but curious how I was suppose to get that sleeve off the old and on the new. No way it was stretching over the large connector (I even tried heating it up).
Anyway, all is good! Thanks again to everyone in this thread!!!!!
68ragtop
Well-Known Member
Good News!!
I was thinking the grommet/boot would stretch quite a bit, but I haven't done that style so I can't say if it could have stretched that much. I know on my 96 its not easy either, but the boot definitely had to be out of hole in the hull, or the connectors would never pass. On the 96, its a large group of connectors rather than one large one. I'm a little worried that the glue might fail on you, but that shouldn't be too bad too replace if you need to.
The gauge itself should be pretty secure just being pressed into the rubber grommet in the hood. I used a little soap & water when I pushed mine in place, they were still very snug, If I remember correctly the grommet had to be fitted to the hood, then the gauge pressed in.
The rubber boot I cut and glued back together is not holding. I just used regular superglue...I know not that smart. As soon as I tried to bend it into place the glue gave. I assume I should use some type of rubber cement. is there any specific kind I should use?
The gauge is also not secure enough as it is now. I have a feeling as soon as I hit the water and the ski bounces around, this gauge is going to come free. Should I use a tiny amount of the same rubber cement I use to hold the boot in place on the gauge to hold it in place as well?
Thanks!
The gauge is also not secure enough as it is now. I have a feeling as soon as I hit the water and the ski bounces around, this gauge is going to come free. Should I use a tiny amount of the same rubber cement I use to hold the boot in place on the gauge to hold it in place as well?
Thanks!
SabrToothSqrl
Well-Known Member
I don't think any type of glue will hold, something about your process is flawed. People have replaced gauges before...
 You might want to see if you can buy a replacement ?
The reason I cut it off in the first place is because I couldn't get it off the old gauge wiring and on the new one
Update:
I actually tried Gorilla Glue - Epoxy and it looks to be holding well. I was able to put the rubber boot back together, use the epoxy, zip tie it in place, let it set for an hour or so (even though it only says it needs 5 minutes).
I then was able to bend the boot and get it in place while this epoxy held the boot together great. So, if anyone else needs something for the type of thing, give Gorilla Glue - Epoxy a try. Worked for me.
Thanks again all!
Last edited by a moderator:
- Status
- Not open for further replies.
Similar threads
- Replies
- 4
- Views
- 184
- Replies
- 3
- Views
- 193
- Replies
- 2
- Views
- 285
- Replies
- 3
- Views
- 407
- Replies
- 8
- Views
- 637