• This site contains eBay affiliate links for which Sea-Doo Forum may be compensated.

Gouge in block deck

Status
Not open for further replies.

mtf0011

New Member
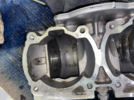
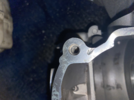
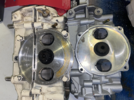
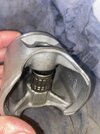
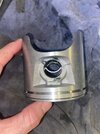
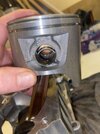
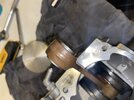
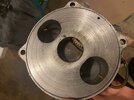
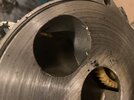
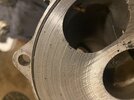
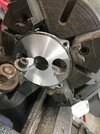
Hey everyone. In the middle of rebuilding a 717 out of my 97 season GTI, and whilst inspecting the used block that I ordered off eBay to replace my trashed one, I noticed a gouge in the block deck. Pictures are attached. What do y'all think? I've heard of guys filling gouges with high temp jb weld and sanding it level.
 

Attachments

  • tempImageFLtiEq.png
    tempImageFLtiEq.png
    2.9 MB · Views: 40
  • tempImageLWFix6.png
    tempImageLWFix6.png
    2.5 MB · Views: 39
For good measure you can put some JB Weld on there but you'd likely be better off just leaving it alone and let the gasket seal which it will easily do. If you choose to use Metal Filler, DO NOT sand so that you remove any aluminum. YOu don't want to create a low spot on the gasket surface. I would suggest sanding till it is almost flush then using a Flat stone on the gasket surface. It's not bad at all. Good Luck.
 
thanks a lot for the quick reply. Two more questions for someone who knows more about these things than me.

1.) Why does my original block have a groove that goes all the way around on the rotary valve face thingy and my replacement does not? is this an issue? Original block is white, silver is eBay block.

2.) My wrist pin bearing will not fit inside the piston. The bearing fits inside the rod fine but I cant get it to sit down inside the piston. It’s like the cage is too wide. All these parts came in the same kit. Am I missing something?
 

Attachments

  • tempImagetHd3F4.png
    tempImagetHd3F4.png
    3 MB · Views: 30
  • 7118AFB2-5896-4A53-9531-0726E416C45C.jpeg
    7118AFB2-5896-4A53-9531-0726E416C45C.jpeg
    253.3 KB · Views: 21
  • 023F1A5F-394E-45B7-AC3F-93E03F7664BD.jpeg
    023F1A5F-394E-45B7-AC3F-93E03F7664BD.jpeg
    278.6 KB · Views: 16
  • 62F3DA26-D3DC-46B0-96FC-61A835C2FD63.jpeg
    62F3DA26-D3DC-46B0-96FC-61A835C2FD63.jpeg
    313.9 KB · Views: 16
  • B8A9A3D4-53DF-4567-95C7-976EACD5C9C3.jpeg
    B8A9A3D4-53DF-4567-95C7-976EACD5C9C3.jpeg
    211.2 KB · Views: 16
Last edited:
The groove isn't suppose to be there. Likely a foreign object got inside the rotary valve chamber and caused the damage.
 
Can't help you on the wrist pins. I use WSM kits and have not had a problem. On the engine block.... clean it up really good. No BURS. Scotch-Brite and flush it really good when complete. I might put JB weld on those gouges on the gasket surface. Now what's really important is that you make sure the oil holes that feed the outboard bearings are clear ( I have it circled in the picture). When you assemble the engine block make sure the gasket surfaces (rotary valve and mag cover) are lined up perfectly and maintain viligence as you tighten the bolts. Those surfaces should be even/flat.

Print out the pages you need in the manual and read them over thoroughly. Good Luck !

Forum Picture of Engine Block.png
 
On that piston,,,without the bearing,,,are you able to slide the wrist pin back and forth,,,I usually put some oil mix on the pin first,,,at our marine/watercraft shop, we use "perfect seal",,,on both sides of a gasket,,,never had a water leak,, that gouge is nothing,,,seen worse,,,use some "perfect seal",,,and you will be fine.
 
Put some three bond 1211 on the base gasket and call it a day just make sure the gouge is flat with nothing sticking up did you lube the wrist pins and bearing?
 
On that piston,,,without the bearing,,,are you able to slide the wrist pin back and forth,,,I usually put some oil mix on the pin first,,,at our marine/watercraft shop, we use "perfect seal",,,on both sides of a gasket,,,never had a water leak,, that gouge is nothing,,,seen worse,,,use some "perfect seal",,,and you will be fine.
Now I gotta look up what the hell "Perfect Seal" is. LOL
 
So turns out that the eBay seller sent the incorrect bearings with the kit. He’s sending me new ones. Another question, on the backside of this rotary valve pump thingy(??) there are some grooves in it and some knicks at this port. Do people have this surface machined during a rebuild??

Thank you to everyone for the replies and help.
 

Attachments

  • 8C844C21-0A14-4CFD-B0D2-9CA38B7F71A8.jpeg
    8C844C21-0A14-4CFD-B0D2-9CA38B7F71A8.jpeg
    385.9 KB · Views: 13
  • DF713E58-D7A9-4D52-9389-9186AB0DDB57.jpeg
    DF713E58-D7A9-4D52-9389-9186AB0DDB57.jpeg
    246.1 KB · Views: 13
  • 413558A2-D7AF-4BD0-B5EC-A5977031C980.jpeg
    413558A2-D7AF-4BD0-B5EC-A5977031C980.jpeg
    342.1 KB · Views: 18
What is more difficult to detect without putting a straight edge across the sealing surface and using a feeler gauge, is how much wear there is by the ports. As you can see in this picture where I am machining the surface this valve cover had a significant amount of wear. It was junk. Yours might not be too bad but the smoother and flatter.... da betta !!! LOL Get that clearance spot on and you'll have much easier time starting the engine. Good Luck !!
 

Attachments

  • Rotary Valve Cover Lathe Machine (2).JPG
    Rotary Valve Cover Lathe Machine (2).JPG
    313.7 KB · Views: 26
Having a really hard time finding someone local who will machine my valve cover. Is anyone aware of any mail in services that can do this??
 
You can probably buy a used one off Ebay in good shape for the price you'll pay machining and.... the shop has to do it correctly. Lots of variables with that. I do my own but no one elses. Pain in the azz. The only thing I get out of it personally is the difference at start up. Snappy. :)
 
SBT said they would do it for me. Just wish it wasnt going to take 2+ weeks.... I'd really like to go ahead and drop the motor in even though I dont have the valve cover yet. If I drop the motor in, will I have enough room to install the rotary valve, valve cover, and carb after the fact?
 
Status
Not open for further replies.
Back
Top