• This site contains eBay affiliate links for which Sea-Doo Forum may be compensated.

Another Seadoo... New owner!

Status
Not open for further replies.

bwhitsonjr

New Member
Picked up a nice used (what I thought was nice) 2006 Seadoo GTX Wake edition. 94 hours. Came with a custom dolly. 2 DESS keys. I'll let you be the judge of that. I'll attach some pictures and hopefully you can give me some feedback.

I'm thinking I'll need to remove the PTO cover and attempt a refinish.

This was definitely riden in salt water. I'm glad it has a closed loop cooling system. As for the open loop cooling system for the exhaust.... I don't know.

It makes 2 beeps when I put the key on and continues to make 4 beeps. Is this normal?

Does anyone recommend a good source for parts on a Seadoo?

Performed a compression test but the engine keeps cutting out. It only turns 3-4 times and stops. I've watched videos online where they keep spinning and don't stop. I push the throttle to WOT to put it into drown mode, or whatever it's called.

Otherwise it fires up and runs no problem. I have to clean it up like I would like it. And lastly there are some small fiberglass places as indicated in the pictures that is damage that needs repair.

Thanks for your time in reading this and let me know any thoughts, feedback, or comments. All are welcome!

IMG_2642.JPG

IMG_2645.JPG

IMG_2651.JPG

IMG_2652.JPG

IMG_2654.JPG

IMG_2656.JPG

IMG_2658.JPG

IMG_2659.JPG

FullSizeRender.jpg
 
2-beeps means the key is on the DESS and it is a correct key/lanyard for the MPEM. 4-beeps means it is still on the DESS but the engine is not running. It does that to let you know that the MPEM is still powered up, which will drain the battery until the lanyard is pulled off the DESS..
 
As CoastieJoe said the beeping is normal so don't worry about that. It looks to be in good condition overall. It just needs a good cleaning. Get a cover if you want to keep it in good condition - especially the seat.
 
As CoastieJoe said the beeping is normal so don't worry about that. It looks to be in good condition overall. It just needs a good cleaning. Get a cover if you want to keep it in good condition - especially the seat.

Forgot to mention... it did come with one.

I don't want to get hung up on the PTO cover but it's definitely got some corrosion going on there. Salt water came through the carbone ring according to someone and was never cleaned. Planning on pulling the pump and replacing everything on the shaft from the impeller to the PTO.

I've been told this would be a good time to pull the PTO cover and clean then replace. I've never done anything like this and don't know what to expect. Is oil going to spill out? Do I have to replace a seal? I'm thinking about just sending mine to SBT. "SBT offers a re-conditioning service for SeaDoo 4-Tec oil pump housings." $259.95.

At that price might just try to pull and redo myself.
 
Last edited by a moderator:
Forgot to mention... it did come with one.

I don't want to get hung up on the PTO cover but it's definitely got some corrosion going on there. Salt water came through the carbone ring according to someone and was never cleaned. Planning on pulling the pump and replacing everything on the shaft from the impeller to the PTO.

I've been told this would be a good time to pull the PTO cover and clean then replace. I've never done anything like this and don't know what to expect. Is oil going to spill out? Do I have to replace a seal? I'm thinking about just sending mine to SBT. "SBT offers a re-conditioning service for SeaDoo 4-Tec oil pump housings." $259.95.

At that price might just try to pull and redo myself.

I honestly couldn't tell you. Hopefully someone else can help you.
 
To remove the rear PTO cover the driveshaft needs to come out, oil drained, coolant drained and there is a gasket between the cover and the block. This is much easier to do with the engine out of the hull on a stand or work bench. If you do pull the motor then you need to check the engine to pump alignment when reinstalling the engine. It's not a difficult job just a little time consuming.
 
To remove the rear PTO cover the driveshaft needs to come out, oil drained, coolant drained and there is a gasket between the cover and the block. This is much easier to do with the engine out of the hull on a stand or work bench. If you do pull the motor then you need to check the engine to pump alignment when reinstalling the engine. It's not a difficult job just a little time consuming.

Cool! Thanks for making it sound a little easier than I thought. I actually would rather leave the engine in while removing the cover. I'm ok with a small workspace. I'd rather not remove all that is required to pull the engine. Rather do the work with the engine staying put. After all the way it would work in my mind is it would take as long or longer to get the engine out and back in after the work was performed.

I'm going to do that. Drain oil. Drain coolant. and still put some rags or towel under the PTO after I pull it off. Oh! I plan on pulling the pump as well so I can inspect the impeller, wear ring, and I'm also going to replace the carbone ring as well as the bellow and just about every part from the impeller to PTO. Once I'm done I'll change plugs and refill with fresh fluids.

By the way... Do I just use a pre-diluted 50/50 green mix from the parts store as the coolant? Or does it require something special?

Thanks for your reply and help!
 
To remove the rear PTO cover the driveshaft needs to come out, oil drained, coolant drained and there is a gasket between the cover and the block. This is much easier to do with the engine out of the hull on a stand or work bench. If you do pull the motor then you need to check the engine to pump alignment when reinstalling the engine. It's not a difficult job just a little time consuming.

I've seen a lot of videos on youtube that you've done as well... Just wanted to say you do a great job or explaining how to and it's easy to follow. I just watched the one where you replaced all of the valves in an RXP (I think) today. That is one big job!!!!! I keep thinking when you were unhooking the wiring harness, if it were me, I would miss something!

Keep up the awesome work! :thumbsup:
 
Thanks for the :thumbsup:

I have had the PTO cover off two machines to upgrade the flywheel bolts and I can't imagine doing it in the hull especially on a GTX, RXP maybe because removing the seat cowl allows better access. After you have removed the driveshaft you are 80% towards pulling the motor remove a few wiring connections the intake manifold three engine mounts and out it comes. Remove the intake manifold from the block and a few electrical connections and you can lay it on a towel over the side of the hull so you don't have to disconnect everything.

Coolant is standard 50/50 green stuff.

Good luck.
 
I know you've done this before... At the current moment I don't have an engine hoist or lift. I've been thinking about getting a wench for attaching to the 2X4 beam that runs above me. However, once I get it out the work bench isn't necessarily close. I know for a fact I can't carry that block! I may have to invest into a cart of something to set it on IF I decide to take it out.

I've been thinking about getting a service manual. Whatcha think?

Thanks for the info so far :cool:
 
Still waiting for the parts to come in. In the meantime.... Figured I would continue to go through the ski. Life the front end and let all the coolant drain. Evac the oil tomorrow and refill. Also take care of the refill on the coolant. Once the plugs come in get it cranked and clean out the compartment with some Salt-off I ordered.

While doing my check, what do I find? A broken hose clamp on the bottom of the coolant hose. I'm sure glad I'm taking my time and going over this thing. It would've been real nice to take it out for a nice ride and find it overheating due to the hose coming off. Something tells me to go through and replace all of the clamps just for precaution???

Oetiker clamps on are some and I've priced a kit with the plyers... OUCH! Those things aren't cheap. Anyone know of a good source?

IMG_2682.jpg

IMG_2683.jpg

IMG_2684.JPG

IMG_2685.JPG

IMG_2686.JPG
 
No need to use oetiker clamps find a local hose supplier and get some AWAB hose clamps, all stainless steel with a solid band. On the bigger hoses I use stainless T bolt clamps.

On my 2015 RXT-X every hose clamp I could get to has been replaced with AWAB or T bolt.
 
I looked at both syles and I like the T bolt for the big. And I'm sure the AWAB will work much better on the regular style hose clamps I have on there now.

I was watching a video and I still like the principal of the Oetiker style clamps. They don't loosen due to vibration and they give with heat and cold. Most of the hoses in there still have that style... I may just leave those alone. But I see plenty other that I plan on changing.

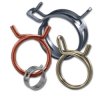
What about these?

Hose-clamps.jpg

I don't care for these personally!

There are 2 that I can see so far. 1 that was on the bottom of the coolant tank, and another is where the hose connects to the left side hose that goes into the ride plate. Kinda hard to get to, but it sure looks rusty! I thought they would put SS clamps on everything in a water ski?

Thanks for the clamp ideas! Those will be the ones I get!
 
It doesn't take a rocket scientist but the drive shaft doesn't look pretty. I don't know what to make of the impeller shape?

When reinstalling the intake grate do I need to apply some more sealant before I bolt it back to the hull? I'm referring to the one big bolt... Does Black ATV silicone work?

IMG_2698.JPG

IMG_2699.JPG

IMG_2701.JPG
 
I had quite the struggle with getting the drive shaft apart and out of the ski...

It had rusted where you slide the support ring back, and it gave me lots of trouble. I couldn't think of anything else but to cut the boot off so I didn't have pressure pushing on the support ring. Gently rolled it with a pair of channel lock to get it moving. Once that happened it slide back and I was able to get the c-clip out. It was a doozy!

Anywho I took some pictures so you can see what I'm talking about. Pictures speak 1000 words. Got a new carbon ring, o-rings, bellows, support ring coming in today. Judging by what you see... Should I replace the shaft bearings? For some reason when I went to pull the shaft a ring in the shaft bellow was stuck on the driveshaft. I pulled that off and put it back in the boot. Oil came out of course... Not much. But it got me curious what keeps that in there? Is there a taper on the driveshaft that keeps that in there. In a video from 3ftdeep on youtube (aka Tytan) he said the "Inner sleeve must be flush with outer circumference of PTO seal assembly." Make sense?

Without further adu...

IMG_2711.JPG

IMG_2712.JPG

IMG_2713.JPG

IMG_2715.JPG

IMG_2716.JPG

IMG_2718.JPG

IMG_2719.JPG

IMG_2722.JPG

IMG_2723.JPG
 
My current situation is having extreme trouble getting the support ring pulled back enough on the drive shaft to put the c-clip in. The bellow is quite stiff and the driveshaft is not helping. Since i pulled it and buffed it with a wire wheel to brake the layer of rust that was on it. You can see the before and after photos above.

I saw a tool that would hold the driveshaft in placed while pushing back on the support ring. Tytan used one I can't seem to find. I'm going to try and make my own. Any help in this area would be greatly appreciated!

I'm to the point that I'm probably going to have to replace the driveshaft so it won't be so difficult to slide the support ring past the c-clip groove. I've been fighting with it for sometime.
 
Last edited by a moderator:
The pump with impeller will do the same thing as that tool.

Put a 1/2" to 3/4" thick spacer or stack of washers in the impeller where the driveshaft goes in then reinstall the pump this will push the driveshaft forward and keep it there while you compress the boot. Remove the spacer when reinstalling the pump.
 
I agree. Some washers to push the shaft in further. Once the clip Is on, remove the pump and get rid of the washers.
 
The pump with impeller will do the same thing as that tool.

Put a 1/2" to 3/4" thick spacer or stack of washers in the impeller where the driveshaft goes in then reinstall the pump this will push the driveshaft forward and keep it there while you compress the boot. Remove the spacer when reinstalling the pump.

Wow! That did the trick! Thanks for the idea... I didn't actually have any washers so I put a small 1in socket that fit the width of the impeller hole and it gave a snug fit! I was finally able to get the support ring back far enough to put the c-clip on. Victory!

I finally got it out on the water... No leaks :thumbsup:

Howver I did bottom out a couple of times. I didn't realize the place I put in that the water level was so low.

Onto the way it rode. I can't seem to understand why I had to turn to the right a little for it to go straight. Not sure if that's due to the O.P.A.S. or what? Also the reverse would get stuck in reverse... I had to shut it off and them put in Forward before it would go. I'm sure there is a way to oil/lube/grease the cable. Or what else can I check?

Thanks fellows!

The steering wears a bit with age and is adjustable as far as left/right goes at the nozzle area.

What is your idle speed/RPM? To high and it is hard to get it out of reverse. If that isn't the issue, then something at the bucket is likely worn. I believe it is also adjustable as well, again, at the rear of the ski/nozzle area.
 
Last edited by a moderator:
It kept right around 1800... sometimes a little below.

I have no clue on how to adjust idle should that be too high.

I have no clue how to adjust left/right

I have no clue how to adjust reverse/neutral/forward.

I'm sure with a little help I can figure it out :thumbsup:
 
It kept right around 1800... sometimes a little below.

I have no clue on how to adjust idle should that be too high.

I have no clue how to adjust left/right

I have no clue how to adjust reverse/neutral/forward.

I'm sure with a little help I can figure it out :thumbsup:

Without a CanDoo pro, you will be doing a lot of guessing. It could be as simple as the TPS is out of adjustment. Which would increase the idle, which will raise the RPMs, which will make it very hard to get it out of reverse,,,

As far as adjustments go, you have to get your fingers dirty. Get back there and look at the linkage and how it attaches.
 
From reading online I'm finding that 1800 rpm is perfectly normal...

There is an adjustment knob on the steering cable near the shifter. Might try and turn that and see what happens.
 
Last edited by a moderator:
Status
Not open for further replies.
Back
Top