99 GTXL not idling, backfiring

Note: This site contains eBay affiliate links for which SeaDooForum.com may be compensated
Status
Not open for further replies.

andy.262

Active Member
I've got a 99 GTX Limited with a brand new SBT engine that will not idle, cannot reach max RPM, and is backfiring out the exhaust. After installing the new engine, I did the break-in procedure painstakingly correctly (followed SBT's break-in procedures EXACTLY). It worked totally fine for the entire break-in and for about half a tank of gas after. Then it started randomly stalling, but would start back up fine and work fine for a while. Then yesterday it stalled, and now can no longer idle. It will start on the trailer (haven't tried in the water), but will immediately die when I let off the throttle. At the same time as this started happening, it now backfires through the exhaust.

Things I've tried/checked:
- have spark on both cylinders
- cleaned carb fuel filters (carbs were rebuilt 2 seasons ago, genuine Mikuni parts, followed the sticky, have been fine since then)
- cleaned filter inside the water separator
- bypassed the fuel selector (didn't make a difference either way)
- there was a little bit of water in the bottom of the airbox when I removed it, not sure if that's relevant or not
- EDIT: checked reeds shortly after posting, they look to be fine - not cracked or bent, no light coming through when held up

I'm confused as to how this just randomly started happening after being completely fine during the whole engine break-in period. Any ideas on what I should check next?
 
Last edited:
Oops!,,,my error,,,yes, no RV,,,well, usually exhaust backfire is too much fuel, (or incorrect timing),,,perhaps a reed is damaged?
 
I did check the reeds shortly after I made the first post. They all looked OK to me, not cracked or bent at all. Held them up to the light and was not able to see any light coming through, so I think that means they are OK
 
Carbs and needles and seats would cause the exact symptoms even though they were done two years ago.

I would never install a new engine without going through the carbs.
 
"going through" meaning new rebuild kits? Or just taking apart, cleaning, and reassembling existing parts?
 
"going through" meaning new rebuild kits? Or just taking apart, cleaning, and reassembling existing parts?
"Going through" typically means getting the carbs back to factory specs (follow the sticky post)......if that means all new MIKUNI parts (needles, seats, etc....)....then that's what it means....just to eliminate the carbs from the equation.......

to me...sounds like a fuel problem (too much, leaking, etc....)...doesn't take much either

Backfiring - usually indicates "a detonation" in the exhaust, so excess fuel is getting into the exhaust somehow.....
 
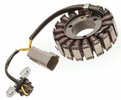
I would also verify the magneto/pickup sensor are all good condition.
Any easy way to test them? Just visual inspection? I kind of dread having to remove the mag cover since that would probably mean taking the whole engine out again just to be able to reach it.

I got the carbs out again this weekend, I will be checking pop-off today to see if that somehow got messed up. Any other carb tests I can do while I have them out and on the bench already?
 
There's a test in the FSM for the pickup sensor I believe. I made a tool from an old ski from the wireharness... but realistically... no. you're going to have to pull the pipe in a GTX to get the cover off to inspect the magneto and pickup sensor... if it's in bad condition it could be telling the MPEM to spark at the wrong times, which would cause backfire/no start.

However from you stating it did work after reassembly makes me think you installed it correctly... so it's not #1 on my what could be wrong list, but it is on there.
 

Attachments

  • s-l1600.jpg
    s-l1600.jpg
    301.9 KB · Views: 4
The ski starts and runs, therefore I would eliminate the pickup coil as an issue. If the coil was suspect then the spark would be out of whack with the MPEM and the machine probably wouldn't run.

A mistimed spark would not contribute to a backfire since a backfire occurs in the exhaust and there is no spark in the exhaust....excess fuel in the exhaust is detonating from the heat in the exhaust, so most likely the problem is the fuel system (i.e. carb(s)) is allowing too much fuel through the chambers and the excess is getting pushed into the exhaust and BOOM...backfiring. A fuel RICH condition I would suspect.
I would agree. The only two seadoo's I have ever seen actually backfire out the exhaust had leaking needles and seats. It was very loud.
 
So both carbs have pop off set where they should be, right around 20 for each. However, one of them is failing to hold pressure after popping (without the diaphragm on, right after the pop). The other one holds no problem. The leak is very slow, but after a few minutes it does leak all the way to 0 PSI.

I tried swapping - one at a time - the needle, seat, spring, and arm from the non-leaking one onto the leaking one. Replaced the o-ring around the seat of the leaking one. Checked and double and triple checked that the plugged ports on the plastic T were not leaking (plugged as part of the pop off test). Still slowly leaks.

Is this slow leak enough to cause my issues? What other possibilities besides needle and seat could be the cause of the leaking? I know my tester is good since it doesn't leak on the other carb. I want to believe that the needle and seat are not the cause of the leak, since swapping them from the non-leaking carb did not fix the leak in the leaking one.
 
Yes if it’s leaking air then it’s pretty likely to be leaking fuel.

Try mixing some dish soap and water and spraying it all around the carb. Bubbles will form at the leak.
 
So block off the non inlet fuel openings, spray the miki soapy solution, pump it up, and look for leaks,,,maybe a gasket is not oriented properly, torn,,,,hold the diaphram to bright light, and look for a pin hole leak,,,did you clear out the return /restrictors?,,,if that is blocked, that would create a lot of back pressure,
 
So it very much appears that one of the transparent mylar check valves on the fuel pump side of that carb is leaking. I'm seeing bubbles, and when I put my thumb over it to seal it it stops losing pressure. Ordered a new rebuild kit, will update again when that check valve is replaced
 
A messed up rectifier can cause all sorts of ignition problems. Unplugging it to test is very quick and easy to confirm/reject.
 
So it very much appears that one of the transparent mylar check valves on the fuel pump side of that carb is leaking. I'm seeing bubbles, and when I put my thumb over it to seal it it stops losing pressure. Ordered a new rebuild kit, will update again when that check valve is replaced
Did you orient the check valve properly? They have a minute curvature and need to be in the right orientation to seal properly....it's very hard to tell by the naked eye, new check valves have a stripe on one side which MIKI's post explains which side is UP and Down.

Flip the check valve over and see if that makes a difference, also, be ever so gentle with those little rubber nubbins that hold the check valves in place....very easy to cause/miss a puncture in one of them.
 
yeah it was oriented properly according to the sticky using the blue stripe. I remember having a great time working with the little rubber nub, and by great I mean terrible. It is definitely not out of the question that I damaged it when I put it in, although it did appear to be leaking from the side of the transparent disc instead of the middle. I did not have a ball end allen key of a small enough size (like recommended in the sticky) when I originally did it, but now I do so I'm hoping to have some better luck this time. If there's anything I've learned when working on these machines it's that having the right tools makes all the difference.
 
yeah it was oriented properly according to the sticky using the blue stripe. I remember having a great time working with the little rubber nub, and by great I mean terrible. It is definitely not out of the question that I damaged it when I put it in, although it did appear to be leaking from the side of the transparent disc instead of the middle. I did not have a ball end allen key of a small enough size (like recommended in the sticky) when I originally did it, but now I do so I'm hoping to have some better luck this time. If there's anything I've learned when working on these machines it's that having the right tools makes all the difference.
The right tools...AMEN to that....a little money invested in the right tools pays dividends in the end.

I also use a lighted magnifying glass (on one of those swing arms) to check and re-assemble carbs and such....I can't see small and close up anymore so that magnifier really helps....can take a better closer look at things.....it's certainly helped. Good luck with her.....
 
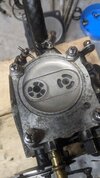
Alright I can't get this stupid thing to seal. Let me make sure I'm doing this right and I'm not crazy. Every time I put pressure in the carb to do the pop-off test, it pops and then immediately drops to 0 pressure. If I put pressure in that same spot and spray soapy water on the face of the fuel pump body, I see tons of bubbles coming from the check valve on the right in the image. Am I correct in thinking that it should be sealed there?

I've tried replacing the mylar film and the rubber nubs many times with brand new ones (some from aftermarket kits, I know shame on me, and some I had left over from the genuine Mikuni kit for my 787). Tons of bubbles every time.

PXL_20210701_230533363.jpg
 
If I fully assemble the fuel pump side of the carb and attempt to set pop-off, it pops and then loses pressure. If I plug the port circled in the picture, then it stays steady. Your carb thread doesn't say to plug that one though, so is that a problem?PXL_20210701_234903457.MP~2.jpeg
 
I believe that is the "inlet,",,,that is where you attach your gauge,,the other inlet is the return,,you may have them backward,,,,plug off the pulse inlet for giggles ,
 
Status
Not open for further replies.
Back
Top