'98 Speedster Stereo Factory Harness?

Note: This site contains eBay affiliate links for which SeaDooForum.com may be compensated
Status
Not open for further replies.

BlueWaterDepot

New Member
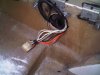
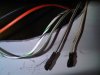
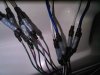
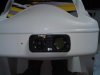
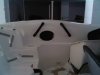
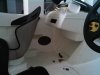
Hi everyone! Im new to the site. Stumbled upon this site by looking for some info on '98 Speedster wiring harness color diagram and location. We're installing a Sony CDX-H905IP head unit to the passenger side where the "Oh $h!t handle" was located and installing 4 - 6x9 Infinity Kappa speakers. We've already got the holes cut and have found a wiring harness in the passenger side compartment and assume this is a factory stereo wiring harness? Anyone know where these wires terminate? Is the lead wire hot? Or what the colors mean? Thanks for any help and we will post some pics of this project too for everyone to reference!
 
That is a harness, red yellow black got to head unit. grey and white are speaker wires, one for each side. I used the red/yellow/black on the harness and ran my own speaker wire
 
98 speedster factory harness

I have ben looking at the same thing you are Icant find a mannual to download to chase the wires that way so I had to just look on the boat.
As far as I can tell red=12V with switch on, Yelow+ constant 12V, black= ground, greys go to one speaker, whites to other speaker, cant tell which side goes where, but it looks like the wites terminate between the passengerside seat and the back seat, and between the drivers side seat and the back seat in the wall, feel around for them if you already have the holes cut and tell me what you find.
 
Speaker wires are there..... port side wire is easy to find, starboard is harder. Easy to run new wires.
 
We've got the port side speaker holes cut and can find the wires right where laylo said, they're mounted about midway up inside the wall with tie straps that are epoxied to the inside of the wall. Going to cut the starboard side and will let you know what we find in there! We're going to have to run more wire anyways since we're using more than two channels for the stereo. Thinking maybe could use the factory wire to fish some new and higher gauge wire thru?
 
speaker connection

just wondering where exactly you cut the holes(can you put a picture on here) and what kind of ends were on the speaker wires if any, the head unit connection looks like a old 98 model pioneer plug in.
 
Well we got all the wires ran! I was wrong on the year though, the boat is a '99, don't know if this changes anything on the wiring harness colors but did find all the wires for two channels with them both terminating behind the front seats. There are two orange wires that come out of the harness that turn into one orange before the harness leaves the front compartment. We cut the connector seen in the picture hooked one to constant and the other to memory then contected all conections with butt splices and shrink wrapped the ends to keep out water. Then we fished the other channels thru the front and added an illumination wire to the running lights to dim the unit a night. Also when installing speaker behind driver seat, SEE PICTURE, WATCH OUT there is a main wiring harness right there. We were using a dremal so didn't cut to deep, but if would have used the jigsaw this would have made for a long day of splicing!
 

Attachments

  • IMG00173-20090426-1833.jpg
    IMG00173-20090426-1833.jpg
    97.1 KB · Views: 113
  • IMG00175-20090426-1938.jpg
    IMG00175-20090426-1938.jpg
    61.5 KB · Views: 96
  • IMG00176-20090426-2216.jpg
    IMG00176-20090426-2216.jpg
    69.3 KB · Views: 94
  • IMG00177-20090426-2325.jpg
    IMG00177-20090426-2325.jpg
    52.5 KB · Views: 108
  • IMG00168-20090426-1818.jpg
    IMG00168-20090426-1818.jpg
    48 KB · Views: 101
Last edited by a moderator:
I couldn't attach any more pictures to the last post so here are the pictures of where the speakers are cut out and a close up of that main wiring harness! Also the speaker by the driver seat if using a 6x9 needs to be turned long ways or it will not fit. Forgot to take a picture. I'll add them when they're all installed!
 

Attachments

  • IMG00164-20090426-1808.jpg
    IMG00164-20090426-1808.jpg
    95.4 KB · Views: 76
  • IMG00166-20090426-1808.jpg
    IMG00166-20090426-1808.jpg
    103.1 KB · Views: 84
  • IMG00180-20090427-0025.jpg
    IMG00180-20090427-0025.jpg
    52.5 KB · Views: 80
  • IMG00167-20090426-1818.jpg
    IMG00167-20090426-1818.jpg
    62.6 KB · Views: 78
jeeze

Man I am glad you did that before I cut into mine now I can see what back there before I cut the holes, saved me alot of headache I"m sure, thanks for the info and pictures I appriciate it.
 
Status
Not open for further replies.
Back
Top