96 GTX Jet Pump Installation

Note: This site contains eBay affiliate links for which SeaDooForum.com may be compensated
Status
Not open for further replies.

Titaniumboy

Active Member
I accidentally went a little too far while removing bolts for a jet pump oil change and removed four bolts too many. Now I have the entire jet pump inadvertently removed. The removed jet pump left behind a splined drive shaft just hanging in space.

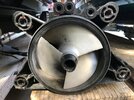
The wear ring and ring-to-impeller gap look great. The impeller looks really good also,

Is there anything else I should be looking at or checking while I have the ski at this stage of disassembly? I can provide pictures if needed.
 
The impeller and wear ring ring look pretty good to me for 84 hours of use.

CA4B6F5E-10A4-4F74-A3F3-8194621146F5.jpeg


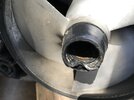
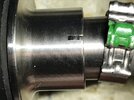
The rubber lip at the bottom had been even more rolled over into the bore when I first removed the pump assembly.

32599B46-8B38-4894-B8F6-8C27AC33E98F.jpeg


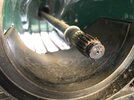
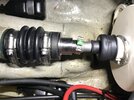
And here’s is the drive shaft. Anything need to be cleaned, lubed, or replaced?

D9C14A63-D728-4613-8F1C-050CDB97E2AD.jpeg
 
I have been reading the shop manual and it talks about removing the small clamp from the drive shaft boot. And then disconnecting the engine water inlet hose and both bailer pickup tubes from the impeller housing. Basically the shop manual says that the jet pump assembly and the drive shaft will come out together as a unit.

That did not happen for me. Merely removing the four 17mm nuts allowed me to pull the jet pump assembly clear of both the ski and the drive shaft.

Here is a closer view of the rubber boot where you can see the section that had been rolled over.

47383CD4-878E-41C4-8D70-D0AC6025466D.jpeg


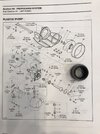
This diagram from my 1996 shop manual is not what my pump assembly looks like, and the 1996 GTX shop manual supplement does not show any propulsion system information at all. The 1996 Parts Catalog seems to be much more accurate.

3CF1777A-8957-4DFA-8E55-6CBABAD29A56.jpeg


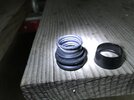
I did a test fit of the rubber boot and plastic cap on my dangling drive shaft, and the rubber boot easily slides over it. Should the rubber boot fit tighter so that the synthetic grease applied to the drive shaft and impeller splines does not wash away? Of course with a tighter fit it might be hard or impossible to slide the jet pump assembly back onto the drive shaft.

76C68675-BF33-4555-90F0-B352935041EF.jpeg
 
Last edited:
Things look good.

Make sure you don't have any dings on the leading edge of the impeller, if so just lightly touch them up with a file.

The liner looks good in the picture.

Take the time to pull the cone off the housing and replace the pump oil since you have things on the bench. Probably the most important thing you want to do at this point.

The rubber boot is still good to use. You really need to pull the drive shaft out of the machine to get that two piece boot back on properly. The folded lip is from someone, in the past, shoving the pump onto the end of the shaft. The best approach is to have the shaft in the impeller, boot in place, then put the pump/shaft assembly into the machine.

The rust on the shaft is normal. Clean it up and inspect it for obvious damage but it looks like all the other shafts out there.
 
Those are parts 14 and 15 in your diagram.

I install the rubber boot in the impeller then the plastic ring over that and finally insert the driveshaft. Everything is lubricated with Seadoo XPS synthetic marine grease.
 
Thanks for the help.

I am definitely planning on changing the pump oil. In fact that is what I had initially set out to do when I accidentally went a little too far.

I really think that the rubber boot and plastic cap are loose enough that I will be able to reinstall the jet pump assembly back onto the drive shaft with the drive shaft in place. We shall see.

I don’t have XPS synthetic grease on hand and the dealer is not too convenient at the moment, plus Amazon delivery is middle of next week. I have a tube of Super Lube synthetic grease with PTFE and a tube of Mercury marine grease 2-4-C with PTFE. The Mercury grease doesn’t appear to be synthetic so I will be using the Super Lube for now, and I will order the Seadoo grease for later.

The Super Lube label lists various marine uses such as trailer bearings, inboard/outboard drives and prop shafts.

https://www.amazon.com/Super-Lube-41150-Synthetic-Cartridge/dp/B0042FG74W/ref=sr_1_4?crid=2LNGNH1QM3PXY&dchild=1&keywords=super+lube+synthetic+grease&qid=1625609852&s=industrial&sprefix=Super+lube+synthetic,industrial,236&sr=1-4

Amazon.com: Mercury 2-4-C Marine Lubricant With 92-802859A 1: Automotive
 
Dang it. Pretty soon you guys will have me disassembling the engine.

Just kidding. Probably a really good idea.
 
Driveshaft pulls out the back of the ski... assuming you undid the clip or o-ring for the carbon seal?
 
What you are doing right now is something all DOO owners need to know how to do. Keep going, keep asking questions, you'll have it running in no time.
 
I discovered today that the 1997 shop manual presents a much more coherent write up for my 1996 GTX.

Assuming that the large and small clamps must come off of the PTO rubber boot, I finally succeeded in removing these with my Oetiker pliers.

AB56C620-B832-49BB-A3B9-B378A07DDF62.jpeg


When trying to pull aft on the carbon seal and top hat, I can see that the drive shaft is also moving aft out of the PTO. In the photo below I can see what appears to be an o-ring under the slit in the top hat.

387585AC-BB21-424F-99B5-E74501AA8DEE.jpeg

I believe that what must happen next is that the top hat must be moved to the left to reveal the underlying o-ring. Any tips on how to get the top hat to move to the left without damaging anything?

Am I on the right track so far?
 
common mistake, you need to pull back on the SS ring and loosen it from the O-ring (which has been replaced by a c-clip) clip on the drive shaft BEFORE removing the 4 bolts that hold the pump on. Just slide the end of the drive shaft that is dangling back into the pump and reattach the 4 bolts. Then you can pull the SS ring back over the o-ring and loosen it from the driveshaft. Loosen the 2 hose clamps on the rubber bellows. Take the 4 bolts back out and remove the pump again and the driveshaft will slide out the back. That should take 5 minutes. Just be careful not to lose the rubber bumpers on each end of the drive shaft.
 
You only need to remove the stainless clamp on the smaller rear portion of the PTO boot.

And yes, the pump has to be in to remove the stainless hat retaining clip/o-ring.
 
bigJake, in my defense of doing things out of order in removing the drive shaft, remember that I never intended to remove the drive shaft and only removed the pump assembly by accident. Things just sort escalated after that. I blame miki. :)

I initially tried putting the pump assembly back in, but found that the drive shaft was drooping just enough to not allow the jet pump assembly to be installed back onto the studs. I grabbed a piece of string and used it as a cradle so I could lift the drive shaft the little bit needed for it to go into the jet pump assembly.

I did not appreciate just how much force was going to be needed to move the steel top hat aft in order to access that locking o-ring. So I resorted to using a scrap block of wood and a prybar, and even then it take a fair amount of force to move the top hat. I found out later that the two internal o-rings in the top hat was providing most of the resistance. In the pic below I have removed the locking o-ring from the drive shaft groove.
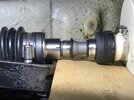
C86D8CA1-C097-4501-BF43-6DAB1C82CC79.jpeg


Almost there. In this pic the drive shaft has moved aft enough to come out of the PTO rubber boot. The locking o-ring has been removed and there is also enough room now to remove the top hat.

C8F00D44-B3EB-4CE4-8FB1-64E26A7DEA48.jpeg


Success ! That was a bit of work to get to this point, but it will go much faster next time. Drive shaft splines still need cleaning.
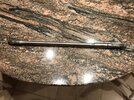
A20E48B0-8AE8-4368-B550-72E21A0C6C5C.jpeg


The drive shaft cleaned up nicely. The rubber bumper, which was the reason we removed the drive shaft, appears to be in good shape except that it has taken an impression from being forced into the PTO all these years. I’m tempted to swap the two bumpers around as the impeller side rubber bumper looks pristine.
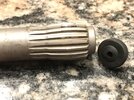
77577B3B-7FB5-44D2-B711-1F595A91E6DD.jpeg


Since I took off the large clamp unnecessarily from the PTO rubber boot, I decided to take the opportunity to remove the rubber boot completely and clean out all of the old grease.

Now that I needed more grease to fill the PTO rubber boot, I decided to take the time to go to the Seadoo dealer 45 minutes away today. Shockingly, they did not have the Seadoo synthetic grease or the Seadoo E-TEC 2T full synthetic injection oil in stock. The parts guy was complaining that there is a bunch of stuff that they order that is not showing up in a timely manner, and that they are having a hard time keeping their shelves stocked.

I did not call ahead to see if the grease and injection oil was in stock. I’ve never experienced a Seadoo dealer being out of these kind of things in the 25 years we’ve had the GTX. Things are getting weird in the US supply chain.
 
Last edited:
Now that I needed more grease to fill the PTO rubber boot, I decided to take the time to go to the Seadoo dealer 45 minutes away today.

I've never visited a Seadoo dealer since I bought my 97' GTX in 2017. Regular red synthetic grease is fine for the PTO boot. Also, as mentioned above, may want to replace that oring with a c clip. As far as the oetiker clamps, I hate those things, once removed I had switched to SS ties. There cheap, about $5 shipped Stainless Steel Cable Ties - 8" (Pack of 10) All Purpose Weather Outdoor Use | eBay and have served me well, I pull them tight, cut, then tuck them with a small pair of needle nose pliers. It's better than using the nylon ties which some people use.
 
GG, thanks for the reply.

What is the benefit of the c-clip compared to the o-ring? I’ve never heard of a c-clip - where would I buy one? If the o-ring were to break, it appears like the top hat would be able to move away from the carbon seal and could cause a big water leak.

The SS ties are a good idea. Although to be honest I haven’t had too many problems with the Oetiker clamps since I bought a proper Oetiker plier. Removing them can be a boatload of fun.

Any downside to swapping around the rubber bumpers on the drive shaft?
 
I recently had to replace the carbon seal in my wife's 96 GTX since it was worn out (obviosly original since it had the 0-ring when I pulled it apart). The replacement carbon seal kit had the c-clip in it, not sure if that is sold as a separate part?
 
GG, thanks for the reply.

What is the benefit of the c-clip compared to the o-ring? I’ve never heard of a c-clip - where would I buy one? If the o-ring were to break, it appears like the top hat would be able to move away from the carbon seal and could cause a big water leak.

The SS ties are a good idea. Although to be honest I haven’t had too many problems with the Oetiker clamps since I bought a proper Oetiker plier. Removing them can be a boatload of fun.

Any downside to swapping around the rubber bumpers on the drive shaft?

C clip is a running change, there is a possibility of the oring failing allowing a leak as you describe. I bought the c clip by itself on ebay, and I've also bought the carbon seal kit, which includes a new c clip, so either way.

I don't see a downside swapping the rubber bumpers around on the driveshaft, yet I also don't see an upside.
 
Thanks for everyone’s ideas and tips.

I cleaned up the drive shaft with a bench grinder wire wheel, not that it was very dirty. Then the drive shaft went back into the loose pump assembly. The drive shaft certainly goes in better this way than if I had tried to mate the pump assembly back to the dangling drive shaft like I originally planned.

I snaked the drive shaft into the hull and stopped a little short of the splines going into the PTO rubber boot so I could put on the sliding ring (what I was calling the top hat) and locking o-ring.

I then needed a second set of hands to guide the drive shaft into the rubber boot as I pushed on the pump assembly from the rear of the ski. It took just a little jostling of the PTO to get the splines aligned properly so that the drive shaft could be fully inserted.

After loctiting and torquing the pump assembly nuts, I was expecting another big hassle of getting the sliding ring pulled back far enough to get the locking o-ring in the groove. So I got the scrap wood block and pry bar in position like I had done for the removal. To my surprise, I was able to easily move the sliding ring back far enough by hand and then drop the locking o-ring in its groove. Putting a little grease on the o-rings inside the sliding ring really made a huge difference.

The locking o-ring and the two sliding ring internal o-rings looked in brand new condition, so they were all reinstalled. While everything was out, I took the opportunity to measure and identify these o-rings. The locking o-ring appears to be a standard -210 and the sliding ring o-rings are -118.

Marco O-Ring Standard Size Chart

Printable Master O-Ring Size Chart (Caution: large 32 MB file)
 
Last edited:
Your GTX makes me jealous. Mine, the previous owner left leaking top and bottom grommets on the oil tank and the entire bottom of the seadoo is caked in dried oil. It's a mess and it stinks.

I powerwashed it, which helped, but really I need to take everything out to get it clean, and I just have zero desire to do that now that it's assembled and working.

Since you have it at a disassembly point, make sure your carbon ring and hat are in good shape too. If it's damaged at all you'll lose a lot of acceleration due to cavitation, and if it's badly damaged, you'll take on water. Finally, if you haven't replaced the bellows between the carbon ring I'd do that as the new one both is slightly thicker and not worn out, so it'll put better pressure on the carbon ring and prevent leaks (cavitation).
 
Your GTX makes me jealous. Mine, the previous owner left leaking top and bottom grommets on the oil tank and the entire bottom of the seadoo is caked in dried oil. It's a mess and it stinks.

I powerwashed it, which helped, but really I need to take everything out to get it clean, and I just have zero desire to do that now that it's assembled and working.

I am the original owner, so I am lucky in that regard. And here I was thinking my hull could use some cleaning. Can you imagine owning a Seadoo for a quarter century?

I’ve heard some people put a solution of Simple Green in the hull and let it slosh back and forth while trailering. I’ve never needed to do this, so can’t vouch for it one way or another.

Since you have it at a disassembly point, make sure your carbon ring and hat are in good shape too. If it's damaged at all you'll lose a lot of acceleration due to cavitation, and if it's badly damaged, you'll take on water. Finally, if you haven't replaced the bellows between the carbon ring I'd do that as the new one both is slightly thicker and not worn out, so it'll put better pressure on the carbon ring and prevent leaks (cavitation).

Too late for replacing the bellows! I finally got everything back together last night. The carbon ring and sliding ring looked super flat and shiny on their faces. I had never really dug into the drive system before and it took me awhile to get it apart and back together. It will take me 1/3 the time the next time I have to do this.

Now that I realize that the bellows and carbon ring and sliding ring are all that stands between me and a sunken ski, I will be paying a lot closer attention. If I see any hint that the bellows is causing cavitation or leakage, that sucker will be replaced immediately. And perhaps I will change it anyway in the off season?
 
Last edited:
The PTO in the picture has a grease fitting. Should that be greased, how often, and with what grease?

I have greased this fitting in the past with whatever marine grease I had lying around. I probably have only greased this fitting only once or twice since I’ve had the ski, but the ski only has 84 hours on it. Don’t be like me.

I took the opportunity to take off the PTO rubber boot and completely clean out the old grease. I used Seadoo synthetic grease 293550010, but probably any good grease would be OK. There seems to be a wide variety of opinions. I think the main thing would be to not mix different brands or types of grease. Pick one and stick with it.

What seadoo grease and oil to use?


The 1997 shop manual ( which seems to be a better resource than the 1996 shop manual) says that “PTO Flywheel Lubrication” should be every 10 hours. I have no idea why it would be that often. That zerk only seems to lubricate the drive shaft splines. Maybe the idea is to build up a small amount of pressure in the PTO rubber boot to discourage water intrusion?
 
I will grease mine, then! Thanks for the info.

As for the carbon ring:
If the ring shatters, the seadoo will swamp (not sink because of the styrofoam). It happens in seconds. This won't happen due to an old bellows... You'd need to have a very worn carbon ring or a sudden direction change at high rpm (like vertical jumping off boat waves).

Your ski will let you in know when the ring is going bad. You'll start to have cavitation at high suction (full throttle while not moving, for instance) and your "out of the hole" performance will suffer. The symptoms are the same as a worn wear ring or impeller, except you shouldn't lose top-end mph. You have to ignore it for quite a while for it to get bad enough to sink the ski.


With a new impeller, wear ring, carbon ring, and hat my 96 GTX revs to 7000 rpm for 1/4 a second or so then drops. Then revs back up as it accelerates. If you stay pegged at 7k for more than a second I'd be looking to see if something in the drivetrain is bad. I've been told it's not supposed to overrev on launches but I've checked everything and can't find any problems.


The old bellows provides slightly more force on the carbon ring, ensuring a better fit and minimizing cavitation, but unless the bellows completely rips, it won't sink the ski. From your pictures, your bellows are in fine shape and won't sink your ski. I would replace it the next time you have the drivetrain out, but I wouldn't go out of the way to do a special job.

Also, when you replace the pump I'd consider replacing the neoprene seal. It can get worn or torn if you've had it off and on a lot and is cheap. It's the foam like ring between the pump and the hull. If it leaks it'll also cause cavitation.
 
Last edited:
I will grease mine, then! Thanks for the info.

As for the carbon ring:
If the ring shatters, the seadoo will swamp (not sink because of the styrofoam). It happens in seconds. This won't happen due to an old bellows... You'd need to have a very worn carbon ring or a sudden direction change at high rpm (like vertical jumping off boat waves).

That sounds like fun.

Your ski will let you in know when the ring is going bad. You'll start to have cavitation at high suction (full throttle while not moving, for instance) and your "out of the hole" performance will suffer. The symptoms are the same as a worn wear ring or impeller, except you shouldn't lose top-end mph. You have to ignore it for quite a while for it to get bad enough to sink the ski.

Good to know.

With a new impeller, wear ring, carbon ring, and hat my 96 GTX revs to 7000 rpm for 1/4 a second or so then drops. Then revs back up as it accelerates. If you stay pegged at 7k for more than a second I'd be looking to see if something in the drivetrain is bad. I've been told it's not supposed to overrev on launches but I've checked everything and can't find any problems.

That is strange. Almost like the impeller can’t get a bite on the water at first.

The old bellows provides slightly more force on the carbon ring, ensuring a better fit and minimizing cavitation, but unless the bellows completely rips, it won't sink the ski. From your pictures, your bellows are in fine shape and won't sink your ski. I would replace it the next time you have the drivetrain out, but I wouldn't go out of the way to do a special job.

Sounds like a good plan.

Also, when you replace the pump I'd consider replacing the neoprene seal. It can get worn or torn if you've had it off and on a lot and is cheap. It's the foam like ring between the pump and the hull. If it leaks it'll also cause cavitation.

Wait, what? Why would I be replacing my pump?

I don’t seem to have a neoprene seal between the pump assembly and where it bolts onto the hull. The 1997 shop manual shows a part 28 that looks like it might be this neoprene seal, but says it is only for the SP/SPX/GTS. The 1996 GTX Parts Catalog does not show a neoprene seal either?
 
Status
Not open for further replies.
Back
Top