


-
This site contains eBay affiliate links for which Sea-Doo Forum may be compensated.
You are using an out of date browser. It may not display this or other websites correctly.
You should upgrade or use an alternative browser.
You should upgrade or use an alternative browser.
2003 GTX DI Project
- Thread starter etemplet
- Start date
- Status
- Not open for further replies.
After a week at the Food & Wine Festival at Disney World, I'm back home and playing with this ski. ") Pulled the fuel pump and replaced the filters, cleaned the tank and gave it all a good once over. I sure don't like that cheap internal filter. Some are difficult to get to seal properly. I'll send the injectors off this week, put some fresh 93 octane in there and see how it goes. That's probably 2 weeks away but I got other skis in line.
Pulled the fuel pump and replaced the filters, cleaned the tank and gave it all a good once over. I sure don't like that cheap internal filter. Some are difficult to get to seal properly. I'll send the injectors off this week, put some fresh 93 octane in there and see how it goes. That's probably 2 weeks away but I got other skis in line.
I need a seat cover and come polish.
Pulled the fuel pump and replaced the filters, cleaned the tank and gave it all a good once over. I sure don't like that cheap internal filter. Some are difficult to get to seal properly. I'll send the injectors off this week, put some fresh 93 octane in there and see how it goes. That's probably 2 weeks away but I got other skis in line. I need a seat cover and come polish.
WaarrEagle
Active Member
Whats your plan for the seat cover? My is also showing its age. Was thinking about having it refinished at an upholstery shop but have not looked around.After a week at the Food & Wine Festival at Disney World, I'm back home and playing with this ski.
I need a seat cover and come polish.
I have done a few seat covers and my preference is to purchase a Black Tip Cover for a seat like this. I won't start till next week but I can post pics on how it goes. I bought the air stapler from Harbor Freight and the staples so I'm tooled up. LOL
I did these two seats. and am pretty happy with them. The back seat on the GTX was hateful mean. I paid a local guy $40 to put the cover on for me. LOL I couldn't get it like I wanted. His wife told me they used steam. Whatever they did it came out pretty darn good.


I did these two seats. and am pretty happy with them. The back seat on the GTX was hateful mean. I paid a local guy $40 to put the cover on for me. LOL I couldn't get it like I wanted. His wife told me they used steam. Whatever they did it came out pretty darn good.
If the picture is correct on the WIX 33095 I have seen as a recommended filter for the DI I don't like it. That's not what is currently on the ski and I don't think this filter is rated for 100 PSI. It looks like it should have a seam but I don't see one. I do like the flanged ends to hold the hose on. I'll check at NAPA tomorrow.

I'll check at NAPA tomorrow.statikuz
Active Member
I found a replacement fuel filter that is sold with the new replacement fuel pump by Quantum. It specifies that is is for the 2000 - 2003 Seadoo DI. $20. I would expect this filter to meet factory specs even though the connections are not factory. I'm comfortable using this one. 
jhjesse
Well-Known Member
I have been using the 33095 for years and the work great. Just about any metal canister filter is rated above 100psi. They are about 10 bucks and the OEM is about 100 bucks.
With the 33095 from summit racing (hint) changing the filter is a snap with no special tools needed.
Everyone has their own preference this happens to be mine.
With the 33095 from summit racing (hint) changing the filter is a snap with no special tools needed.
Everyone has their own preference this happens to be mine.
I sent to the fuel injectors only to fuelinjectorman.com in Florida. He said I Need to send the Air Injectors as well as they are more of a problem on this model. I should have sent these in a few months ago and they wouldn't be holding me up. I'll post more injector info on another thread I started.
I'll post more injector info on another thread I started.Got the fuel injectors back and air injectors. Installed today. I've been flying my airplane and family reunion, all sorts of stuff so no work on the skis till today. I need some pictures on how the forward vent connects. and I'd like to see the exhaust manifold where the bracket connects for the throttle bodies. I just need to install that battery and add some good fuel. Time to break this ski in !!
Ha ha... Keep that woman werkin !!!


I need some pictures on how the forward vent connects. and I'd like to see the exhaust manifold where the bracket connects for the throttle bodies. I just need to install that battery and add some good fuel. Time to break this ski in !!Ha ha... Keep that woman werkin !!!
Last edited:

GGuillot
Well-Known Member
Just put it on the water once for a few minutes. Haven't gotten back on it. I'll post up when I get back to the water..
How are you doing with yours ??
So for the few minutes on the water did it perform okay? Success? or is there still issues to work?
changetires
Active Member
I used a heat gun on mine and bought the Marine Vinyl at Joann’s fabrics. Worked like a champ
You good !! I don't think I can get it to lay down in the seat area without adhesive. I have a buddy that sells 4 way stretch material designed for Seadoos to match the colors but they don't have this burgundy. I found a local guy that is terrific. Really knows his stuff and is really focused on quality. We worked out pricing that is very attractive from my perspective so he'll get this job for sure.
changetires
Active Member
We did the 3 rd seat on the GTX. Gonna wait till we get the ski going before we do the main seat. I was looking online for someplace that has those colored rubber pieces that goes over the tips and tight corners on seats.
I had a 1999 GTX RFI.... I couldn't get that rear seat at all. Something funny about that one cuz i did other GTXs. I couldn't get the back section to make the curve without wrinkles. That's how I found my upholstery guy. He said he used a steamer. The main seat wasn't much of an issue beyond the normal pain in the butt so my wife and I managed that one. LOL I don't have those little pieces you are asking about, only half my seats have them. If you find a source post up about it.
I used a heat gun on mine and bought the Marine Vinyl at Joann’s fabrics. Worked like a champ
Do you have a picture of the one you did?
changetires
Active Member
My bad etemp....I just noticed your reply....I will get a pic tomorrow and try to send
changetires
Active Member
Hey temp.... here are the pics of the 3 rd seat we did...
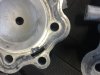
I also found a head for the one that was as dead as fried chicken but will a chip out of it like this hurt it or leak?
I also found a head for the one that was as dead as fried chicken but will a chip out of it like this hurt it or leak?
Attachments


- Status
- Not open for further replies.
Similar threads
- Replies
- 9
- Views
- 1,458
- Replies
- 12
- Views
- 1,127
- Replies
- 0
- Views
- 536
- Replies
- 1
- Views
- 589