


-
This site contains eBay affiliate links for which Sea-Doo Forum may be compensated.
You are using an out of date browser. It may not display this or other websites correctly.
You should upgrade or use an alternative browser.
You should upgrade or use an alternative browser.
ride shoe removal
- Thread starter mxdoc29
- Start date
- Status
- Not open for further replies.
Do you have the shop manual? If not, I would get one.
I take it you have removed the six screws that are retaining ride shoe to
hull?
Here are some notes from the shop manual:
"It might be necessary to heat ride shoe in
order to remove.
Insert pry bars between hull and ride shoe.
Tap ends of pry bars gently and alternately until
the sealant bond breaks.
Apply a slight downward pressure on pry bars until
Ultra Black seal releases and ride shoe separates
from boat.
Unscrew two screws that are retaining intake
grate."
Hope this helps!
If you don't have a heat gun - try a good hair drier
Be careful not to over heat anything - you want to keep the heat gun/hair drier moving at all times - you can blister the gel coat if you get it too hot. Heating the drive plate can help loosen the sealant. Let us know how you make out.
Be careful not to over heat anything - you want to keep the heat gun/hair drier moving at all times - you can blister the gel coat if you get it too hot. Heating the drive plate can help loosen the sealant. Let us know how you make out.
In the older shop manuals it had you put a bottle jack between the ride plate and the swim platform, with a big piece of wood above the jack to protect the platform, and a piece of steel between the jack and ride plate.
It said to very slowly apply pressure until it comes apart, applying heat and just working it off...
Is this suggestion no longer viable?
It said to very slowly apply pressure until it comes apart, applying heat and just working it off...
Is this suggestion no longer viable?
In the older shop manuals it had you put a bottle jack between the ride plate and the swim platform, with a big piece of wood above the jack to protect the platform, and a piece of steel between the jack and ride plate.
It said to very slowly apply pressure until it comes apart, applying heat and just working it off...
Is this suggestion no longer viable?
The jack method is recommended for the single pump models - it might work on the twin engine boats too - BUT you have to remove the jet pump. So there is a decent amount of additional work with the jack method.
Here is the trick to removing the pump shoe from a SeaDoo challenger.
Pick up a Douglas Fir 4x4 from home depot and cut it to about 4 foot in length. $12 I was breaking the 2x4's I had.
Pick up a shortie 20 ton floor jack from Harbor Freight for $38.
Remove jet pump and drive shaft from boat.
Remove the six mounting screws from the bottom of the pump shoe.
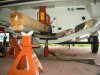
place a heat gun underneath the boat pointing the heat at the bottom of the pump shoe. You want to get the aluminum shoe throughly warm probably around 150 to 200 deg.
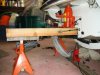
While it is heating up prepare your jacking setup.
place the 4' long 4x4 inside the pump housing/tunnel. Push it all the way in.
set your jack on top of the 4x4 underneath the rear fiberglass step of the boat. I used a piece of 1" x 6" X 12" thick piece of scrap aluminum to protect the bottom of the rear step of the boat. You could also use a 2x4.
use a jack stand to support the other side of the 4x4.
start jacking. The pump shoe should be just about too hot to touch. Keep the heat going from the heat gun. It should only take about 20 min to heat it up.
Start applying more pressure to the ride shoe. The 4x4 should be placing most of its pressure to the inside of the ring. Do not let the 4x4 place jacking pressure on the rear trim plate of the pump shoe or you will break it off. You may need to re-position your jack stand and jack to keep this from happening.
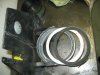
Apply pump pressure and keep the heat going. You will see the pump shoe start to pull away. Once that begins to happen its all down hill.
Use a wire wheel on a die grinder to help remove the silicone. You can also try using a good pressure washer.
Some additional info from : http://www.groupk.com/sd720jetbt.htm
Pump Shoe - The pump shoe is the actual metal part (bolted to the hull) that the pump body seals up against. In the case of the 14.5's, the shoe and the ride plate are made as one piece. It is "fundamental" that this shoe/ride plate is perfectly sealed to the hull with a high-grade silicone sealer. Herein lies a lot of the cavitation problems experienced by many 14.5 owners. Many of these shoes came from the factory with breeches in the silicone that sealed them to the hull. On these units, no kind of custom prop, etc, can eliminate the cavitation. The pump shoe/ride plate "must" be removed and resealed using "Permitex 66c Industrial Clear Silicone" (available in auto parts stores). Removal of the pump shoe is difficult (usually done with a hydraulic jack between the plate and the rear swim step). Once off, all surfaces must be completely cleaned of the old sealer. It is impossible to over emphasize the absolute importance of have this area attended to. We recommend This procedure for "every" single motor 14.5.
As added insurance to sealing between the pump shoe and pump case, we recommend a foam pump sealing-ring (available from the SD dealer). This inexpensive foam ring assures that there are no unknown gaps in the crucial sealing surface between the pump case and the pump shoe.
Wear Ring - The wear ring is a removable Teflon plastic liner that the impeller spins within. In a perfect world, this ring has no grooves or gouges on its surface, and it fits closely to the impeller’s outside diameter. However there can be considerable cavitation if the wear ring is gouged or grooved (as can happen from digestion of rocks or branches). In addition to the cavitation, a damaged wear ring reduces pump efficiency in a way that can cause the engine to run a few 100 rpm higher than normal (for any given speed). The end result is reduced pump thrust, and reduced fuel range. If your wear ring is damaged in anyway, it’s cost effective to replace it...and then stay away from rocks.
Drive shaft protector - The 14.5's come from the factory with a white plastic sheath that slips over the drive shaft. This free spinning sheath is intended to make it easier to remove ropes that might get wrapped around the drive shaft. Unfortunately, the forces of debris entering the pump often causes this protector to fracture and break apart, thus contributing to cavitation. We chose to cut this protector off at the front of the drive shaft (a small part of it must remain to seal the shaft), thus increasing the pump’s water intake area. At this same time we shortened our dock-lines to a length that would bake it impossible for them the wrap the drive shaft when tied to the cleats on the top deck.
Matt
Pick up a Douglas Fir 4x4 from home depot and cut it to about 4 foot in length. $12 I was breaking the 2x4's I had.
Pick up a shortie 20 ton floor jack from Harbor Freight for $38.
Remove jet pump and drive shaft from boat.
Remove the six mounting screws from the bottom of the pump shoe.
place a heat gun underneath the boat pointing the heat at the bottom of the pump shoe. You want to get the aluminum shoe throughly warm probably around 150 to 200 deg.
While it is heating up prepare your jacking setup.
place the 4' long 4x4 inside the pump housing/tunnel. Push it all the way in.
set your jack on top of the 4x4 underneath the rear fiberglass step of the boat. I used a piece of 1" x 6" X 12" thick piece of scrap aluminum to protect the bottom of the rear step of the boat. You could also use a 2x4.
use a jack stand to support the other side of the 4x4.
start jacking. The pump shoe should be just about too hot to touch. Keep the heat going from the heat gun. It should only take about 20 min to heat it up.
Start applying more pressure to the ride shoe. The 4x4 should be placing most of its pressure to the inside of the ring. Do not let the 4x4 place jacking pressure on the rear trim plate of the pump shoe or you will break it off. You may need to re-position your jack stand and jack to keep this from happening.
Apply pump pressure and keep the heat going. You will see the pump shoe start to pull away. Once that begins to happen its all down hill.
Use a wire wheel on a die grinder to help remove the silicone. You can also try using a good pressure washer.
Some additional info from : http://www.groupk.com/sd720jetbt.htm
Pump Shoe - The pump shoe is the actual metal part (bolted to the hull) that the pump body seals up against. In the case of the 14.5's, the shoe and the ride plate are made as one piece. It is "fundamental" that this shoe/ride plate is perfectly sealed to the hull with a high-grade silicone sealer. Herein lies a lot of the cavitation problems experienced by many 14.5 owners. Many of these shoes came from the factory with breeches in the silicone that sealed them to the hull. On these units, no kind of custom prop, etc, can eliminate the cavitation. The pump shoe/ride plate "must" be removed and resealed using "Permitex 66c Industrial Clear Silicone" (available in auto parts stores). Removal of the pump shoe is difficult (usually done with a hydraulic jack between the plate and the rear swim step). Once off, all surfaces must be completely cleaned of the old sealer. It is impossible to over emphasize the absolute importance of have this area attended to. We recommend This procedure for "every" single motor 14.5.
As added insurance to sealing between the pump shoe and pump case, we recommend a foam pump sealing-ring (available from the SD dealer). This inexpensive foam ring assures that there are no unknown gaps in the crucial sealing surface between the pump case and the pump shoe.
Wear Ring - The wear ring is a removable Teflon plastic liner that the impeller spins within. In a perfect world, this ring has no grooves or gouges on its surface, and it fits closely to the impeller’s outside diameter. However there can be considerable cavitation if the wear ring is gouged or grooved (as can happen from digestion of rocks or branches). In addition to the cavitation, a damaged wear ring reduces pump efficiency in a way that can cause the engine to run a few 100 rpm higher than normal (for any given speed). The end result is reduced pump thrust, and reduced fuel range. If your wear ring is damaged in anyway, it’s cost effective to replace it...and then stay away from rocks.
Drive shaft protector - The 14.5's come from the factory with a white plastic sheath that slips over the drive shaft. This free spinning sheath is intended to make it easier to remove ropes that might get wrapped around the drive shaft. Unfortunately, the forces of debris entering the pump often causes this protector to fracture and break apart, thus contributing to cavitation. We chose to cut this protector off at the front of the drive shaft (a small part of it must remain to seal the shaft), thus increasing the pump’s water intake area. At this same time we shortened our dock-lines to a length that would bake it impossible for them the wrap the drive shaft when tied to the cleats on the top deck.
Matt
Attachments
Matt - nice write up.
He has the 1800 - twin motor - not the single motor Challenger.
Does this approach work on the dual motor beasts?
The factory shop manual describes the pry bar method for the dual motor 97 Speedster and Challenger and the jack method for the single motor.
:cheers:
REV
He has the 1800 - twin motor - not the single motor Challenger.
Does this approach work on the dual motor beasts?
The factory shop manual describes the pry bar method for the dual motor 97 Speedster and Challenger and the jack method for the single motor.
:cheers:
REV
robin savell lloyd
Active Member
:agree: I have found this out the hard wayI couldnt get my pump shoe to even remotely budge until I gave her some heat. Heat is the key for dual or single!
MB
- Status
- Not open for further replies.
Similar threads
- Replies
- 0
- Views
- 332
- Replies
- 34
- Views
- 2,430
- Replies
- 2
- Views
- 635