• This site contains eBay affiliate links for which Sea-Doo Forum may be compensated.

New to Me 1993 Sea Doo GTX with a 587. Bogging

rok99

New Member
I bought a 1993 GTX and it is my first jet ski. It was $1800 canadian with a trailer I am mechanically inclined but far from a mechanic...

I first had this jet ski out for about 1.5 hours and drove it at low throttle the entire time between a boat launch and my dock. I noticed it bogging down but after that ride saw the jet intake had a bunch of sea weed in it. I was scared taking it out for the first time and open ocean- I did not crack the throttle much during that first ride.

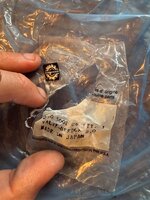
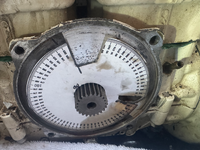
Onto the issues... I've had it out for a 25min and two 15 minute rides after that. The last two times i've really noticed the ski bogging down. Basically even when i pull the throttle to be more open, it does not respond or even dies out as i open the throttle more. The other issue is I've noticed a lot of oil in the hull. The previous owner was using synthetic sea-doo 2 stroke oil but i've swapped for the brown sea doo xps oil. I was thinking of adding UV dye to the oil to ID the leak. The fuel gague and speedo also do not work. Can you 3d print a new paddle wheel? There is also a decent amount of water in the hull that i've noticed though i'm not sure if some is from waves hitting the rear vents.

I've done a few things. The jetski was having trouble starting and I erroneously replaced the starter before realizing that the ground cable was not crimped properly. So, the jet ski has a new starter (Amazon- but i've kept the original starter), battery, solenoid and ground terminals.

I can't pinpoint the oil leak but it almost all appears to be the previous owner's oil. I don't see any of the brown oil in the hull.

More important though to me is the bogging. I've ordered:
1. Mikuni Carburetor rebuild kit (and tools- some pins, JIS screwdriver bits, and assembled a pop off tester). I did not buy needle valves... should I?
2. Fuel filter replacements
3. Fuel float replacement (fuel gague does not work)
4. New oil filter for when i replace oil lines
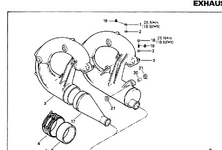
5. A carbon seal kit.

However I really want to just replace all of the oil and fuel lines to be done with it. I note that the sea doo manual says the oil lines are 6, 8 and 12mm and that the fuel lines are 6mm (is that ID or OD?). Issue is that I (A) don't know how much bulk length to buy of each (10ft, 25ft) and (B) am struggling to find suppliers in Canada.
I'm not sure what other cheap and easy maintenance I should do so that I can just enjoy this machine without worrying about it dying out. Any advice is appreciated.
 
Last edited:
Yes, you need to buy the needle and seat and make sure all parts are Genuine Mikuni.
Oil system has to be flushed and new oil filter installed whenever changing oil brands.
Carbon seal isn't used on your generation of ski, it uses a carrier bearing.

The only oil lines that need to be replaced are the small 3/32" ones from the oil pump to the intake manifold.

All fuel hose is 1/4". The vent lines don't need to be replaced.

Change the jet pump oil and inspect the wear-ring.
Thank you for your reply, Mikidymac.

I did get a genuine mikuni kit. I've struggled finding the 2.0 needle and seat online though. I guess it is 100% necessary to replace the needle instead of just clean it?

I didn't fush the oil system having not realized that the previous owner was running the XPS synthetic as he only mentioned that it was XPS, and, the oil tank was emptied. Hoping it is not a huge issue. I will replace the oil filter asap.

I guess I will have to return the carbon seal as the parts desk at my sea doo dealer is quite crap at identifying parts for pre 96 skis. I went home with a cartridge style oil filter from them until double checking against my photos of the engine. Should the carrier bearing or any other seals be replaced to ensure that water isn't entering the hull?

On the topic of hoses. Is 1/4 & 3/32 the ID or OD? Is it better to use 1/4" or metric 6mm? And what type of hose should I buy and of what lengths? I prefer something available at an auto parts store, as, I can get pricing at cost.

Thank you again, it really helps
 
XPS oil can be mixed with other XPS oil so you are fine there but yes change the oil filter and replace them small 3/32" oil injection lines.

Yes, you must replace the needle and seat.
Genuine Mikuni...
Amazon.com: Mikuni 14-1077 Needle Valve 2.0 : Automotive

Yes, return the carbon seal. You should be able to just add a couple pumps of grease to your carrier bearing, don't go crazy or you will pop the seals.

1/4" ID Standard automotive fuel hose 25' is plenty.
Thank you.
I see you suggested ‎786-35015-2.0 . I was suggested to purchase 786-15005-2.0 by a mikuni dealer but they were unsure. How can I be 100% on the mikuni part number? It seems like they are almost all sold out in Canada and are months away...

Thank you.
 
And before anything take a compression test to see where you are at
Compression after sitting for a week with a brand new battery is at 125 and 130. I did a few tests to confirm. Tested with a cheap princess auto gague but I do trust it since I've used it with cars and it has reported 180 and 210psi on different cars.
 
Compression after sitting for a week with a brand new battery is at 125 and 130. I did a few tests to confirm. Tested with a cheap princess auto gague but I do trust it since I've used it with cars and it has reported 180 and 210psi on different cars.
That is low, but still high enough that it will definitely run correctly out of the water and should run correctly in the water as well although it may be somewhat difficult to start in the water. As mentioned in previous posts, sounds like a fuel issue, like it’s not getting enough. Rebuild the carbs and follow @mikidymac carb rebuild thread. Make sure to follow it completely and have good flow through the pilot circuit. I would suggest the back to OEM kit from OSD marine. Keep the original spring in the carb. You will need to buy or build a tool to do the pop off and test for leaks when all done and back together, change the small oil lines and in my opinion it wouldn’t hurt to pre mix at 50:1 till your sure the oil injection room is working as it should. Check that the oil pump arm is aligned. No more driving till the issues are fixed as you could very well be causing pre mature damage to the engine
 
That is low, but still high enough that it will definitely run correctly out of the water and should run correctly in the water as well although it may be somewhat difficult to start in the water. As mentioned in previous posts, sounds like a fuel issue, like it’s not getting enough. Rebuild the carbs and follow @mikidymac carb rebuild thread. Make sure to follow it completely and have good flow through the pilot circuit. I would suggest the back to OEM kit from OSD marine. Keep the original spring in the carb. You will need to buy or build a tool to do the pop off and test for leaks when all done and back together, change the small oil lines and in my opinion it wouldn’t hurt to pre mix at 50:1 till your sure the oil injection room is working as it should. Check that the oil pump arm is aligned. No more driving till the issues are fixed as you could very well be causing pre mature damage to the engine
Thanks Burt. That was my thought as well and perhaps a winter project will be to go through the engine and buy a kit to rebuild. But at 125/130 i do not plan to tear into it this season, since there is only a month left for me.

I've installed a new fuel filter and o ring in the water separator which seems to have not been touched in a long while. But, while I was in there i noticed the fuel hoses are not gray, they are black, but are stamped 1993! Originally i was thinking not to touch the fuel hose... does this carry the same urgency as the gray fuel lines?

I have mikuni carb rebuild kits on the way and new/old stock sea-doo needles 270500126 on the way (i could not find mikuni 2.0 needles that were not over 4,000km away). I have ordered tools for a popoff test as well as the JIS screwdrivers. I've read through the carb rebuild thread a few times and watched a few videos- plan to do it the right way.
Screenshot 2025-07-24 at 11.31.14 AM.png
I have not looked into how to test the oil injection arm, though. Any thoughts on how to learn more about this are appreciated.
 
Thanks Burt. That was my thought as well and perhaps a winter project will be to go through the engine and buy a kit to rebuild. But at 125/130 i do not plan to tear into it this season, since there is only a month left for me.

I've installed a new fuel filter and o ring in the water separator which seems to have not been touched in a long while. But, while I was in there i noticed the fuel hoses are not gray, they are black, but are stamped 1993! Originally i was thinking not to touch the fuel hose... does this carry the same urgency as the gray fuel lines?

I have mikuni carb rebuild kits on the way and new/old stock sea-doo needles 270500126 on the way (i could not find mikuni 2.0 needles that were not over 4,000km away). I have ordered tools for a popoff test as well as the JIS screwdrivers. I've read through the carb rebuild thread a few times and watched a few videos- plan to do it the right way.
View attachment 68034
I have not looked into how to test the oil injection arm, though. Any thoughts on how to learn more about this are appreciated.
I’m not sure what you’re saying about the needle and seat? Are you saying you’re changing sizes? If so don’t do that. Also make sure to keep the original spring in it, even if the kit comes with a new spring. You can put the new spring in, but don’t throw away the old one. When doing pop off, don’t bend the lever, the pop off is what it is and is only changed by having the proper spring. As for the original black fuel lines? I’m not sure what to say, I would take a couple of fittings off, if there’s no green goop or any goop of any kind, you bend the hoses and then seem pliable with no cracking I would consider keeping them, however with that being said, changing them does provide some insurance. As for setting the oil lever, I can’t rennet exactly what but to turn but it’s pretty self explanatory once you get looking at it. The procedure will be in the manual which is available for free at seadoomanuals.net . I can send you a picture from when I was lining up the marks from my HX, XP or GSX. I know I have pics from the HX for sure. I agree with the 125/130, still good for a season or two
 
I’m not sure what you’re saying about the needle and seat? Are you saying you’re changing sizes? If so don’t do that. Also make sure to keep the original spring in it, even if the kit comes with a new spring. You can put the new spring in, but don’t throw away the old one. When doing pop off, don’t bend the lever, the pop off is what it is and is only changed by having the proper spring. As for the original black fuel lines? I’m not sure what to say, I would take a couple of fittings off, if there’s no green goop or any goop of any kind, you bend the hoses and then seem pliable with no cracking I would consider keeping them, however with that being said, changing them does provide some insurance. As for setting the oil lever, I can’t rennet exactly what but to turn but it’s pretty self explanatory once you get looking at it. The procedure will be in the manual which is available for free at seadoomanuals.net . I can send you a picture from when I was lining up the marks from my HX, XP or GSX. I know I have pics from the HX for sure. I agree with the 125/130, still good for a season or two
No. Definitely not changing sizes- but- I struggled to purchase the needles in my size. I verified the size with the seadoosource carb reference list. I had to look for a while until I located the 2.0 sized needles.

Once my needles come I will take the carbs off. I checked the oil lever with a camera and it seems to be aligned.

I tried starting it after cleaning the fuel filter housing, and, keep fouling plugs. They are new and gapped to .020.

Another complicating factor, some of the hex bolts holding the exhaust on are stripped. I was careful to use a 1/4in torque wrench when I did the starter, unfortunately the previous owner left me with a few sets of mangled threads... ugh.

Screenshot 2025-07-24 at 1.02.43 PM.png

Screenshot 2025-07-24 at 1.03.39 PM.png
 
Have you been running it on the hose? They look wet with water, I would order new o ring set for the cylinder cover if your taking it off. Uuugh, stripped bolts suck, hopefully not a salt water machine? Those should be metric #6 I believe. Might be easier ways, but If I couldn’t think of something better I might sacrifice a number 6 hex or 2. Put them in place and then weld them in there. Need new bolts anyways
 
Have you been running it on the hose? They look wet with water, I would order new o ring set for the cylinder cover if your taking it off. Uuugh, stripped bolts suck, hopefully not a salt water machine? Those should be metric #6 I believe. Might be easier ways, but If I couldn’t think of something better I might sacrifice a number 6 hex or 2. Put them in place and then weld them in there. Need new bolts anyways
It's in salt water now, I haven't been running it on the hose but also haven't been able to get it out of the water since it's docked in front of my cottage 10km from the nearest launch unless i get it out with a 4 wheeler. With that said i suspect some of the water dribbled down from the top of the spark plug holes. We got a storm here while it was in the water.

Looking at diagrams and experience says they look like M8. I have thread taps and helicoils at home so likely will be the solution, since it's hard to get my welder out to the beach.

I wasn't planning to take the cylinder cover off... but, am thinking about putting new o-rings now.

This sea doo is giving me a beating.. I've had it for almost a month and haven't been able to get it out
 

Attachments

  • Screenshot 2025-07-24 at 1.43.09 PM.png
    Screenshot 2025-07-24 at 1.43.09 PM.png
    221.3 KB · Views: 11
So i ran into some trouble. I tried bending 3 13mm wrenches to take the carbs off without touching the rotary valve cover, and it was unavoidable to take the rotary cover off.

I'm doing this on the beach and in sand and my knees slipped as i took the cover off, and I didnt notice the rotary valve coming with the cover... I was more worried about the rotary falling off after the cover comes off rather than it coming with the cover...

I'm fk'd. I don't have a timing tool and the engine is in the sea doo which is in the water on a sand bar. Are these timing marks on the engine, to the left of the red line??? Any tips? Really stressed and frustrated right now, with a long weekend coming up.
 

Attachments

  • IMG_0428.jpg
    IMG_0428.jpg
    630.9 KB · Views: 17
  • Screenshot 2025-08-02 at 11.33.45 AM.png
    Screenshot 2025-08-02 at 11.33.45 AM.png
    6.5 MB · Views: 15
No you can’t use those timing marks.
You can print a degree wheel from the service manual. And use a screwdriver down the sparkplug hole to get tdc close. That’s about it.
 
Thank you.
I'm almost ready to reinstall my carbs . However I'm having an issue with the needle valves on the sea doo sticking open after the popoff test. Basically it won't return down. I've been unable to reproduce it consistently but after about 10 or so popoff tests it's reproduced. It's almost as if the edges of the needle valve are catching. It is a new needle valve. Is this a common issue or is there a solution? I'm kind of dumbfounded.
 

Attachments

  • tempImageQZIDaA.png
    tempImageQZIDaA.png
    6.7 MB · Views: 17
It should not come out that far ever.
Are you using all genuine Mikuni parts?
Are you using WD-40 on the seat when checking pop-off?
 
It should not come out that far ever.
Are you using all genuine Mikuni parts?
Are you using WD-40 on the seat when checking pop-off?
I’m using gasoline because I ran out of wd. All genuine mikuni rebuild kit.

The needle valves are old stock bombardier. So genuine.

Could the issue be that I am pressurizing too quickly? I am using a large bicycle pump to test.

I’ve swapped the needle valves and it only occurs on one side. I am inclined to try and polish the four ridges on the needle valves or reuse the old one. After looking for weeks, all needle valves are 2-3 weeks out or OOS in Canada in the size I need
 

Attachments

  • IMG_0459.jpeg
    IMG_0459.jpeg
    1,012.4 KB · Views: 14
  • IMG_0460.png
    IMG_0460.png
    3.1 MB · Views: 12
Where in Canada are you located? I got my mikuni carb parts from a dealer in Canada.
East coast in NS. Any suggestions would really help. Almost everywhere that I've called or found either has long lead times or has just turned me to the internet, but for such a small part I'd really like to avoid the delays of purchasing

I ended out getting the carbs back together with the new/ old stock needle valves and it passed about 15 popoff tests, each at ~30-32psi, but, I put the "bad" needle valve and seat on the pto carb so that, with some care, I can replace it without removing the carbs in the case that i experience the same failure.
 

Attachments

  • tempImageDJepMg.png
    tempImageDJepMg.png
    6.8 MB · Views: 10
East coast in NS. Any suggestions would really help. Almost everywhere that I've called or found either has long lead times or has just turned me to the internet, but for such a small part I'd really like to avoid the delays of purchasing

I ended out getting the carbs back together with the new/ old stock needle valves and it passed about 15 popoff tests, each at ~30-32psi, but, I put the "bad" needle valve and seat on the pto carb so that, with some care, I can replace it without removing the carbs in the case that i experience the same failure.
I get my Mikuni parts from Trans Can Imports. They have 2 locations in Canada.
 
Here is my experience with early 90s SeaDoos. I have a 93 SPX and a 93 GTS. I rebuilt the fuel system in the SPX last Summer The fuel lines in the tank had melted from bad gas. I replaced the pickups and fuel lines. The fuel gauge had also quit working. The sensor in the tank was the culprit. It is made of a circuit board with resistors and reed switches that are activated by a floating magnet. I found a float on Ebay and as an electronics tech, I found reed switches at Digi-Key, an electronics supply house. I had to run wires for some traces on the circuit board that had been dissolved by the bad gas. I got my Mikuni rebuild kits and needle valves from SBT in Florida. I am in the process of restoring my GTS. My plan is to get both PWCs in their best shape and then sell them and a double trailer for someone else to enjoy next season.
 
Last edited:
So here's my update. I got the jet ski back together.
To recap all i've done... Brand new AGM battery, new ground cable and terminals, new starter, new starter solenoid, new oil lines on the rotary valve cover, fresh carbeuretor rebuild with genuine mikuni parts and needles and seats, brand new fuel hoses all around. I put a new fuel selector too as well as new fuel filter and o-ring.

I ran it on the hose for a minute and sounded good. Took it out for about an hour and ran pretty good, accelerated well and got on plane well. I came back to the jet ski a few days later and it started up no problem, but after about 20 minutes of riding the ski started decelerating and died out on me. When I tried to start it back up the starter would not even engage (weird???- voltage issue?? maybe the alternator is not working?).

2 things. I notice the hull has taken on a lot of water. I think it is coming from the tuned pipe gasket. but would this cause the ski to die out? 2. I notice a bubble in the fuel inlet. I've put a clear fuel line to try and observe. it seemed fine initially but this reappeared. i cannot imagine it coming from anywhere but the fuel filter. The o-rings that came with the new filters barely fit.

Any suggestions or thoughts? I'm at my wit's end with this machine.
These machines will not run right with an exhaust leak. They need the back pressure in the exhaust so the fuel will not just go in the intake port and out the exhaust port on the same stroke. Also if the hull fills up with exhaust there will be no oxygen to run the engine and it will die out.

Next time you get it running you should run it in the water on the trailer or tied to a dock and watch the fuel lines. You should see exactly where the air is getting in. if no bubbles are going in to the water separator but bubbles are coming out of it, then it is likely the O-ring...same for the other components. If your fuel pump is weak it may never suck all the air out of the system. With these clear lines, when they get a little age on them, it is good practice to clip the ends when removing and reinstalling.
 
Last edited:
Back
Top