I've been in the market for about a year now, looking for a pump mod that will increase my bottom end hole shot, while not losing any of my upper end performance.
I finally ordered one. I get email from many sites that I visit, as a mod, I like to stay informed for you, the members, in trying to find the best prices for our upgrades.
I just ordered a Solas Concord impeller from www.watercraftsuperstore.net because while shopping around, they had the best deals......along with free shipping!.......key word for me, "free shipping".
Depending on what you are looking for (and they have a support team to help you decide), you can find impellers starting as low as $149.00 dollars. They have other accessories but I did not look through them.
In my search, I looked at places like RIVA ($299), 4-tecperformance ($300+) and Impros along with a couple others. Parker Yamaha came close but most were still over $200 bucks and you footed the bill on shipping.
I will let all you guys know on when I get the impeller and you know, I'll surely be taking some pix of the difficulty level in changing this out.
Most know that I'm pretty much against modding our already high rev engines, so pump mods are the next best thing in increasing performance without jeopardizing the longevity of our Rotax motors.........:cheers:
Wow, what a great vacation! The only problem was, it seems to be over with before you ever really get started!
My daughters and I took the GTX up river for 3 days of roughing it, camping amongst the alligators. Truly, we only saw 3 or 4 and that was early morning.
The GTX has a lot of storage room up front. I was surprised on how much I could carry. We camped on a small sandy beach type area on the Alabama Tenn-Tom river system. It’s connected all the way up to the Great Lakes. We fished, swam, went tubing and spent a lot of time at the local fish camp. They had good food! Outside what would keep in an ice cooler, like sandwich meats and drinks, the food was limited as to what they cooked at the fish camp and our light provisions.
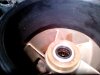
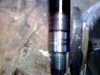
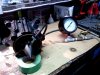
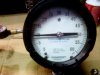
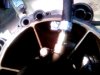
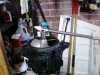
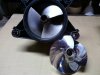
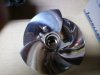
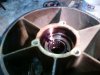
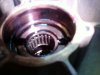
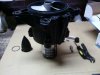
The speed and performance of the ski after replacing the fuel lines was unbelievable! And when I get home, guess what was waiting for me on the door step? My brand new Solas Concorde impeller. I was way too excited to what till next week, that I removed the pump and broke the impeller down. Total work time to get the pump off, oil drained, impeller removed…..oh, about 45 minutes. I don’t think I’ve mentioned it before but using a breaker bar on the impeller removal tool verses a ratchet is the best way to break the Loctite. There was 50 ml’s of oil in the pump and dark. There should have been about 89 ml’s. The good thing was no water intrusion. The bearing surfaces looked good so I probably won’t replace them just yet. Since the ski is over 10 years old, I’ll put that on my list of things to do in the off season (like we really have one!...) for this year.
I’ve attached a bunch of pix for ya’ll to see on the pump and impeller. The Concorde has almost the same progressive pitch but the design of the blades look like it’ll hook up faster and give me a few more mph on the top end. I’ll let ya’ll know the top speed once I have it all back together. I have another vacation scheduled for the 2nd week of August but unlike this one, where I didn’t come into the forum, I’ll be in daily. Probably much more than normal, since I plan to mostly sit around the house…..
Enjoy the pix and I’ll be getting back to work. I’m sure there are loads of threads I’ll be able to sink my teeth into…..It’s great to be back!
I finally ordered one. I get email from many sites that I visit, as a mod, I like to stay informed for you, the members, in trying to find the best prices for our upgrades.
I just ordered a Solas Concord impeller from www.watercraftsuperstore.net because while shopping around, they had the best deals......along with free shipping!.......key word for me, "free shipping".
Depending on what you are looking for (and they have a support team to help you decide), you can find impellers starting as low as $149.00 dollars. They have other accessories but I did not look through them.
In my search, I looked at places like RIVA ($299), 4-tecperformance ($300+) and Impros along with a couple others. Parker Yamaha came close but most were still over $200 bucks and you footed the bill on shipping.
I will let all you guys know on when I get the impeller and you know, I'll surely be taking some pix of the difficulty level in changing this out.
Most know that I'm pretty much against modding our already high rev engines, so pump mods are the next best thing in increasing performance without jeopardizing the longevity of our Rotax motors.........:cheers:
Wow, what a great vacation! The only problem was, it seems to be over with before you ever really get started!
My daughters and I took the GTX up river for 3 days of roughing it, camping amongst the alligators. Truly, we only saw 3 or 4 and that was early morning.
The GTX has a lot of storage room up front. I was surprised on how much I could carry. We camped on a small sandy beach type area on the Alabama Tenn-Tom river system. It’s connected all the way up to the Great Lakes. We fished, swam, went tubing and spent a lot of time at the local fish camp. They had good food! Outside what would keep in an ice cooler, like sandwich meats and drinks, the food was limited as to what they cooked at the fish camp and our light provisions.
The speed and performance of the ski after replacing the fuel lines was unbelievable! And when I get home, guess what was waiting for me on the door step? My brand new Solas Concorde impeller. I was way too excited to what till next week, that I removed the pump and broke the impeller down. Total work time to get the pump off, oil drained, impeller removed…..oh, about 45 minutes. I don’t think I’ve mentioned it before but using a breaker bar on the impeller removal tool verses a ratchet is the best way to break the Loctite. There was 50 ml’s of oil in the pump and dark. There should have been about 89 ml’s. The good thing was no water intrusion. The bearing surfaces looked good so I probably won’t replace them just yet. Since the ski is over 10 years old, I’ll put that on my list of things to do in the off season (like we really have one!...) for this year.
I’ve attached a bunch of pix for ya’ll to see on the pump and impeller. The Concorde has almost the same progressive pitch but the design of the blades look like it’ll hook up faster and give me a few more mph on the top end. I’ll let ya’ll know the top speed once I have it all back together. I have another vacation scheduled for the 2nd week of August but unlike this one, where I didn’t come into the forum, I’ll be in daily. Probably much more than normal, since I plan to mostly sit around the house…..
Enjoy the pix and I’ll be getting back to work. I’m sure there are loads of threads I’ll be able to sink my teeth into…..It’s great to be back!
Attachments
Last edited by a moderator: