Electrical Connector Pin Replacement

Note: This site contains eBay affiliate links for which SeaDooForum.com may be compensated

etemplet

Premium Member
Premium Member
Can someone point me in the right direction regarding replacing or tightening up the pins in this female plug. A couple slide back and forth and I'm not sure if they are gonna make good contact when I connect the plug. All I see is the the large orange rubber that I'd have to wiggle back from the plug but I don't see how that will assist me in tightening the plug terminals inside the plug. Help guidance is appreciated.

MPEM ECM Female Plug Speedster (1).JPG

I have the back section unscrewed but not sure where to go from there. I don't want to ruin the plug.

MPEM ECM Female Plug Speedster (2).JPG
 
I have to keep a sense of humor but I suppose I often boldly go where few have gone. Even the Candoo guys haven't worked on a plug like this. :D I believe the plus have to come out the front. I'm sure they will work "as is" or that I can get them to work with a little finesse' if needed.

The reason I am going to greater lengths to solve this dilemma is that the Port engine was not getting spark. If Either if these suspectwires are responsible in some way for spark to the Port engine then the MPEM may be good.
 
Have you tried a terminal tool to remove the pins and sockets?
I haven't tried anything else yet. I got sidetracked today working on an electrical fence to keep the neighbors goats out of our yard. LOL

I have a great many extraction tools :) so I'll do a little messing around with the spare. Gonna be interesting.
 
Snap-on TT 600-4 is the tool, but if you can find on old telescopic radio antenna, one of the smaller sections works too.
And no, they don't come out the front, remove the orange silicone rubber seal from the back, push in on the wire and hold it
in while you fit the tool or the antenna tube over the pin to release the barbs from the plastic housing, then gently wiggle and
pull it out the back. If the pin is sliding, that could mean one of the two springy "barbs" got bent up, and you may need to use a
tool to hold the pin inward from the back side wile you slide the tube over it from the front side.
When inserting a new pin from the backside, you push it in until it until you hear it snap into place. These pins are replaceable, and you'll
need a 'W' crimping tool to crimp it on.
You might have a bent pin on the mating plug that forced this loose one inward enough to bend the catches (barbs).
 
Wow !! Thanks for the info. The pin on the male side of the plugs is in good conition. but a little bent. Looks like it pushed the side of the plug, deformed it and pushed it backwards. Hamfisted mechanics obviously forced it. I appreciate the insight. Gonna be a big help. I'm not used to getting help at this level and I am pleasantly surprised. Thanks again.

I tried looking this up on Youtube hoping to find a video but "no joy." :D
 
I am glad to be helpful, you're welcome!
The better pin extractors had a solid rod in the center that you can push the pin out from the front side with, as opposed to pulling it out
from the backside. Damaged pins and sockets are difficult to remove when the latching barbs are all deformed, pressure must be applied from the backside against the metal crimped on end. holding the insulation on the wire with hemostat or needle nose, usually will be rigid enough, while you work the tube over the barbs from the front side. You will probably have to replace the damaged pin, so I would get the replacement pin first,
to get a better idea of what you up against. I have tried saving pins for re-use, but that W-crimp is so tight, its almost impossible to un-do. But with enough wire left attached to it, a guy could splice it in, soldering and marine heat shrink.

Digressing from the subject:
I read a lot of posts regarding electrical issues, without mention of the copper in wires being infiltrated by corrosion, under the insulation.
I live by the beach, so my skis are only used in salt water which seems to attack copper. I've found battery cables infected, also smaller 16ga stranded copper wire. Usually feeling the insulation for bumpy, or stiff places will help locate the infection, and when stripping back insulation
to expose the copper, sometimes there's only a few strands still continuous through the powder left from the other "decomposed" copper strands.
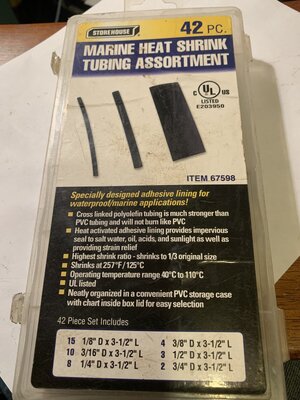
I see a lot of this in trailer lights wiring, but also engine wiring. I cut back the wire until I finds bright and shinny copper, then do a "westerm union" splice and solder it, then the marine grade heat shrink tubing that has a clear glue lining on the inside, and shrink it until this glue oozes out both ends. Liquid rubber is an alternative.
Hope this helps someone.
 
I am glad to be helpful, you're welcome!
<snip>
Hope this helps someone.

Man this is terrific information for me!! Where can I get marine heat shrink tubing? I've run into the same problem you mention with the wire and internal corrosion. I live near the Gulf of Mexico so we get a lot of corrosion on the wiring and everything else. Lucky for me I have an entire MPEM box and plugs for spares but I'd like to save them both.

Any idea where I could purchase those pin connectors as well as the marine shrink tubing?? I don't mind buying the tools either even for a ONE-OFF repair.
 
@Venturian1
I found a set of Snap On TT600 (6 pieceset) of Terminal release tools on Ebay. The (-5) looks like one of the tools you were describing though it seems pretty long. :D

Snap On Terminal Release Too TT6000.jpg
 
I get the heat shrink tubing at Harbor Freight. The rosin core solder they have also. You got the same exact set of Snap-On tools
that I got. About the pins.... I looked up the part number in the parts catalog I downloaded (free .pdf) Sea-Doo manuals, and searched
the web, I believe eBay had what I needed. Now the crimping pliers that do the W-crimp I bought in an auto parts store in Olympia WA
for $50 when I was visiting and re-wiring my Nephew's '79 shovelhead. Thought it was way too much $, but now I don't! No other type of crimp
works on these pins, and the tool is good for 5 or 6 different sizes of wire. So now I have two pair of W-crimpers. the red ones are made by AMP Corp. the same outfit that makes some of the pins / plugs used on seadoos, but I prefer the blue handle pair, (see attachments) they do a better job because of the way they close squarely rather than from a pivot point. I've found that if replacing a bad section of wire, it's best to use the same gauge of wire as the one you are repairing, if twisting the two together, and sometimes, twisting them together then soldering results in a much thicker splice than the wire size, and the heat shrink is too small, or, it shrinks well around the splice, but the heat shrink can't shrink around the insulation tightl. Alternative method is: I just slip a 3/4" - 1" length of the smallest size heat shrink that fits, and slide it away from the end of the wire a few inches at least, and tin the ends of both pieces with solder, hold them together with a small alligator clip, and melt the solder together, then while its still hot, quickly slide the heat shrink over the splice. This way it takes less heat to shrink the tubing, and using an open flame down inside the hull is risky.
Hope this is helpful.
Don in Ventura
 

Attachments

  • heat shrink.jpg
    heat shrink.jpg
    297.1 KB · Views: 1
  • AMP W-crimp tool.jpg
    AMP W-crimp tool.jpg
    254 KB · Views: 2
  • 2 W-crimping tools.jpg
    2 W-crimping tools.jpg
    197.7 KB · Views: 2
  • Rosin core solder.jpg
    Rosin core solder.jpg
    203.8 KB · Views: 2
  • W-crimp zoomed.jpg
    W-crimp zoomed.jpg
    200.8 KB · Views: 2
@Venturian1 You sir are a freakin MASTER !! :) I'm a machinist by trade but fix everything under the sun. Our battles are the same. Ha ha. I fight these fittings with little are no special tools but I"m learning how much better and more efficient it is the have the proper tools. Price... like you say... not withstanding. I actually think I can get away with the pins "as is" but I'd like to try to tighten them up. Since they don't back out all the way there is something left to hold them in. We'll see when the kit comes in. LOL I'll post up.

I see what you mean about the blue pair. Yep, I like them better as well. More gooderer. :D
 

I got 2 key rings of those things I bought a few years ago. I don't know how many of the work. LOL I mainly use the ONE that works on the Seadoo plugs on the two strokes. Thank goodness I got that one. I've found and solved some problems taking those pins apart. :)
 
I got 2 key rings of those things I bought a few years ago. I don't know how many of the work. LOL I mainly use the ONE that works on the Seadoo plugs on the two strokes. Thank goodness I got that one. I've found and solved some problems taking those pins apart. :)
Is that a MPEM? ( multi purpose extractor / manipulator)! Yes, I am a 2-stroke fan.
Had a 08 Yamaha 1100 cc 4-stroke, wasn't much faster and way heavier. prefer the 2-strokes.
now have 4 of them for when my kids come from Las Vegas and bring their kids (yes Grandpa here!)
Have you used "Salt Away" or anything similar? Two of my skis don't "pee" out the back like they used to.
No plugged hoses, so I'm guessing its salt built up in the water jacket(s). Salt Away is to damn expensive
to just run through once and let it run out on the ground, I'm thinking pinch off the hose to the pump and exhaust
and circulate it through the engine from a 5 gal bucket for a few hours with a pond pump to clean out the head and
water jacket.
 
Back
Top