


-
This site contains eBay affiliate links for which Sea-Doo Forum may be compensated.
You are using an out of date browser. It may not display this or other websites correctly.
You should upgrade or use an alternative browser.
You should upgrade or use an alternative browser.
Dirty Carborator?
- Thread starter SaltyBones
- Start date
- Status
- Not open for further replies.
Phil Poeschl
New Member
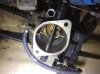
Can you tell much about it from this look?
I just went thru a similar looking carb. You'll be surprised how rough it will look inside I'll bet.
SaltyBones
Active Member
ocod
Well-Known Member
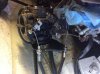
anybody able to tell me how to disconnect this throttle and choke cables?
Loosen those nuts and cable end come out.
Theres a notch where cable slides out
Sportster-2001-951C-Stock
Well-Known Member
Yep, looks like it may never have been rebuilt before. It's definitely time, those tiny bypass hole passages and fuel filters are more than likely in need of a good cleaning by now. I'd replace the needle and seat while I'm in there, and reuse the original Mikuni metering arm spring.
Make sure the accelerator pump is working well, the mushroom valve inside may have deteriorated thus you may have to disassemble the accel pump. (I'd leave it alone if it still works well)
Don't overlook any restrictive orifices that may be hiding inside the original fuel line tubing, those are easy to throw out in the trash by accident and it won't act right without them.
Make sure the brass acceletator injector nozzle check valves located in the side of the carb bore there are clear of fuel gum.
While in there, check the oil injector nozzle check valves aren't gummed up too, and the 3/32"ID oil injection lines aren't rotten (I'd replace them, using Tygon F-4040-A 3/32"ID)
All new fuel lines as well, of course. Those are all 1/4" ID I believe.
How was it running, I bet it was lean hesitating?
Attachments
Last edited by a moderator:
SaltyBones
Active Member
Yep, looks like it may never have been rebuilt before. It's definitely time, those tiny bypass hole passages and fuel filters are more than likely in need of a good cleaning by now. I'd replace the needle and seat while I'm in there, and reuse the original Mikuni metering arm spring.
Make sure the accelerator pump is working well, the mushroom valve inside may have deteriorated thus you may have to disassemble the accel pump. (I'd leave it alone if it still works well)
Don't overlook any restrictive orifices that may be hiding inside the original fuel line tubing, those are easy to throw out in the trash by accident and it won't act right without them.
Make sure the brass acceletator injector nozzle check valves located in the side of the carb bore there are clear of fuel gum.
While in there, check the oil injector nozzle check valves aren't gummed up too, and the 3/32"ID oil injection lines aren't rotten (I'd replace them, using Tygon F-4040-A 3/32"ID)
All new fuel lines as well, of course. Those are all 1/4" ID I believe.
How was it running, I bet it was lean hesitating?
It was having trouble idling in the water (but not on the hose) and would bog down when given throttle. Also has ~120 psi in each cylinder.
Was hoping the engine would make it through the summer and plan on rebuilding it next winter as I don't really want or have time to take on a project that big right now.
Sportster-2001-951C-Stock
Well-Known Member
It was having trouble idling in the water (but not on the hose) and would bog down when given throttle. Also has ~120 psi in each cylinder.
Was hoping the engine would make it through the summer and plan on rebuilding it next winter as I don't really want or have time to take on a project that big right now.
Obviously you already know 120psi is low. I have to wonder though since both are approximately the same, if your compression gauge reading is accurately calibrated (a common concern that needs to be confirmed before throwing money at a problem that doesn't exist).
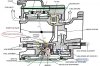
If it won't idle well and hesitates at low speed this suggests the low speed passages are at least partially blocked with fuel gum and possibly aluminum corrosion and debris, so pay particular attention to cleaning the low speed "bypass holes" circled in yellow of the drawing I posted. These are either two or three holes in the carburetor bore just upstream of the butterfly critical for providing fuel during low speed throttle butterfly positions. Shooting acetone carburetor cleaner or brake cleaner under pressure through the brass pilot jet will remove the fuel gum and clear these passages most of the time, you can watch inside the bore as the liquid solvent shoots out from these passages inside the carburetor bore, it should produce a straight stream, not a trickle. A weak trickle or an angled stream indicates a partially clogged passage.
Occasionally, not just fuel gum but internal oxidation of the machined aluminum passage, corrosion can grow inside those "bypass holes" and cause partial blockage, or bits of fuel debris can become lodged in them and block fuel delivery during low speed operation. Often just pushing a piece of monofilament fishing line through them can clear them out if the carburetor solvent doesn't do the trick. Or in extreme cases very carefully using a fine piece of wire, but go easy so as not to damage the hole or scratch the inside, the size of the hole is drilled to a specific dimension and scratching the inside of the channel (or corrosion) can change the calibration. The bypass holes diameter is critical for low speed off idle operation, just as the orifice size of the pilot low speed jet.
The accelerator pump gives a mechanical shot of fuel as you open the throttle, this mechanically richens the fuel mixture briefly until air velocity through the carburetor bore can increase, and begin pulling fuel from the metering chamber through the bypass holes. So if the accelerator pump system (pump, and nozzles) isn't functioning properly, you are likely to experience a lean hesitation when applying throttle, from off idle. For instance, one of the accelerator fuel nozzles might be clogged with debris or fuel gum. Usually a few shots of carburetor cleaner passing through can clear them out. These nozzles have a check ball and spring inside them thus will only pass fuel inward, toward the inside bore of the carburetor, so check this, if they are operating correctly the fuel can only move in one direction. If one or both of them are clogged, then the mechanical fuel enrichment won't operate correctly and the result will be a lean hesitation when APPLYING throttle at low speeds.
If your lean hesitation occurs shortly AFTER this brief accelerator shot is consumed (engine begins to accelerate then falls on it's face), the problem is most likely due to inadequate fuel arriving to the inside of the carburetor bore (throat) which is normally delivered via the bypass holes.
Anyway, the yellow portions circled in the Mikuni owners manual drawing posted above are typical places where fuel debris tends to collect, note these locations happen to be the smallest passages inside the carburetor.
The red circle represents the needle and seat, the rubber tip of the needle tends to wear out or may have a groove that forms over time that can cause the needle to stick in the seat orifice. This makes for inconsistent air/fuel mixture ratios at low speed and can cause hard starting due to fuel leaking into the carburetor bore.
Think of this diaphragm type carburetor in terms of a fuel on demand system, where engine intake vacuum dictates how and when fuel is delivered via the configuration and diameter of the various passages.
Here is a link to the Mikuni owners manual, much of it is useful for identifying OEM parts numbers. You will need to make sure to use the correct parts for your application, some of which is provided in the seadoo factory service manual for your particular engine. It's vitally important to install only the correct parts else the calibration will be changed. These carbs were used on many different engines of various sizes and applications, so there were numerous changes in calibrated components depending on the particular application.
So, don't install the wrong components, double check that any parts used are the correct ones! Don't assume any part from your kit is correct, verify 100%, 1st.
http://www.mikuni.com/pdf/sbn_manual.pdf
Mickirig1
Well-Known Member
SaltyBones
Active Member
Need to soak with WD-40 or something then loosen the 10mm lock nut then the screw part is 8mm. That is the oil injection pump cable.
Also the oil in the line to the injection pump looks green. It should not be green or blue. Looks like the previous owner used the incorrect oil. Please verify.
Also the oil in the line to the injection pump looks green. It should not be green or blue. Looks like the previous owner used the incorrect oil. Please verify.
SaltyBones
Active Member
Need to soak with WD-40 or something then loosen the 10mm lock nut then the screw part is 8mm. That is the oil injection pump cable.
Also the oil in the line to the injection pump looks green. It should not be green or blue. Looks like the previous owner used the incorrect oil. Please verify.
It's red in the tank (from what I can tell) and green in the lines. Thoughts?
The only way the lines get green or blue is staining from the wrong oil. If the oil in the tank is red and you found the yellow seadoo jug they probably added the correct oil to the tank but had the wrong oil before. They are not compatible and can actually gel when mixed together causing problems. It is messy but the correct way to do it is to drain the oil tank and engine cases, replace the oil filter and small lines that run from the oil pump to the intake and add known good oil. if you remove one of the large lines on the side of the engine the correct oil in the tank will flush all the wrong oil out of the cases but it will make a mess. I would go to home depot or lowes and get some clear hose the same diameter and run it out the back of the ski to a drain pan then have it ready to connect to the engine as soon as you remove the factory hose, then hold the factory hose above the tank so it doesn't spill oil all over. This will flush the rotary valve cavity in the cases. Once you change the filter and add the correct oil the oil bump has a bleed screw to get the air out of the lines but be careful tightening it as it can strip easily. Then start the ski and hold the oil pump lever wide open with the ski idling and you will see the oil slowly pumping through your new clear lines into the intake, when the exhaust really starts to smoke you know it is primed.
Now would be the perfect time to replace the oil tank if it is leaking.
Now would be the perfect time to replace the oil tank if it is leaking.
Sportster-2001-951C-Stock
Well-Known Member
Oh man, so I shouldn't mix the blue and red stuff to make a cool looking custom orange curdle? Yep, mixing 2-stroke oils is a really bad idea, unless you want a curdled gelatinous mess..
SaltyBones
Active Member
Sounds good. I'll drain and replace all of that stuff while I'm waiting on my selector switch, carb, and wear rings.
SaltyBones
Active Member

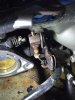
Nasty. Looks like it had some moisture and/or bad fuel sitting in it. For single carbs the price of a carb kit and needle and seat compared to a new carb at $200 if mine looked like that I would just replace it. For dual carbs $400 a pair is a little much so I would probably rebuild.
SaltyBones
Active Member
Just wanted to make sure...Thanks again!!
The key with the carbs is maintenance and fuel. Some in harsh areas rebuild their carbs every year. For me that is a little much but lets say you rebuild them every year for $60. You could never rebuild them and just install a brand new one every 4 years and save $40. I guarantee an brand new carb will last 4 years with no maintenance as long a you use good fuel and stabilizer. Here in my area we do not have the high ethanol content and I use StaBil over the winter. I only rebuild my carbs about every 2-3 seasons and have not had a problem.
Sportster-2001-951C-Stock
Well-Known Member
Looks like a rebuild candidate to me, so I must've missed something.
- Status
- Not open for further replies.
Similar threads
- Replies
- 6
- Views
- 299
- Replies
- 7
- Views
- 218
Share: