• This site contains eBay affiliate links for which Sea-Doo Forum may be compensated.

RESTO 95 XP800 Resto Thread

Loganab13

Member
Figured I'd take the time to document this one fairly thoroughly since I doubt I'll come across another 95 XP800 any time soon. Though I'm pretty happy with my 96 XP & SPX, I've been actively searching for an XP800 for the last 4-5 years without any luck. There's just something about that hump seat and yellow single gauge hood...

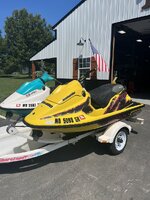
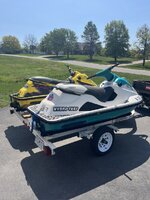
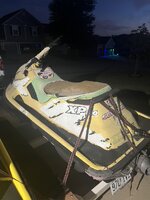
As luck would have it, I'm scrolling through Marketplace late one night and come across a listing for an old boat trailer that had been converted into a three-place PWC trailer. In the very corner of the picture, I see the unmistakable yellow hull and pink bottom. I sent the guy a message asking about the ski, figuring I'd get no where. Low and behold he responded, saying he didn't know anything about the ski and didn't have plans to sell it, but would for the right offer. Long story short, after a four hour road trip, I'm the proud new owner of my dream ski.
19BBCC18-4539-4FC1-8203-0D915AD08A97_1_105_c.jpeg

9AD0E5F0-3355-4671-A315-039657A8EE31_1_105_c.jpeg

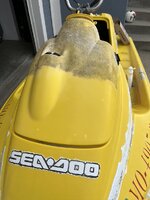
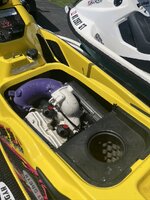
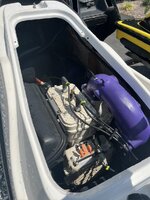
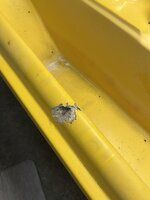
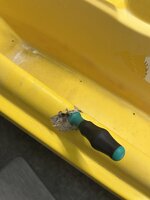
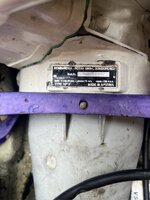
The good news: it's a 95, has a clean title, is 100% complete, has a set of R&D 3 degree trim tabs, an R&D ride plate extension, R&D intake grate, and it's got a 787x motor. The cylinders look flawless, the tank has been replaced under recall, and there's no oil in the hull. The bad news: it's sat outside, uncovered for at least the last 10 years. The hump seat is there, but the foam is powder and I don't think there will be any saving it. The bar pad is gone, the rear grab handle is intact but it's pretty weathered and there are a few splits in the rubber. Someone also drilled a 1" hole just below the grab handle for a bilge pump outlet, and there's a decent gash above the port side rub rail. It still has the Tempo fuel lines, and the carbs don't look like they've ever been touched (there's still paint over all of the phillips head screws on the carbs). All that said, the inside of the hook looks flawless other than the janky bilge pump wiring.
 
With the long weekend, I decided to see what I drug home. Not having a key, I pulled the gray box and swapped the one from my 96 in. I got two beeps and the multifunction gauge lit up and surprisingly works. Unfortunately the aftermarket starter is bad, so I have a used OEM on order that I'll rebuild with a kit from OSD marine. I pulled the head and the cylinders look great, so we'll see what it does once the starter comes in. As previously mentioned, it still has the old gray fuel lines so I'll replace those and rebuild the carbs with back to stock kits from OSD Marine. The MPEM is also original, so I plan to send that off to Westside Powersports and have a couple keys programmed to it.

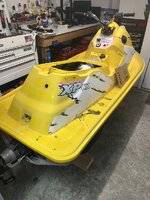
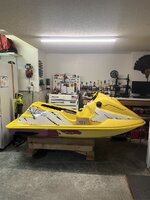
Since I'm waiting on parts, I decided to pull the old traction mats, rub rails and get started removing the old graphics. It's so sun fried that the graphics flake off in tiny chips even with a heat gun. I had a 3M eraser wheel laying around that takes them off just fine, it's just a slow process. I also used the Soft Scrub with bleach trick on the hood and it honestly turned out fantastic.

72A36CD0-3734-47D9-919C-451A4546A5D4_1_105_c.jpeg

7C45516A-C936-4B05-9CA9-AEB9508A2811_1_105_c.jpeg

33A157A0-8716-474E-B991-7DEFFC89DA1E_1_105_c.jpeg

D76F5B24-87CC-4983-BF3D-E7B3334F9C2F_1_105_c.jpeg

My biggest concerns now are what to do with the gash above the rub rail, and the seat. I'm pretty handy but have never done any fiberglass or gelcoat repair. I'll grab a close up of the damage next time I get a chance and see if anyone has any input. Since OEM seat foam and covers are so hard to find, I may take the seat to an upholsterer and see if they can't shape new foam to match the OEM look as closely as possible, unless anyone has a better idea. Last concern is the bilge pump hole. Anyone have any thoughts on what to do with it? I'm not confident enough with fiberglass to try and patch. I thought about finding some sort of billet block-off, similar to what you can get for the fuel selector hole, but haven't really looked just yet. I also need to see if I can find a yellow bar cover with the styrofoam. It's either that or pick up a reproduction UMI from Westside Powersports...

Fair warning, this one will probably be a pretty slow burn. Between buying a new house and getting married within the last three months, there's a lot of life happening right now.
 
Last edited:
Also, if anyone around the Kansas City area is looking for a couple skis, my 96XP, 96SPX and 96 Shoreland'r trailer are for sale. Both skis have had all of the fuel lines replaced, carbs rebuilt with genuine Mikuni kits from OSD Marine, both jet pumps have been completely serviced, both have Jettrim seat covers and turf, and the SPX has a new gray box and harness with an OEM MPEM. The XP has new graphics from PWC Graphics and Pro Taper bars. Compression is around 145psi on the XP and 140 on the SPX. The trailer is in good shape with new LED lights and carpeted bunks, but is missing the passenger side fender.

F1739E57-02AF-4BC1-9FBC-451041FFE305_1_105_c.jpeg

98D7B3F2-FD44-4234-B092-BF6F263BF642_1_105_c.jpeg

8909DDD7-8B5E-482C-BA70-419F77AFB353_1_105_c.jpeg

41832AE6-2203-4716-BE2A-F5B548DACAFB_1_105_c.jpeg

71C140F1-8562-412F-A881-956CE3EE258B_1_105_c.jpeg

The SPX does have three broken bolts where the pipe meets the manifold. Happened about a month ago and I haven't gotten around to fixing them yet. The hood on the XP is black now since the yellow started to chip and wasn't as close a match as I'd hope. Asking $4k OBO for everything. Clean titles for both skis and the trailer. I just don't need three skis. I'd be willing to work out a deal on a nice single place trailer as well.
 
Last edited:
Not sure if your on a budget or if it would be any cheaper than taking to your upholstery shop but you should be able to glue a piece of foam to the existing foam, you would probably need to cut the old foam down some to get to some good foam to glue to. Electric turkey carving knife works great for cutting foam and rough shaping, 40 grit sandpaper on a disc works great for final shaping of the foam. What seat cover would you be using? I see you have Jet Trim on the 2 you have now, those covers come with a thin layer of foam don’t they? Enough to cover minor imperfections? If not, you may need to glue a thin 1/4” layer of the entire seat before installing the new cover.
 
Not sure if your on a budget or if it would be any cheaper than taking to your upholstery shop but you should be able to glue a piece of foam to the existing foam, you would probably need to cut the old foam down some to get to some good foam to glue to. Electric turkey carving knife works great for cutting foam and rough shaping, 40 grit sandpaper on a disc works great for final shaping of the foam. What seat cover would you be using? I see you have Jet Trim on the 2 you have now, those covers come with a thin layer of foam don’t they? Enough to cover minor imperfections? If not, you may need to glue a thin 1/4” layer of the entire seat before installing the new cover.
I thought about that. I have family in the upholstery business so I figured it might be easiest/cheapest just to take it there and see what they can do. I really like the Jettrim covers, but I'm contemplating just going back with yellow vinyl on this one since I like the stock look. I'm still kind of up in the air on it.
 
I thought about that. I have family in the upholstery business so I figured it might be easiest/cheapest just to take it there and see what they can do. I really like the Jettrim covers, but I'm contemplating just going back with yellow vinyl on this one since I like the stock look. I'm still kind of up in the air on it.
I’ve stretched some flat vinyl over a 95XP seat and I also did my 2002 GTI seat, I had to do some foam repairs on that seat. The GTI seat had an area that was concave so I had to glue the vinyl in that area first before stretching over the rest or else it would have just tented that curve. I’ve never had a hump seat, but would it not tent as well if it were not glued? I know Today we wrench was selling covers that have a pull cord sewed onto the cover, pull the cord through the plastic seat pan and attach it to the pan to keep the concave part of the vinyl in place.
2002 GTI seat skin replacement
I’ve attached the link to the GTI seat skin, you may find something useful in there if you decide to tackle it yourself.
 
Nice find!
Get rid of the R&D rideplate extension, they don't do anything good, keep the trim tabs.
Get a billet bilge pump outlet and just plug it on the inside.

1999 SPX also had the hump seat so maybe that will help with your search...
 
Nice find!
Get rid of the R&D rideplate extension, they don't do anything good, keep the trim tabs.
Get a billet bilge pump outlet and just plug it on the inside.

1999 SPX also had the hump seat so maybe that will help with your search...
Thank you! I’ve heard that about the rideplate extension. I think I’ll go that route for the bilge pump hole. I was bummed to find that but it is what it is.

I knew the 99 seat was the same. Honestly the seat will probably be the last thing I worry about, so I have some time.
 
Pics of damaged fiberglass I mentioned. As you can see, a small portion of the damage extends through the top side of the rub rail and into the hull. Best way to repair?

IMG_2849.jpeg

IMG_2850.jpeg
 
One method is to grind it down till you get into good fiberglass, blow off with compressed air, clean with acetone, layer fiberglass mat soaked in resin starting with the smallest piece you can use, then each piece larger then the last, till it’s flush or just below flush, then apply gel coat, probably 2 or 3 coats of gel coat, sand that flush
 
The bad thing is the gelcoat is cracking around it so there is more structural damage than you can see. It is also an area you can't get inside to fix it from the back.
Matching the gelcoat is going to be difficult also.
 
The bad thing is the gelcoat is cracking around it so there is more structural damage than you can see. It is also an area you can't get inside to fix it from the back.
Matching the gelcoat is going to be difficult also.
I think the picture is a little deceiving. There is definitely some spider cracking but I think the majority of it is residue from an old sticker someone stuck over the top of the hole. I picked around a bit and what’s left of the gel coat is firmly adhered. I know the repair won’t be perfect but anything will look better than the gash that’s there now. I agree that matching the gelcoat is going to be a challenge. At the end of the day I’m just going to make this a reliable ski so it will never be 100% perfect.
 
Should be fine fixing it from the outside, you may want to lay that first piece of fiberglass cloth and let it dry before adding the additional layers, just rough it up first.
 
Problem with layering the cloth is you are going to have to grind out a big area blend and taper it and build it up layer over layer then sand it down lower than the existing gelcoat to build up the gelcoat. You are going to have an area 4-5 times the size of the original hole to do it correctly.
I would go with some marine-tex and gelcoat.
I have done a lot of fiberglass repairs on these from holes to complete rebuilds.
sj1.jpg
sj2.jpg
sj3.jpg
 
The repair will be larger than the size of the present damage, by the time you bring back to good fiberglass and grind it at an angle so you have more room to layer it, it will be twice the size it is now which may not be a bad thing since you do have a lot of stress fractures in the gel coat, what I like about the fiberglass repair in this manner is I feel it restores the rigidity to the hull, but with such small area, I doubt structure would be an issue anyways. If you keep the water out I’m sure the hull would hold up as it is now. It is a fair amount of work though, and it will be impossible to match the gel coat exactly, especially since gel coat international is no longer in business, luckily I still have a can of yellow. Hopefully it’s still good.
 
Thanks guys, I'll give it a shot. I'm going to wait to get too deep in cosmetics until my starter comes in and I can verify compression. Based on what I've seen so far, I don't have any major concerns engine wise, but I do want to hear it run first and foremost. Gotta get through our wedding reception this weekend and hope work slows down a bit; figured this will be my winter project when I'm not working on house projects. I will say I'm extremely excited to have a big heated garage at the new house!
 
I wouldn't use Gelcote or try to match it. Fix the fiberglass and make it even. Fiberglass Bondo for matching and making it slick. Find paint to match and if you don't like it put a STICKER over it. LOL I've never had to use a sticker. :D It's a jet ski.
 
I wouldn't use Gelcote or try to match it. Fix the fiberglass and make it even. Fiberglass Bondo for matching and making it slick. Find paint to match and if you don't like it put a STICKER over it. LOL I've never had to use a sticker. :D It's a jet ski.
My biggest problem is that I’m a perfectionist 😂 I said it would never be perfect a few posts above but I know myself and whenever I get started on the repair, I’ll end up doing whatever is needed to make it look as flawless as possible. I’ll probably end up going the Marine-Tex route and trying to build it up as seamlessly as possible. If all else fails, a few strategically placed stickers will have to do lol
 
My biggest problem is that I’m a perfectionist 😂 I said it would never be perfect a few posts above but I know myself and whenever I get started on the repair, I’ll end up doing whatever is needed to make it look as flawless as possible. I’ll probably end up going the Marine-Tex route and trying to build it up as seamlessly as possible. If all else fails, a few strategically placed stickers will have to do lol

I've made a lot of skis nice only to see people damage them the first few weeks. Jet skis bump into things. :D I am a perfectionist as well... we have to draw a line where we are going to stop. If it looks good from 10' away it's good. :) Just from this ole boy's perspective.
 
Back
Top