• This site contains eBay affiliate links for which Sea-Doo Forum may be compensated.

93 Seadoo XP

Status
Not open for further replies.

spadil5

New Member
Bought a very cheap XP that I want to rebuild. Crankshaft in good shape just needs top end. I have one concern and I'm looking for some advice.

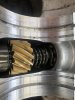
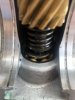
The rotary shaft is in great shape but I found that the shield from the case bearing became dislodged from the bearing and is now spinning freely in in the shaft. Will this cause any issues? Do I just need to suck it up and replace bearing?

Thanks
 

Attachments

  • 6DA56CBB-6E55-4C5E-91DE-211C9E453EE8.jpeg
    6DA56CBB-6E55-4C5E-91DE-211C9E453EE8.jpeg
    283.1 KB · Views: 41
  • CB47ABA5-5E21-4C64-9511-780FD6F4F977.jpeg
    CB47ABA5-5E21-4C64-9511-780FD6F4F977.jpeg
    206.2 KB · Views: 43
It's part of a rebuild anyhow.

Chances are the bearings are going to be okay, but the seal should be changed during a normal rebuild. At this point just do a 100% rebuild on that shaft and get the motor done right. Don't cut any corners ifthe motor is already apart.
 
It's part of a rebuild anyhow.

Chances are the bearings are going to be okay, but the seal should be changed during a normal rebuild. At this point just do a 100% rebuild on that shaft and get the motor done right. Don't cut any corners ifthe motor is already apart.
Sounds good, I appreciate the feedback. First time doing this type of work but I am pretty excited about it. This site has become a great resource
 
There is a puller tool to remove the shaft. The rest is pretty easy. Be very careful to not damage the brass gear.

When you put the case halves together make sure to rotate the rotary valve shaft slightly as you are setting the case halves together. This wil allow the brass gear on the rv shaft to mesh with the steel gear on the crank before the case halves are fully seated together. I have seen cases pushed together with the brass gear being damaged in the process, the gear fails very soon after and you are going back into the motor to fix it.
 
I think in my 98spx resto thread I show the RV shaft puller I made. It's an 1-1/2 PVC cap, drilled a hole in the center and use a long screw and washers and pull it out. It's pretty simple.
 
Thanks Racer, I used the pvc cap and I got it out with no issue. The shaft is straight and no wear on the gear and I was also able to pull out the case bearing without any issue. The only issue I have now is that the bearing I bought to replace has shields on both sides although I thought I was buying single shield. Will there be any issue with using the double shield bearing?
 
First time doing this so I didn’t realize that the bearing needs to be pulled. Looks like a trip to Harbor freight for a separator
 
waiting on the bearing to arrive I decided to open up the carbs. They are in rough shape and before I order the Mikuni rebuild kit is have a question. There is a rusted circle part on this carb as you can see from the pic. Most pictures I’ve seen online are not this bad. Is the carb bad and should I look for replacements or will it not matter?
 

Attachments

  • A95A5941-DC95-498D-8B52-B817D197C33D.jpeg
    A95A5941-DC95-498D-8B52-B817D197C33D.jpeg
    321.4 KB · Views: 18
  • A0E4F733-A769-47E8-9CE3-B26A06A2989A.jpeg
    A0E4F733-A769-47E8-9CE3-B26A06A2989A.jpeg
    380.2 KB · Views: 18
The buildup on the welch plug needs to be removed. Use a dremmel tool and a brass brush wheel. Do a complete take down on the carbs and make sure ALL the passages are cleared. Refer to the carb rebuild thread at the top of the 2 stroke section on doing a proper carb rebuild and check over. You do not need to replace the carb, but be very careful to not grind down through the plug as you are cleaning it.
 
The buildup on the welch plug needs to be removed. Use a dremmel tool and a brass brush wheel. Do a complete take down on the carbs and make sure ALL the passages are cleared. Refer to the carb rebuild thread at the top of the 2 stroke section on doing a proper carb rebuild and check over. You do not need to replace the carb, but be very careful to not grind down through the plug as you are cleaning it.
Greatly appreciate your help, making this process much easier.
 
I always approach the "fix it" way because there simply isn't any supply to fall back on up here.

If you have a source for some good carbs go that route.
 
I’ll keep an eye out for some cheap ones. I’ll probably do a cleaning and see how they turn out, not really in a rush with this project and don’t mind putting in the time as it’s a learning experience for me. Worst case I buy a pair next year when I intend to ride .
 
Status
Not open for further replies.
Back
Top