1998 Challenger slight refresh, at least I hope

Note: This site contains eBay affiliate links for which SeaDooForum.com may be compensated
Status
Not open for further replies.
I have been following all the different repair threads going on and thought it was about time to add mine. I bought this 98 Challenger in October of last year. No water test, it was too cold at that time here in Michigan. Check the compression and everything looked great. Stored the boat for the winter and come spring sold my 96 Speedster and started working on this one. Fixed the fuel baffle with info from here, so far so good. Also properly bolted down the seats that were missing half of their fasteners. Started right up after being stored so it was time to take it out on the water. I decided to take the whole family out, now you can see where this is heading, hoping for the best but in the back of my mind knowing this wasn't a great idea.

We were out on Lake St. Clair the engines started but didn't want to stay running. Also the port side cavitated very badly. I was able to get the engines running ok and by feathering the throttles got up to around 40 everything was going ok. Now we stopped and both engines were having trouble making power plus the cavitation was getting worse so we limped back, about an hour, to the ramp and made it back home. This could have ended much worse.

Got it home and started tearing it to it. First it looks like the RAVE valves were never cleaned. Also it seems the previous owner sucked up a piece of a plastic tarp and that was causing the cavitation. Amazing that we even got up to 40 with all this stuff going on.

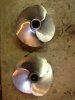
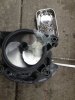
So the RAVE valves are cleaned and the engines sound great, on the trailer. Now I have the pumps all apart. One of the impellers looks ok, the other is chewed up, but should I replace both of them because they are apart? I'm putting new wear rings in both sides and there is a little gel coat work that needs to be done inside the port side intake. Anything else I should repair while it is apart? The carbon seals look good and they didn't leak while out on the water. One side has the driveshaft protector, the other doesn't. Should I leave the one in? I've never had a boat with RAVE valves. Would the loss of power and RPM's be cause by dirty valves?

Even with all these things the boat was fun while we were out on the lake and it can only get better.
 

Attachments

  • impellers.JPG
    impellers.JPG
    278.1 KB · Views: 49
  • rave.JPG
    rave.JPG
    708.3 KB · Views: 53
  • pum.JPG
    pum.JPG
    386 KB · Views: 50
To get ready for my second water test I put new wear rings in and had the beat up impeller reworked by SBT. The refurb impeller looks great and the new wear rings make it a really close fit. The port side pump intake had a bit of damage to the gelcoat. A little epoxy and sanding and the intake is as good as new.
pumps.JPGDamage.JPG
The engines both started right up on the trailer and ran ok. I did find that the fuel filter on the starboard engine was put in backwards. I can't believe the mistakes that I'm finding on this boat.

Time to head out on the water. This time the boat gets up on plane a lot better and makes good power. The carbon seals seem to be leaking a bit more then they should so I guess just pushing up the boot wasn't cutting it. Time to order a internal driveline rebuild kit. Probably should have done this from the start but tried to get by cheap. The starboard engine had trouble making power at WOT. It would surge from 5500 RPM to 7000 RPM. Sounds like a fuel delivery problem.

Back home on the bench I tore down the starboard carbs and both filters were packed full. Looks like I found the fuel delivery problem. Amazing that the engine even ran with how full those filters were. Of course I broke three bolts getting the carbs off of the engine. Seems the last person to work on the boat used red locktite. One problem down another created. I'll tear down the port side carbs next and get those filter cleaned.

The trailer was also a bit of a mess. Two different tail lights and some burned out lights so I replaced them with LED lights and everything looks much better. Trailer jack was a rusty mess so I just put on a new one. I also added electric brakes because I will be towing this behind our minivan and need the extra braking. I towed my 96 Speedster without a problem, but the Challenger full of fuel would have been a bit of a handful. The brakes bolt on and really didn't take that much work.
brakes.JPG
After the carb cleaning and new carbon seals the boat should be good to go. I can then get started on a polish and wax so the boat will look as good as it goes.
 
I'm curious, which bolts did you break? I had three break as well, the ones that hold the box to the top of the carbs. And all 6 air box bolts came out warped.

I hope your carb cleaning fixed your surging issue. They are fun boats for sure, when they are running right.
 
I broke two of the four that hold the box to the carbs and one of the six that was holding the spark arrest to the box. Lucky there was enough sticking out so I just put some heat to it and backed the broken piece out with a pair of pliers. It seemed like there was locktite on them so I retapped all the holes to clean them out and ran the bolts through a die. I'll reassemble with blue locktite and the proper torque.

I'm almost positive that this will fix the surging issue. I should have took a picture, those filters were packed with junk.
 
The port pump must be standard to wipe the gel coat out on, I just did a Challenger repower for a buddy and his was the same way. I also upgraded his carbon seals to the heavy duty units from osdparts.com. Super nice pieces for sure! I've been talking aobut putting disc brakes on my Speedster trailer for years, one of these days.....Best of luck with the refresh and looking good so far.

Did you put a new neoprene seal on the pump mounting plate?

http://www.seadooforum.com/showthread.php?61486-Big-thanks!&p=327354&viewfull=1#post327354
 
Yes, the new wear rings came with a neoprene seal, but there wasn't one on there when I took the pump off. No black sealant either.

Here is a nice picture of my son on the boat on the second water test. He enjoyed floating in the lake for a bit after beating him up on the waves.

On the water.JPG

Of course I made him pay for the trip. I needed his help in getting the rave spring that I dropped in the engine compartment. No way could I fit in there the way he did.

A little help.JPG

And he didn't find the spring. I had to order a new one.

The carb cleaning on the starboard side engine is complete and I mounted it up and it fired right up. The idle now on the trailer is 3K RPM exactly what the manual says it should be. I'm going to clean the filters on the port side carb tomorrow and that should finish off the engine work.

The driveline pieces came in the mail so they will go on next. Once the carbon seals are replaced I think the boat should be good to go. All that should be left is cosmetic stuff.

Speaking of that. While I was under the boat wiring up the brakes I notice that the boat must have been beached quite a bit. There are more scrapes and dings on the bottom then I remember. I'll have to look into fixing all those, but I think that will be left for the end of the season. I want to enjoy the boat for awhile.

Should be back on the water Thursday as long as the rain holds off.
 
Yep, you should take a look at stainless under a microscope and you'll see why it galls so easily to softer metals. It happens so easily, one could argue thread locker is unnecessary. I've run into this before plenty of times, silver plated stainless hardware is a great way alleviate this problem. I use anti-seize compound while keeping in mind it's not a thread locker.
 
The port side engine came apart pretty easy. Somebody has obliviously been in this engine before. There was a broken bolt on the spark arrest box that looks like I will have to drill out. Now the interesting thing is once I took the carbs apart and pulled the filters.

filters.JPG

Sorry the picture is a little fuzzy, but you should get the idea. The top filter is the mag filter and it has just a little bit of junk in it. The pto filter is on the bottom and it is packed. Now why would someone go to all the trouble of taking off the carbs and then only clean one of the filters?

Time to clean everything and put it back together. Should purr like a kitten now.
 
I rather doubt either carb has been cleaned out lately, maybe never. A majority of the trash that goes through the fuel pump always seems to end up in the PTO carb for some reason, at least that's what I found in my 951cc carbs as well. Not sure if yours are configured similarly but I'm thinking the path of the fuel exiting the fuel pump is such that the trash tends to flow into the PTO carb or it could just be that fuel line sees more latent heat and rate of internal decay is greater. Carb cleaner will destroy the mesh in those tiny filters, I hear brake cleaner doesn't though. I put new ones in mine but it seemed just blowing them out backwards with air did a fair job of removing the gunk. Inspect closely unless replacing those filters, I prefer new ones, they're in the kit.

You might still experience a lean bog if there's still gum or even light oxidation in the venturies though. I would suggest getting liberal with the carb cleaner through the brass jets under the metering plate, to dissolve the gum that made it past the filter and got stuck in the venturis. The fuel path through the pilot jet "bypass holes" (I call these transition ports) is critical up to about +70% throttle and may as well hit the larger high speed venturi and jet good as well. I guess you did this already.

I actually had to increase my pilot jet size in order to eliminate my lean bog, I went up two sizes from factory but one size may have been enough. I'll probably go back one size to see, always go fat then come back, two-strokes are lein-seize prone and I question the EPA-mandated calibrations, especially in the case of a carb that's been in service for a while and probably has some oxidation in the "bypass holes". Mixture has to be right though, else there'll be power left on the table, just don't try running it too lean b/c fuel cools the piston crowns and it's critical to have enough to do the job if you want to avoid partial seizures. I cringe when I read someone describe a dead-spot and how it takes off if they open up the throttle, that's running in the damage zone and the lean seizure can occur as they begin backing off the throttle and it goes back to lean.

But try the original factory calibration first and see though, just avoid running it if it lean-bogs, that's a recipe for partial seizure damage. Make sure your fuel lines are air-tight too, pressure check then with a few psi, any small inward air leaks will cause the same lean-bog phenomenon as well.

I'll add, it's my opinion a carb hasn't been properly rebuilt unless the metering valve needle/seat have been replaced and pop-off is tested, a sticking/torn or grooved metering needle can make the idle mixture erratic, too lean one minute and/or flooding the next.

Good luck, double check everything.
 
All the carbs are back together and the boat runs great, on the trailer. I didn't rebuild the carbs just cleaned them. It could be a winter project to rebuild them, but I want to get on the water soon. I also pulled the carbon rings off.
carbon ring.jpg
The left side is the port side and looks beat up. The port side pump on my boat must have had a hard life. I put all new parts in the driveline, pto boot, collar/carbon ring, accordion boat, clamps and even driveshaft bumpers. This along with new wear rings and a new impeller should take care of any cavitation. After this I think the boat is done.

I hope to get out on the water on Monday to make sure everything is good and figure out some fuel economy. The plan is to take it out on Lake Michigan and check out Sleeping Bear dunes while we are up north renting a cottage later this month. Need to make sure we have plenty of fuel to make it out and back.

Total so far:
Boat $4250
Impeller (refurb) and wear rings $150
Driveline rebuild kits $150
Gaskets (RAVE & Carb) $40
Fluid and lubes/assorted fasteners $40

Trailer
Brakes - $180
Wiring for 7 Pin $50
Jack Stand $22
LED Lights - $45

I also had to buy a brake controller and wire the van, but I don't think that is fair to roll into my costs for the boat. If the total doesn't grow much more I'm in pretty good shape.
 
Your engines are out of alignment too. The carbon set up on the right in the pic, I can see where the driveshaft is rubbing the carbon ring at lower right side about 5 o'clock. And I can see the offset lip about 6 o'clock on the left carbon ring. Whats funny is(not really), the 99 Challenger I just did a repower on had the exact same mis-alignment, but the sides were flip flopped from yours. If you look inside the carbon rings where the driveshaft goes through you will see how super smooth it is, then you will see a mark where the driveshaft is rubbing--at least it looks that way from your pic. I had to do some serious alignment to those engines. The one was on height wise in the rear but the front was low and I had to loosen the motor mounts in the rear where they attach to the hull and slide it to the center of the boat. The other side I had to shim the rear up a good 1/8" and center it to the pump a bit. I swear Ray Charles put these engines in at the factory.

Keep up the good work!


attachment.php
 
Wow, great call. I just pulled the carbon seals out of the boots and yes both of them have wear marks where the driveshaft was rubbing. Now I'm almost positive that these are the original engines and they haven't been pulled out. Must have came that way from the factory. Looks like I'll need an alignment tool and some shims. Thanks for catching that from the picture.
 
See if you can rent/borrow an alignment tool locally first, just to check them. Hate to see you buy one. Start spraying the motor mount bolts now with penetrant, I was so friggin' scared I was gonna snap one in the hull. I loosened them just enough to get some movement.


If you look close you can see the lip around the edge, about 1/16" to the right in the first pic. Now for the inside, you can see the little lines against the smooth surface, there is .040" worn from the inside compared to the opposite side. Nor run that out over 19" of driveshaft, that's a decent amount of mis-alignment. Some one rotated the other side, there are 3 indents where the shaft wore the carbon down, LOL.


Now for the inside!


Nice pictures. Both of my carbon rings look just like that. I wish I would have noticed it earlier so I would have an idea of which way it was out of alignment. I'll see if I can find the alignment tool locally, but I found that I could rent it from SBT for $75 so that isn't too bad. How many shims did you use on your engine? I've got to decide if I want to order one or two shim packs to do my boat. Leave for vacation in two weeks so I'll need to wrap this up. The goal is not to have to work on the boat on vacation. My old speedster never seem to live up to that part of the deal. Thanks again for the help.
 
You can get away with one pack. There are both thick and thin shims in there so lay them out first. You don't want to use a stack of thins to make one thick ;)

Pop the stainless ring forward and see if you can get a look see, perhaps use your better eyes on your cell phone if it has a camera.

Don't forget that $75 didn't include shipping. At that price I would buy one, then sell it locally for $100. Who am I kidding, I'd keep it.

Sent from my SGH-T989 using Tapatalk 2
 
Last edited by a moderator:
Latest update. I'm up in northern Michigan over by the Sleeping Bear Dunes. Towed the boat 250 miles up here. The brakes on the trailer worked great. I'm towing with a Toyota mini van. My Speedster would push on the van when you tried to stop. With the brakes on the Challenger you don't notice it is there when you brake. Felt very solid and safe. For the price I should have done this to my Speedster.

Boat is running great. The starboard side engine is hard to start when cold. Both engines start on one push when warm. I'm thinking that the carbs will need to be rebuilt over the winter. I put new plugs in it and it seemed to help a bit. The starboard side also makes about 6800 rpm based on the tach. The port side is 7000. No cavitation problems, which is good since I replaced just about everything from the PTO back. Boat is doing 45 mph on my iphone gps.

This is a great forum. With a little searching and a little help I have a pretty nice running boat for not too much money. Of course I think my savings are going into the gas fund. We tend to run around the lake at full throttle.
 
Never seen electric brakes on a boat trailer, just the hydraulic surge brakes. Let us know how they hold up after a season of dips in the water.
 
I broke two of the four that hold the box to the carbs and one of the six that was holding the spark arrest to the box. Lucky there was enough sticking out so I just put some heat to it and backed the broken piece out with a pair of pliers. It seemed like there was locktite on them so I retapped all the holes to clean them out and ran the bolts through a die. I'll reassemble with blue locktite and the proper torque.

I'm almost positive that this will fix the surging issue. I should have took a picture, those filters were packed with junk.

I heard war stories about Seadoo and their extra strength thread locker.
 
Last edited by a moderator:
Been working on the cosmetic side of the boat now that it is running well. Put in hydro turf, new stereo, painted the windscreens and got rid of the ratty cup holders for some nice stainless steel models. Still a few things left to do. The rubber trim around the windscreen is missing on the port side. Any idea where to get that trim? Also the captains chairs could stand to be recovered but they appear to be molded right to the cushion. Anyone recover these? Before I get too much grief for the color of the turf I let my wife pick the color. I'm partially color blind so anything I picked would have been worse. At least that is what she tells me.
photo 1.JPGphoto 2.JPGphoto 3.JPGphoto 4.JPGphoto 5.JPG
 
Status
Not open for further replies.
Back
Top