1992 seadoo xp seal carrier bearing

Note: This site contains eBay affiliate links for which SeaDooForum.com may be compensated
Status
Not open for further replies.

Seadooguy1991

New Member
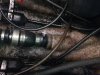
Hey there I've got a 1992 seadoo xp motor runs great I've noticed my seal carrier bearing slides up and down and has play when turning it first I noticed the noise when I start the machine up.
This is my first seadoo so forgive me if I'm wrong but should it not be able to move freely up and down on the shaft?? My next question is that the rubber boot doesnt seem to be connected to the hull should it be? The clamp closest to the hull doesnt seem to be clamped to anything to hold it there. Does it get clamped to a hull insert of some kind? Just got this seadoo would love any feedback thanks guys
 

Attachments

  • 20190522_130215.jpg
    20190522_130215.jpg
    3.9 MB · Views: 35
Yes you are correct, that hose clamp in back needs to be loosened, shove the hose back onto the round fitting in the hull and tighten things back down.

IF things still don't seem right or water gets into the hull then there is the chance the round sleeve the hose clamps to has cracked or the bearing/seal assembly is worn and needs to replaced or rebuilt.

If I remember right there is a kit to fix the round tube if it is cracked.
 
That round fitting I'm assuming is the hull insert that rubber boot gets clamped too? In the pic where the hose needs to be loosened and shoved back that fitting has broken into 3 pieces it was cracked and isn't there now. Do I just get a new hull insert? Or is there another way
 
I did the insert fix one time. It is a factory milled piece, you cut the broken piece off flush with the hull fiberglass and epoxy the unit in place from the inside.

Don't do anything yet, to the machine.

Research to see if you can find the part.

I'll look around as well.
 
It's been 25 years since I did the work, but the part looked like this.

It was a metal insert that slid into the existing hole and provided a surface for the rubber tube to clamp to. The knurled end got smeared with a high strength epoxy and you just stuck it into the original hole and let things set up overnight. The tollerances are pretty snug so you want to work things around to make sure the epoxy bonds as much surface area as possible. Make sure the hull surface is grease and crud free, maybe ever rough it up a little with some sand paper. Screenshot_20190524-214606_Samsung Internet.jpg

Remember, you pretty much have one shot at this. Take your time because you can't pull it back out and redo once the epoxy sets.
 
Jet Ski Plus

I don't know the company, but I would give them a call and confirm that "yes, this is a repair kit for a broken thru hull fitting".
 

Attachments

  • Screenshot_20190524-215804_Samsung Internet.jpg
    Screenshot_20190524-215804_Samsung Internet.jpg
    574.7 KB · Views: 15
  • Screenshot_20190524-215748_Samsung Internet.jpg
    Screenshot_20190524-215748_Samsung Internet.jpg
    361.7 KB · Views: 19
Ah okay I understand should I epoxy the boot to the insert then clamp it? I'll order the parts tomorrow but why was mine plastic in the first place by the way thanks for your help I appreciate it alot I'd really like to get out and riding this thing if it ever stops raining here
 
Do not epoxy the rubber tube to the metal insert.

The rubber tube is held on to the insert with the hose clamp. The rubber tube, the hose clamp and the bearing assembly attached to the other end of the rubber tube are designed to be removed from the machine easily so they can be fixed if needed. The hose clamp presses the tube to the fitting with enough force to make a water tight seal as well as to keep the tube from spining with the drive shaft.

The ONLY PART you epoxy to the machine is the knurled end of the metal insert.
 
Okay thanks so much I really appreciate it! Just to clarify the knurled end is where that little dip is in the metal insert? Mine was plastic and I can get this bearing seal insert out thru the back I've heard right? And just to clarify again it should not be moving up and down the shaft like mine was and what effect would it have on the machine
 
You have to pull the pump and driveshaft to do the repair.

The way yours is it will flood the ski with water as soon as you launch the ski. It has to be fixed.


This is what needs to be done. The video doesn't have any talking but clearly shows the process.

A bearing does not have teeth that grab the shaft. The bearing does the exact opposite and provides a rolling surface that contacts the shaft with minimal resistance.

The purpose of the bearing in this situation is to support the seal assembly centered on the shaft so the seals contact the shaft with equal force all around. If a bearing was not used in this situation then any missalingment of the seal assembly on the shaft would wear the seal in one area and not contact it in others. This would cause the seal to fail rapidly and allow water to enter the hull and sink the machine.
 
Just make sure you cut the damaged area off as flush as possible, clean that hull inside the tube so the epoxy gets a solid bond to the hull.

As stated before, you need to pull the pump and drive shaft out to do this job.

10mm to unhook the steering.

13mm to remove the 4 bolts hoding the venturi/nozzle on. When you pull the venturi cone off be watching for the 2 small O-rings between it and the pump body, they must be reinstalled.

17mm for the four main bolts holding the pump on.

Inside the machine use a 1/4 nut drive or socket to loosen the hose clamp holding the large black hose to the fitting right above the thru hull fitting, that is your main coolant inlet line. There are two small (3/8 ID) clear lines going to two fittings right next to the main coolant line, unhook those.

Now you can pull the pump out, pull the driveline out and do your work.

There might still be a clamp holding the driveline into the rubber boot on the pto flywheel, all I can say is it takes a special tool to remove it properly. A little ingenuity will get it off of there and a lot of people never put it back on, it just allows for a grease slinging mess in the hull if you over grease the pto.

The pump might be sealed to the hull with some silicone, slowly pry at it until it wiggles free. If it was sealed woth silicone then look to get a neoprene ring to seal it to the hull or use a very light bead of marine silicone on the wear ring face to seal things back together.

Good luck.
 
Wow did you ever explain that well thank you very much it has made the job much easier to do I really appreciate your time in getting back to me with lots of detail
 
While the pump is out look at the cone at the rear and remove the allen pipe plug to check the oil level. With the pump sitting on the bench, level as it would be mounted on the machine, the oil level should be up to the bottom of the filler hole. The oil should not be milky, if so it needs to be flushed out and replaced.
 
Everything came out fine driveshaft looks good and straight just waiting on the parts hopefully they come in this week gona change the pump fluid while it's out as I have no idea when it was done last
 
If the oil is not milky from water getting in then don't mess with it, unless you really want to swap it. Just make sure the level is good.

Take the time to clean out the bearing in the shaft bearing/seal assembly. Flush it with brake clean, roll things around with your finger, flush it again, repeat until it's clean. Get the old grease out, put a good layer of fresh grease on the bearing before you put the shaft back through. Give it a couple of shots of grease after things are all back together and run it. Use a good marine grease.
 
Status
Not open for further replies.
Back
Top