On 2nd Build -- The incredible Missing Screw

Note: This site contains eBay affiliate links for which SeaDooForum.com may be compensated

pantaloonz

Member
Good day all, hope everyone is well, been a while since I posted.

I'm on my 2nd Rebuild, -- got an engine winch, corrected a couple of minor issues with first build -- Running Great! (better than I expected even)


So I'm on my 2nd build, this time I labeled each hose and connection for really easy reinstall! - Thank you Dymo!
(plus I HAD to clean the hull it was nasty)

2001 Seadoo RXDI 951

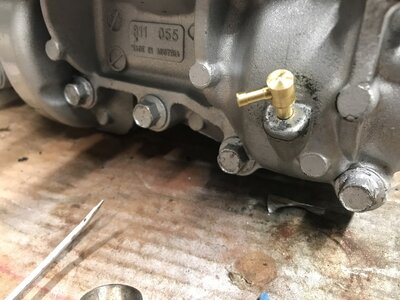
Anyway somewhere along the pull out, and teardown, including pulling but not yet tearing down the jetpump i've unearthed a TINY HEX SCREW - 4MM I think.
I have a vague memory of removing it from an inner wall Hull attachment, but for the LIFE of me I can't pinpoint this sucker.

the screw is 25 mm long, with threads only on the last 5mm, it's a number 4 Hex with a washer.

DOES ANYONE KNOW WHERE THIS GOES?? I've looked at my parts catalog.. can't find it.

I just replaced the crankshaft and counterbalance, sealed the case, installed the bendix and the cap, the flywheel and starter. and put on the flywheel cover. To my knowledge none of that process had a place for a screw like that. I'm moving on the top end next but I can't get this out of my head!

Happy Cruising out there Everyone and Thanks for reading!
-pantz
 
Just hang on to it. It's not engine or powertrain hardware.
Did you do the fuel system?? Injectors serviced, fuel fliters replaced, etc...

Good luck with the hoses. :D
 
Hello there and thanks for the Response!

I have one minor correction it's a number 3 allen that fits this screw.

looking the case over again last night, there is a definitive washer mark on the outer most tab of the flywheel cover, and the threads match the hole: that is I need to turn the screw to get in or out of the hole, but again I can't remember for the life of me what was sitting here.. I think it might have been some sort of cable management down/around the air box?

1694002594583.png
(that not my engine, but it looks almost exaclty like that)

I did pull the injectors all the way out, I like to inspect and clean the bolts, and check out the fuel ports and check for wear etc. So the injection rail is out but I wouldn't say I'm "servicing" it.

In regards to hoses, are you referencing everyone's favorite tempo lines? (I guess I should do that if in fact those are present)

As mentioned above, I labeled each and every hose with a dymo label maker, I went as far as to reference what step they were in the SBT engine removal guide along with my own descrption. I used a lot of stickers on it but it will be worth it.

I just came into a 3rd RXDI that scheduled for rebuild after this WOOOYAH!

-pantz
 
Thats not the screw description I had in my mind. LOL I'm thinking that is a 6mm. That attachment point is for a ground wire. That ground wire will likely be in the harness with the Mag plug. It will be easy to see.

NOTE... be very very careful with that bottom hose coming off the mag cooler. If too much weight is applied to that hose it will break off the plastic fitting. So be very very careful around the rave solenoid when installing the engine they are very fragile. Good Luck !
 
In regard to hoses I'm references all the hoses that need to be connected on the DI. A few of them look exactly alike and given their length could connect to more than one place. Some hoses need to be connected before you lower the engine into place. Make sure the vent line under the compressor is clear as well. Good Luck !!
 
Spoken like someone with very real experience, I concur on all points. And thank you for your input

I know the ground you are referring to, I will check that out tonight.

That bottom hose I know too well, I've broken both in the skis I've pulled. I don't know why that cooler cover is not metal like the rest of the bottem end? -- I typically put that on very last before the engine goes back in. Yes those plastic bibs break VERY easily.

And yes, hoses, hoses everywhere on a DI, and yup hoses with enough play to reach multiple positions.
not sure how well it will come out but here's a pic showing some of my labeling madness: (starboard side anyway)
1694013319538.png

I found that the SBT guide to removal and insertion is really quite good. I just got a portable engine winch now which makes the removal and insertion FAR easier. I can lower the engine, shift pieces, adjust hose positions, make sure braces are positioned right etc, a real game changer. Especially that bugger of a fitting under the air piston head, that is a freakin nightmare.

Since I only have DI's now I can as a last resort trace cabling if I lose a label, though navigating a fully loaded engine hull is a bugger :)

I'll be redoing the tiny hoses from the oil pump to case the next couple days while I wait for the top end to be delivered. -- Cleaned up the raves last night, they were bad..


-pantz
 
If you have a hand-held air pump. Test the check valves going into the cylinders and air compressor. I've found those to be problems in the past. They are $30 each but worth the cost of an engine. I've been able to get them clear and working properly and only had to replace a couple. I keep them on hand cuz I don't like stopping once I get started. LOL.

I had to machine this dang drain fitting at the bottom of the air compressor. Oh what was fun. LOL Be careful with it cuz you can't find them.

951 DI Compressor Drain Fitting - Made it (6).JPG

I don't know where you are getting your hoses for the oil lines but be careful. I checked all my hose material to verify and even today I cut a piece and put it in laquer thinner before installing it. I had an oil line to the compressor disintergrate and destroy the compressor on a new engine. What a pain that was to do with the engine in the ski. :) Thankfully the other lines tested good. Those vendors will sell you anything.
 
My lable method is masking tape and permanent marker. I like to leave them hang in the bilge so they get full of oil, fall off, or you can only read a couple of letters if any at all. Much more interesting. :D :D When I figure out where they go I remove what is left of the tag and wipe the hose down to eliminate traces of the tag and residue. That way people think I know what I'm doing and I like neat and pretty. Ha ha.

For my last engine trick... since I remove the rave solenoid... I installed it backwards. That was an interesting journey trying to figure out what was going on. LOL Which brings me to question your Rave solenoid. I'm used to seeing the green ones.

Do you have fittings to test fuel pump and air compressor at the rail?? I love those things. Very handy. Good Luck!!

I finsihed this one a month ago. Notice the green rave solenoid? They ain't cheap. :D Don't go by the picture for installation... I think it's backwards. LOL

DI engine Start Up 6-18-23 (2).JPG
 
Yo again,

answering your last two sections of questions in this post..

You machine your own fitting? That's beastly, and quite impressive. I'm not sure I'd have the patience even if I had the shop.
-I only visually checked the fittings, I do take very fine wire and do what I can to ensure holes are clogged, but that's just laymen effort.
I don't have the tools/fitting to check pressure at the rail, if you have more info on that I'd be interested.

I don't recall now where I bought my tubes, but they were made for that application and have been doing amazing in my first rebuild. I like the tranparency cause I want to see nice RED tubes

The rave solenoid in all my skis is black, just like the one I have in my picutre. I checked another image of have of ski1 it is also black.

I do also bathe my lower cases in a diesel bath.. that tend to clear gunk out of passageways quite nicely :)

-pantz
 
Back
Top