• This site contains eBay affiliate links for which Sea-Doo Forum may be compensated.

exhaust outlet repair

Status
Not open for further replies.

onlyadoo

New Member
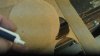
So I picked up this ski locally had couple problems, one of which I'm unsure how to repair. The p.o. sucked sand into the exhaust water jacket and melted the exhaust outlet. Now in repairing they made there own piece and plugged the drain line for the cylinders. Okay so I just replace it back to original, right? Wrong! So after carefully, and I mean with a cutting wheel cutting the outer flange I discovered someone enlarged the hole in the hull an entire inch. So with their repair destroyed but removed without damaging anything, I'm left with too large of a hole. Now what?:facepalm: Anyone have any Ideas?WIN_20160220_15_03_02_Pro.jpg
 
Any chance you can post some pics? The cooling lines need to be like they originally were, so make them that way, you can't just plug them like they did. Let's see what you got.
 
You can use fiber glass resin and mat to repair it. The exhaust is now out the back of the Ski? You have to do it in 2 steps. Start at the Bottom half. Use 3 inch masking tape to make an area to repair. Use tape to make dams to hold resin and cloth from leaking out. You arch the tape on bottom half to keep resin leaks in place. Mix resin and cut the mat ready to go. Soak mat in resin and place / stuff around bottom of hole. Let it to set. Take tape off, then tape off top part. Then repeat the steps, fill hole with resin and cloth. Wear 2 pairs of nitral gloves. Resin is very sticky. You can strip one pair off if you can't control the sticky gloves doing the repair. Takes 20 to 30 min for resin to react / set.
 
You can use fiber glass resin and mat to repair it. The exhaust is now out the back of the Ski? You have to do it in 2 steps. Start at the Bottom half. Use 3 inch masking tape to make an area to repair. Use tape to make dams to hold resin and cloth from leaking out. You arch the tape on bottom half to keep resin leaks in place. Mix resin and cut the mat ready to go. Soak mat in resin and place / stuff around bottom of hole. Let it to set. Take tape off, then tape off top part. Then repeat the steps, fill hole with resin and cloth. Wear 2 pairs of nitral gloves. Resin is very sticky. You can strip one pair off if you can't control the sticky gloves doing the repair. Takes 20 to 30 min for resin to react / set.

Would that be strong enough to not break or fall out?
 
Well got the crank replaced, engine painted and noticed this(last pic). Now I inspected this, couldn't see it until I put the paint on. Anyone have any Tylenol lol:facepalm:WIN_20160308_11_45_55_Pro.jpgWIN_20160308_11_45_41_Pro.jpgWIN_20160308_11_45_41_Pro.jpgWIN_20160308_11_44_50_Pro.jpg
 
It looks like an SBT engine? I would give them a call. It either left their factory that way or was damaged in shipping.
 
i just picked up a extra engine and it had a bad jug just like yours. I think Nick would be the best. just get a good used one...but if it can be welded let me know how it goes...
 
if the area is degreased fiberglass resin and cloth / mat will no doubt be a permanent repair. Your talking about an opening that is too large for the pipe exiting right? Needs to be reduced down in size to the pipe? I can explain more if need be. I have used fiber glass resin and mat / cloth for like 20 years.
 
Anyone know if this could be welded? View attachment 34303

That looks like a typical water-freezing crack. That is indicative of a clogged outlet hose. Check the line that connects the T-barb from the rear of the motor to the exhaust outlet. They can buildup sand and crap, and prevent the cases from draining properly (happened to me). Yes, you can weld it, but I would try JB weld first. clean it down to aluminum, rough it up with 60 grit for a good mechanical bond, and goop it up. Should hold forever, and not leak. If you do get a little leak, your siphons would take care of it and you'd never even know. I've heard of these (and other motors) going a long time with JB weld repair. You'll never run out of lake water to cool it, and your carbon seal leaks a little by design anyway. A bit of water in the hull is nothing to worry about. This is not the end of the world :thumbsup:

As to your question: yes it can be welded. That is probably the best solution (other than buying a new jug). It's up to you really.

Took it to a machine shop, he said around $35-$50. Works for me. The exhaust outlet was rigged and that drain line was plugged. The head pipes water jacket had some sand caked in it.
 
So I've repaired the cylinder WIN_20160330_20_01_44_Pro.jpg used a grindstone to clean it upWIN_20160708_01_54_39_Pro.jpg I repaired the exhaust outlet problems back to original WIN_20160313_23_12_59_Pro.jpgWIN_20160313_23_22_21_Pro.jpgWIN_20160313_23_34_20_Pro.jpgWIN_20160323_13_23_03_Pro.jpgWIN_20160327_18_55_53_Pro.jpgWIN_20160327_21_58_42_Pro.jpg engine rebuilt WIN_20160330_20_02_16_Pro.jpg and installed WIN_20160327_20_43_04_Pro.jpg so upon filling her up with oil I found out that the oil tank leaked, had to replace. And I am now back to the original problem(s).
 

Attachments

  • WIN_20160313_23_13_05_Pro.jpg
    WIN_20160313_23_13_05_Pro.jpg
    361 KB · Views: 14
Last edited by a moderator:
Status
Not open for further replies.
Back
Top