• This site contains eBay affiliate links for which Sea-Doo Forum may be compensated.

96 XP restoration

Status
Not open for further replies.

esahlin

Member
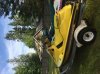
Picked up this 96 XP in a package deal with a 96 GTX and a double trailer a couple of months ago for 1K. This 96 XP had been hammered on. There was a crack in the rear of the XP behind the grab bar (it has a pink one I assume the black one was damaged) like the PO backed into something with the ski on a trailer and smashed the grab bar and cracked the glass. When I purchased it, it had been sitting for 4 years outside.

The engine turned over but made alot of noise. I pulled the motor and even-though it had been previously rebuilt..... I think the PO let it sit with water in it as the crank bearings were rusted and the magneto flywheel area was full of rust.

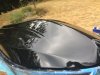
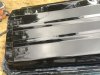
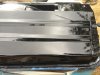
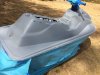
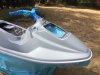
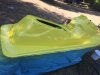
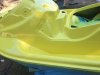
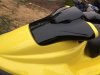
While I am waiting on the cylinders to be re-bored I decided to do a repaint of the ski. I sanded the hull, filled some large scratches and primed and painted it single stage black with 3 costs of clear. So far I think I am going to paint the body yellow, hood black and handlebar cover black. Ill update with pics.
 

Attachments

  • IMG_0652.jpg
    IMG_0652.jpg
    1 MB · Views: 68
  • IMG_0373.jpg
    IMG_0373.jpg
    117.5 KB · Views: 69
  • IMG_0374.jpg
    IMG_0374.jpg
    90.3 KB · Views: 61
  • IMG_0377.jpg
    IMG_0377.jpg
    103.9 KB · Views: 62
  • IMG_0376.jpg
    IMG_0376.jpg
    110.5 KB · Views: 61
That is a good looking bottom paint job. I'm always happy to see another one get saved.

If you ever need any aftermarket parts for that I'm your guy. Billet goodies, grates, trim tabs, pipes. carbs, rev limiters, fancy pumps, etc.
 
Thanks Matt. Once I get this thing back on the water I will probably look into some nice upgrades. These are my first ever jet skis and I am excited to see what the light and quick XP is like on the lake. I got the GTX running and on the lake about a month and half ago...... its been a lot of family fun. I have a teenager and I'm trying to use this XP to get him interested in the rebuild and restoration process.
 
Matt good to see your son working on a ski...I have yet to get my son that far along. I'm trying to pull him away from those darn video games as much as possible this summer.

When I disassembled the engine, one set of the crank bearings had visible rust on the ball bearings and turned with abnormally high resistance.....so I bought a new fully assembled WSM crank.

Racerxx....As far as the paint on the hull....I sanded the gel coat and sprayed 2 coats of epoxy primer, filled gouges with bondo on top of the dried epoxy primer. Wet sanded with 320 -400 and then sprayed 2 coats of 2K urethane primer. Wet sanded the 2K to final 600 grit. Then sprayed 3 coats of single stage urethane black and sanded it with 600 grit wet to remove dust and any orange peel. Then I sprayed 3 coats of polyurethane clear and wet sanded with 600 up to 2500 grit. Then buffed and polished.

Black is a real pain to get really nice and if you get within a foot close to it in the direct sunlight you'll see a multitude of sins. My job is far from perfect but it turned out good and I tried not to spend too much time and kept telling myself its just a boat hull...lol.
 
Glad you like the threads. I made those to document my work and to help other guys down the road.


What brand supplies did you use? Yes, black shows all flaws
 
For the paint....the black single stage I didn't need a lot so I bought it from Summit Racing its their brand (Not sure who makes the Summit brand paint). It sprayed pretty well and I didn't have any problems with it. I also bought the small amount of epoxy primer from Summit Racing. The Polyurethane clear coat I had left over from when I painted my car....its made by Southern Polyurethanes a small company in Georgia I believe. Its a really very nice clear coat and came highly recommended by some small higher end auto restorers.....reasonably priced and was super easy to spray and a beautiful clear shine.
 
More priming and painting. I have another couple coats of clear to go.

Not sure if I am in love with this yellow (Performance Yellow from Summit Racing) its a little light....but its not bad. The other yellow available at Summit Racing looked too much like a "School Bus" dark yellow so I went with this one. I didnt want to spend to much time buying samples from different places to find my favorite yellow or try and get an exact SeaDoo yellow match based on the PPG paint code so thats why I chose the Performance yellow.
 

Attachments

  • IMG_0385.jpg
    IMG_0385.jpg
    141.9 KB · Views: 40
  • IMG_0386.jpg
    IMG_0386.jpg
    147.6 KB · Views: 43
  • IMG_0387.jpg
    IMG_0387.jpg
    129.9 KB · Views: 49
  • IMG_0388.jpg
    IMG_0388.jpg
    140.6 KB · Views: 50
Last edited by a moderator:
One thing I can say about that "Performance Yellow" color is that the bugs and bees sure love landing on it....they just cant stay away from it. Still deciding on some decals....wont be stock might do something custom not sure. Going to pull it in the garage now and start assembling the engine.
 

Attachments

  • 96xpone.jpg
    96xpone.jpg
    144.3 KB · Views: 30
  • 96xptwo.jpg
    96xptwo.jpg
    144.9 KB · Views: 28
  • 96xpthree.jpg
    96xpthree.jpg
    121.2 KB · Views: 28
  • 96xpfour.jpg
    96xpfour.jpg
    129.9 KB · Views: 25
  • 96xpfive.jpg
    96xpfive.jpg
    148.8 KB · Views: 28
Thanks Racerxx....The yellow and black is a nice combination on these skis.

I had a dilemma with the rub rails on this ski. They were really faded and beat up. So I decided to paint them. I sanded them with 320 wet to get the plastic as smooth as possible then cleaned them and sprayed them with some adhesion promoter. Then a couple of coats of reduced epoxy primer .....I reduced it a bit so that I could spray it as slick as possible. I thought this would help maximize the adhesion of the single stage to the plastic rub rail. Then I followed up with 3 coats of single stage urethane black. I didnt wet sand the single stage after cure but the rub rails turned out decent and I left them inside for a week before installation. While inside they hardened and shrank like 1 inch in length.

I had to do a partial install of the rails and after one afternoon in the hot sun they became quite flexible and I was able to stretch them and easily line up the rivet holes and install. So far so good as I haven't noticed any paint cracks in the rub rails. Its early so we will see in time how the paint holds up.
 
Status
Not open for further replies.
Back
Top