94 seadoo cosmetics rebuild/refinish

Note: This site contains eBay affiliate links for which SeaDooForum.com may be compensated
Status
Not open for further replies.

Caleh86

New Member
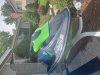
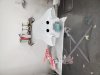
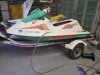
how's it going folks? New here and fairly new to the pwc world... I'm currently fixing up my 94 seadoo xp and I am having trouble finding a few things... i am a paintless hail repair tech and work in a body shop so I have unlimited access to painting materials and such... I'm wanting to fix up my seadoo with a black and blue color scheme and replace several trim pieces to match or paint what i can to match... i figure i can paint the plastics but in having problems finding new bumper trim pieces so I'm hoping that someone here can point me in the right direction... I'd be fine with replacing the purple with straight black and I'm wondering if trim that is specified for other models is compatible or if it's possible to modify for fitment... also, i can't find any replacements for the handlebar pad in any other color than the original so I bought a blacktip cover for now... does anyone know of a compatible replacement in black? Also trying to find a black replacement for the handle at the rear of the seat or is it possible to strip the red rubber and recover the inner with maybe plastidip or gator guard be liner?
I am also trying to locate new gauges or possible digital upgrades... any and all input/help is greatly appreciated! Thanks in advance!
 
Handle bar cover is the way to go to make it black.

Not aware of any digital upgrades for the dash.

Look for the bumper trim off an SP of the same year.

Go here -

https://www.jetskiplus.com/seadoomodelref/
For a quick visual of what colors were used on which machines. It looks like a couple of similar hull shapes used the black rear grab bar. 95 xp 800, 96 xp, 97 spx?
 
Thanks a ton for the reply! I figured the handle bar cover would be the best/only route but thought it wouldn't hurt to ask lol... so the SP rub rails will fit without and modification? I'll look into that today! I'm, no digital upgrades, do you know where to find original gauges or are you aware of other models that are compatible? I found a yellow hood from a 96, I think it was, that has the 2 gauges that come on the 94 but has a 3rd in the center... do you know if these gauges would be compatible?
 
Sorry, but I'm not that up to speed on the electronics.

I use this site -

http://www.hlsm.com
To cross reference parts for my projects. I only use the tach on my 94 xp, the fuel gauge was dead when I got it or I would give it to you.

I have the same machine with the 657x motor. If yours is stock I can throw out what I did to wake mine up.

1- Raise the pop off to 26 to 28 psi.

2 - Drop the low speed jet from a 75 to 72.5

3 - leave the high speed jet stock but turn the high speed adjustment out 1/4 turn.

4 - Make sure the RV cover is machined to spec.

5 - Put in a 271000454 impeller 15/20.5

6 - put in an "anti rattle" pump cone, not that it quiets things down but it made a slight improvement in low end.

My motor, exhaust, intake and carbs are not modified.
 
Last edited:
Awesome, thanks for the info! Would you happen to have links to some "how to" videos for any of those adjustments? I'm very mechanically incline but definitely not experienced so this whole process is a learning experience for me... again, very much appreciated!
 
Last edited:
For sure! I'm finished up with it now! Aside from a few small details like repainting the gas cap, vts trim indicator, and plastidipping the rear handle... also need a new left mirror and gauges... The bottom is kawasaki green with light dusting of holographic blue metal flake and the top is a deep black base coat with heavy blue20200703_112054.jpg20200703_134930.jpg holographic flake! Looks like a rainbow in the bright sun! I wish it would let me upload video because the pics really don't do the blue flake any justice! 20200705_173752.jpg15951763473871523296895615221757.jpg20200705_161733.jpg15951762098536815203240494819246.jpg15951762839048530705762508681627.jpg15951763473871523296895615221757.jpg15951764085732802789844214583976.jpg15951764803476687754282594831002.jpg
 

Attachments

  • 15951761497356863010461119217170.jpg
    15951761497356863010461119217170.jpg
    3.4 MB · Views: 5
As far as tips go on the rebuild, I'm afraid I don't really have much to offer lol unless you maybe have a specific question that I can answer... biggest tip I can give really is prep work... be diligent in your prep work and don't cut any corners, any imperfection in prep work will show in the final product... the better your prep work, the better the final product... I am lucky enough to have access to a body shop since I do automotive hail damage repair... because of that, I had easy access to all the materials and the paint booth... this was my first time using a real paint gun and spraying with automotive paint so it was definitely a learning curve... the body shop manager painted all the green pieces for me but left me on my own for the top... he mixed my black base coat and the flake coat for me but then he left lol so I had to mix all my clear and lay all of it myself... when spraying the clear, you have to be extremely mindful of your spray and really watch as it goes down... you want a "wet" look when your done spraying... adjusting your jet when you're spraying in tight places to make sure the clear doesn't "cure" before it hits the surface or you end up with dusting/ webbing on your surface... not to worry though if that happens, just adjust your spray for more of a "stream" rather than a fan and bury the webbing... also, if you choose to use flake, I suggest laying a few layers of clear on top of it or you'll end up sanding down pieces of the flake when you do your "cut and buff"... this did happen to me in a few places but not enough for me to be unhappy with the final product... thanks for checking it out! Let me know what you think!
 
BTW, I wanna say that I am very pleased with the performance after the carb rebuild and fuel line replacements! It really made a HUGE difference in the performance! I couldn't be more pleased with how this turned out!
 
Also just realized i forgot to include before pictures
 

Attachments

  • 20200703_132711.jpg
    20200703_132711.jpg
    2.7 MB · Views: 7
  • 20200703_132703.jpg
    20200703_132703.jpg
    3.2 MB · Views: 6
  • 20200531_204641.jpg
    20200531_204641.jpg
    3.4 MB · Views: 6
  • 20200531_201416.jpg
    20200531_201416.jpg
    3.4 MB · Views: 6
  • 20200531_201431.jpg
    20200531_201431.jpg
    2.8 MB · Views: 6
  • 20200305_121700.jpg
    20200305_121700.jpg
    3.2 MB · Views: 4
Status
Not open for further replies.
Back
Top