• This site contains eBay affiliate links for which Sea-Doo Forum may be compensated.

1998 GTX Click When Try to Start

Calbuckeyefan

New Member
1998 GTX Limited. Last summer it started clicking when I try to start it. In the last week I’ve replaced the starter and solenoid. Same issue, clicking when I try to start. However, the other day we jumped the posts of the solenoid and it cranked once, then wouldn’t. Today after the new solenoid, cranked 3 times then back to clicking. Any suggestions?
 
here are some of the things I would look at:
I would load test the battery, because it is free and easy.
What starter and solenoid did you buy? Are they OEM. Aftermarket electronic parts are notoriously unreliable for our skis. I went through two solenoids before buying a used OEM one, one test dead right out the box. Also check your grounds, make sure they are clean and secure.
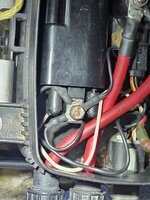
Check the wires in the back electrical box, the coil has three at the bottom end. Make sure they are spread apart, clean , and tight. They tend to move when they are tightened. If they bunch up , contacted can be intermittent.
One more thing, remove spark plugs, ground wires and see if she turns over.
How do you spread the 3 black wires out? They are go under the same nut, correct?
 
How do you spread the 3 black wires out? They are go under the same nut, correct?
put bolt on with all three wires, get it tight but enough to move each around, spread them until each of the wire leads is not on top of the other, slowly tighten bolt and adjust wires until it is tight and they are still apart. see pic of how mine is.
 

Attachments

  • coil wiring.jpg
    coil wiring.jpg
    407.1 KB · Views: 11
here are some of the things I would look at:
I would load test the battery, because it is free and easy.
What starter and solenoid did you buy? Are they OEM. Aftermarket electronic parts are notoriously unreliable for our skis. I went through two solenoids before buying a used OEM one, one test dead right out the box. Also check your grounds, make sure they are clean and secure.
Check the wires in the back electrical box, the coil has three at the bottom end. Make sure they are spread apart, clean , and tight. They tend to move when they are tightened. If they bunch up , contacted can be intermittent.
One more thing, remove spark plugs, ground wires and see if she turns over.
Now we are getting it to crank everytime we bridge the terminals on the solenoid.
 
So now I would check out your start button and see if it checks out with a meter. Do you get any cranks with the button at all? Does your buzzard work?
If your start button is good , clean your key and post, and check the post for continuity as well. hence you should get beeps when you put key on post.
It just cranked twice without jumping the posts, so it was working. Then it started clicking again. So we tried to jump the posts again and now it won’t work at all. The buzzer isn’t working, which is new as of yesterday it was working.
 
It just cranked twice without jumping the posts, so it was working. Then it started clicking again. So we tried to jump the posts again and now it won’t work at all. The buzzer isn’t working, which is new as of yesterday it was working.
. I’ve replaced the starter and solenoid, still clicking when trying to start. Also, no beeps or anything from buzzer. However, today we got it to turn over by bridging the solenoid with pliers. Then, I randomly tried the button again and it worked twice then started clicking again and the pliers wouldn’t work either. So I’m kinda stumped. The bolt that holds the wire for the ignition and 2 other wires (grounds I think) is stripped and not holding the tightest. Could that be the issue, not getting a consistent ground?
 
Did you get this resolved? If not, let us know and I'll try to walk you through orderly troubleshooting (electronics tech in a couple of prior lives).
 
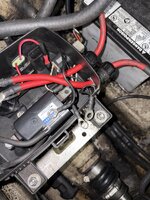
IMG_6911.jpegI am having an issue where the ski will crank intermittently. Sometimes it’ll click, then sometimes it’ll crank. I have it narrowed down to these grounds being the issue. If I get them in the right spot, it’ll crank. Then it won’t after a few tries. Any suggestions? What are each of these grounds for?
 
Did you get this resolved? If not, let us know and I'll try to walk you through orderly troubleshooting (electronics tech in a couple of prior lives).
No. I still haven’t go this resolved. Got a new electric box for it bc it was stripped out where the grounds go. Got it in, still clicked. Loosed the bolt and it cranked, but it stripped the hole again. Apparently the bolt I am using must not be the stock one so I’m going to fix that. Still can’t figure out why it’ll crank and then it’ll just click.
 
Those connections need to be clean and tight.
If you stripped the hole and the bolt will not tighten you can put in a paperclip and bend it over the side under the coil. That should make the hole smaller and give the bolt something to bite into.
 
Those connections need to be clean and tight.
If you stripped the hole and the bolt will not tighten you can put in a paperclip and bend it over the side under the coil. That should make the hole smaller and give the bolt something to bite into.
Thanks for the reply! What are each of these connections for? Trying to narrow down the issue. I have cleaned those connections before.
 
OK, I've got a minute. 1st thing for me is obtaining a wiring diagram. If you don't have the service manual, I'd strongly advise obtaining one; it's much easier to point out troubleshooting test points looking at the factory drawing. Lacking that at the moment, here's a 'generic' start circuit that should get you, uh, started. (sorry...)
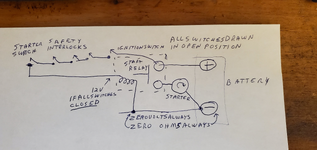
1750436393555.png

Troubleshooting steps:
Volt-ohm meter & basic operating principles of same, obviously needed.

Black meter lead to battery negative *POST* (not any connector, bolt, etc; the actual post).
Red meter lead to battery positive post (see above).
power on, any interlocks that may exist, closed: press start button.
If starter turns, battery voltage should drop from ~12.5 V to (likely) somewhere between 9.5 & 11V, while starter is turning.
If starter doesn't turn, what's battery voltage while the button is pushed? If it remains at pre-button push levels, something in the start circuit is open or high resistance. If voltage drops to well under 9V, either the starter is shorted out or the battery is bad.

Assuming voltage stays at ~12.5V and you hear nothing or only a click, now we need to find the open/high resistance in the circuit.

Keep the black lead on the battery post throughout the following tests.

Move the red lead to the 'hot' side of the start relay coil (it will be a small terminal; not one of the 'fat' ones), press start. you should see 12v. If yes, continue; if no, you have a problem somewhere in the switch chain between battery + and the start relay coil 'hot' terminal.
Continuing.
If you do see 12v on the start relay coil, you should hear and feel the click of the relay. If no, move the meter probe to the negative terminal of the start relay (also small terminal) and press start again. You should see *ZERO* volts there, whether the start button is pushed or not. If you see any voltage there, there's a high resistance between the negative terminal of the relay and the battery negative terminal. Note that there could be interlocks in that ground path, instead of in the positive path to the relay coil.

If you see zero and you get the click, move the red probe to the 'hot Fat' terminal of the relay. Should see ~12.5v whether start is pressed or not. Press start, should hear click and if starter turns voltage should drop slightly (see above). If click and no starter turning, and voltage stays near 12.5v, then the contacts in the relay may be bad, but continue: move red probe to the other 'fat' terminal, press start, you should see same voltage as before. If zero or low volts, starter *might* be shorted (very unlikely) or as I said, the contacts in the relay are bad.

If voltage stays up near 12.5V, move red probe to the starter fat terminal, press start. Starter should turn and you should see 9.5-11V on the starter fat terminal. If it stays near 12.5v and starter doesn't turn, starter might be open, but we don't know yet (haven't checked ground path).
Move probe to the frame of the starter (may have to scratch through the paint somewhere, or get on a bolt and scratch through rust/corrosion to get a good connection). Press start and you should see ZERO volts. Anything higher than a couple of tenths of a volt indicates a broken or high resistance ground path back to the battery negative.

That's about all I can give you until you make the tests, but here's a tip on high-resistance type problems. They can be caused by corroded surfaces where a wire terminal attaches to its post (in either the postive circuit or the 'ground' (return) circuit. Corrosion can sometimes be hard to detect visually; you may need to wire-brush all mating surfaces until the metal is bright to be sure that corrosion is gone. But corrosion can also happen in the crimped area where the wire is inside a terminal. The shrink tubing that serves as a strain relief on many wire/terminal joints does a great job at hiding any corrosion, but even without the shrink tubing, it can be hard to detect. A good tug/twist on each wire is worth trying (check start function before/after each wire is tugged on) is a *sometimes* effective quick check. If you find one that makes a difference, you can play with the tug/twist to see if start function comes and goes as you wiggle the wire in its terminal.

Please respond both here and via PM once you've tried this stuff. I'm more likely to see a PM than the forum, with my rather hectic current (lack of) schedule.
 
Back
Top