Thru this forum I discovered that the bouncing my boat does on open water is called Porpoising and thought it was a function of boat weight-apparently not-prior articles on trim tabs I've read said it cured the condition completely! So I bought a set-haven't tried them out yet but here is the procedure for all to reference:
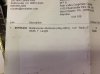
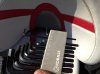
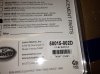
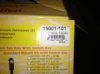
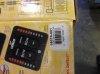
Went with Lenco 9" tabs and a LED dual switch to tell me what position they are in at a glance-Part numbers of all the products I bought are in the pics attached. about $650 total went thru something marine in FL
Background_ Lenco used to sell a trim tab kit for seadoo but discontinued it-it mounted on the outside of the transom and when the reverse gate was activated it blew right on the tabs making reverse kinda useless and a lot of pressure hit the tabs. I modeled my install from a forum poster and used his pics as a starting point.
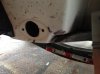
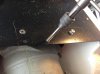
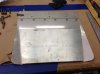
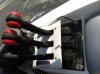
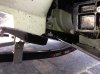
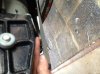
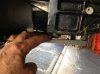
I found that the OEM Lenco tabs have mtg holes but the one row of holes are close to the pivot edge so I needed to move the tabs as close to the glide plate as possible so I could utilize those holes close to the hinge tab edge. I also wanted the tabs mounted as close to boat center as possible which meant using a dremel to remove some glass-see pics. I took the butt plug out and felt inside and there was plenty of meat without breakthrough available.
I also mounted the tabs ONTOP of the rideplate and countersunk the screw holes so a flush surface to the water remained.
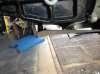
1)-dremel the hull so the last two sections of hinge can mount closer to center of boat-see pics
2) once the hull was modified with the dremel, place the tabs on top of the plate and see if it rotates on its hinge OK
3) with Vice grips clamp the trimtab on the bottom of the rideplate, scratch exact locations of the edges and holes so you can drill the mtg holes
4) center punch the holes and drill with a #7(.199dia) drill so you can tap the holes with a 1/4-20 tapered tap
-I chose to tap the ride plate holes as added security that once screws are threaded in and nut as are on top nothing will come loose.
5) use an 82 degree countersink in the drill and countersink all the holes so the 1/4-20x3/4" long flat head Phillips screws will mount flush(McMastercarr source)
6) thread one screw thru-closer to the outer side of the boat and place the trim tab over it-thread another screw thru closer to the center of the boat-Now use the tap in a drill to retrace your holes to ensure the tab clears the freshly drilled/tapped holes. If its off a little the tap will remove what's needed on the tab to align it perfectly.
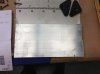
7) remove the tab, take the piece of aluminum stock-see pic for McMaster PN and lay it over the tab, trace the bent edge line onto the aluminum and cut it on the bandsaw-clean up the edges on a belt sander or file
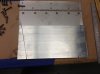
8) clamp the aluminum plate strengthener to the tab along the aft edge with vice grips-flip it over and transfer the holes in the tab to the aluminum by spinning a drill bit in the OEM tab holes-this will leave point marks on the aluminum exactly centered over the OEM holes
9) center punch those point marks and drill with a #7(.199 dia) drill and tap the holes to 1/4-20. ...thread screws into the holes from below the tab and cut off the extra with a hand grinder( before the screw is half way in-apply RED Loctite to the threads-grind cutoff screws flush with the alum strengthener
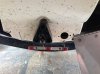
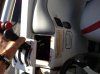
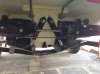
10) Attach the tab to the boat with two fasteners thru the ride plate-swing the tab up and keep it max up with a piece of foam or couch cushion under it to hold it up -
YOU WANT THE TAB IN ITS UP POSITION TO BE 1/4" FROM THE REVERSE GATE FRAME-CLOSEST POINT! This will set best position when down as well
11) Put the mounting brackets on the LENCO positioners and hold the positioner up to the transom with bottom bracket on the tab-position it such that the lower bracket is 1/4" from the aft edge of the now strengthened tab-look to ensure nothing will collide with the strut reverse gate up or down!-Mark the position with a sharpie on the aluminum strengthener and remove the tab
12) You need to use a LENCO angle shim-PN shown on pics attached between the strut and the tab due to the severe angle of strut mounting-MAKE SURE THE PIVOT ON THE LOWER BRACKET IS PARALELL TO THE HINGE OF THE TAB! transfer the lower bracket/angle shim to the aluminum by spinning a drill bit same size as the thru holes-center punch those marks-drill a thru hole size(.166dia or close so a 1/4" bolt goes thru easily)-drill thru the alum and the stainless tab
13) mount the bottom bracket to the tab with 3/4" long 1/4-20 stainless bolts-I use Phillips head cause they are less resistance to water flow(rounded)-snug them you will have to remove one of the nuts later-flat washer under nylon lock nut
14) with strut now bolted to the tab, mount the tab completely using 1/4-20 x 3/4" long stainless bolts-use stainless 1/4-20 Nylon-insert lock nuts (avail thru McMaster Carr) on top of the ride plate
NOTE- I TRANSFERED ALL THE TAB HOLES TO THE RIDPLATE BUT THE TWO HOLES CLOSER TO THE CENTER OF THE BOAT-I ONLY DRILLED THE HOLE THAT WAS FORWARD ON THE PLATE-no nut used here-I tapped thru the plate into the fiberglass-
-----on the hole that is closest to the center of the boat-pump 50 yr silicone sealant (home depot) into the hole before threading the bolt thru the ride plate/tab and into the tapped fiberglass.
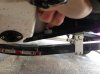
15) now the tab is on the boat and the strut is attached to the tab only-you need to swing the strut-with its upper pivot on it, up against the transom so you can mark with a sharpie around the upper bracket when the strut is perfectly aligned and place correctly-the correct placement will be when the tab has 1/4" clearance between the reverses gate frame and the tab-see picks
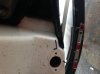
-outline around the bracket on the transom-remove the bracket-place it in the outline and drill three 3/16 holes thru the transom where the mtg holes on the bracket are-also touch the 3/16 bit to the center hole as a place holder.
----drill a 3/8 hole in the place marked center hole for the cable pass thru
16) thread the cable from the strut thru the bracket, thread the grommet over the cable-apply some silicone sealant around all holes in the transom and screw the bracket to the boat
17) Push the top mtg bolt thru the bracket and top of strut & tighten
18) reach inside the boat and pull the slack from the cable into the engine compartment
19) tighten the bottom bracket bolt/nut-you probably will have to remove the 1/4-20 nut from the bracket/ on the nut side of the pivot bolt-then put it back on and tighten all nuts/bolts
DO THE EXACT SAME PROCEEDURE TO THE OTHER SIDE TRIM TAB-CRITICAL THAT THE UP POSITION CLEARANCE IS 1/4" BETWEEN REVERSEGATE FRAME AND CLOSEST POINT ON THE TRIM TAB! POSITION THE STARBORD STRUT WHEN THE REVERSE GATE IS UP!!!!! THIS IS WHEN IT HAS MINIMUM STRUT TO GATE CLEARNCE!!
----WIRING CONNECTIONS-SEE INSTRUCTIONS THEY ARE VERY CLEAR
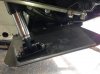
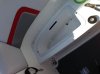
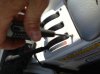
I removed the throttle/reverse/fwd control cluster to obtain access where I mounted the control switches
-you will need to unscrew the coverplate on the throttle controls-qty 4 Phillips, then lift the coverplate and remove qty 4 allen head metric 3.5mm flat head screws-the entire control cluster will lift out so you can put the nuts on the back of the new switch panel behind the cockpit wall(four nylon-8-32 nuts)
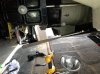
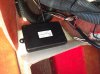
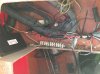
If you remove the rear starboard under seat bucket (two flathead screws) you can feed the wire harness up to the under the cooler area. good idea to pull a string along with the cables so any future runs will be easier!
I put in a long terminal strip with half jumpered to 12vdc and half to DC Ground which made it easy to tie in the harness
ALSO- I had to remove two sacrificial anodes from atop the glideplate for this install-I reinstalled them outboard ontop of the glideplate after the tabs were in by drilling thru the plate & tapping from below and thru 1/4-20 threads-then mounted them above the plate.
only 5 pics allowed per post?? Ill try posting rest in replys
Went with Lenco 9" tabs and a LED dual switch to tell me what position they are in at a glance-Part numbers of all the products I bought are in the pics attached. about $650 total went thru something marine in FL
Background_ Lenco used to sell a trim tab kit for seadoo but discontinued it-it mounted on the outside of the transom and when the reverse gate was activated it blew right on the tabs making reverse kinda useless and a lot of pressure hit the tabs. I modeled my install from a forum poster and used his pics as a starting point.
I found that the OEM Lenco tabs have mtg holes but the one row of holes are close to the pivot edge so I needed to move the tabs as close to the glide plate as possible so I could utilize those holes close to the hinge tab edge. I also wanted the tabs mounted as close to boat center as possible which meant using a dremel to remove some glass-see pics. I took the butt plug out and felt inside and there was plenty of meat without breakthrough available.
I also mounted the tabs ONTOP of the rideplate and countersunk the screw holes so a flush surface to the water remained.
1)-dremel the hull so the last two sections of hinge can mount closer to center of boat-see pics
2) once the hull was modified with the dremel, place the tabs on top of the plate and see if it rotates on its hinge OK
3) with Vice grips clamp the trimtab on the bottom of the rideplate, scratch exact locations of the edges and holes so you can drill the mtg holes
4) center punch the holes and drill with a #7(.199dia) drill so you can tap the holes with a 1/4-20 tapered tap
-I chose to tap the ride plate holes as added security that once screws are threaded in and nut as are on top nothing will come loose.
5) use an 82 degree countersink in the drill and countersink all the holes so the 1/4-20x3/4" long flat head Phillips screws will mount flush(McMastercarr source)
6) thread one screw thru-closer to the outer side of the boat and place the trim tab over it-thread another screw thru closer to the center of the boat-Now use the tap in a drill to retrace your holes to ensure the tab clears the freshly drilled/tapped holes. If its off a little the tap will remove what's needed on the tab to align it perfectly.
7) remove the tab, take the piece of aluminum stock-see pic for McMaster PN and lay it over the tab, trace the bent edge line onto the aluminum and cut it on the bandsaw-clean up the edges on a belt sander or file
8) clamp the aluminum plate strengthener to the tab along the aft edge with vice grips-flip it over and transfer the holes in the tab to the aluminum by spinning a drill bit in the OEM tab holes-this will leave point marks on the aluminum exactly centered over the OEM holes
9) center punch those point marks and drill with a #7(.199 dia) drill and tap the holes to 1/4-20. ...thread screws into the holes from below the tab and cut off the extra with a hand grinder( before the screw is half way in-apply RED Loctite to the threads-grind cutoff screws flush with the alum strengthener
10) Attach the tab to the boat with two fasteners thru the ride plate-swing the tab up and keep it max up with a piece of foam or couch cushion under it to hold it up -
YOU WANT THE TAB IN ITS UP POSITION TO BE 1/4" FROM THE REVERSE GATE FRAME-CLOSEST POINT! This will set best position when down as well
11) Put the mounting brackets on the LENCO positioners and hold the positioner up to the transom with bottom bracket on the tab-position it such that the lower bracket is 1/4" from the aft edge of the now strengthened tab-look to ensure nothing will collide with the strut reverse gate up or down!-Mark the position with a sharpie on the aluminum strengthener and remove the tab
12) You need to use a LENCO angle shim-PN shown on pics attached between the strut and the tab due to the severe angle of strut mounting-MAKE SURE THE PIVOT ON THE LOWER BRACKET IS PARALELL TO THE HINGE OF THE TAB! transfer the lower bracket/angle shim to the aluminum by spinning a drill bit same size as the thru holes-center punch those marks-drill a thru hole size(.166dia or close so a 1/4" bolt goes thru easily)-drill thru the alum and the stainless tab
13) mount the bottom bracket to the tab with 3/4" long 1/4-20 stainless bolts-I use Phillips head cause they are less resistance to water flow(rounded)-snug them you will have to remove one of the nuts later-flat washer under nylon lock nut
14) with strut now bolted to the tab, mount the tab completely using 1/4-20 x 3/4" long stainless bolts-use stainless 1/4-20 Nylon-insert lock nuts (avail thru McMaster Carr) on top of the ride plate
NOTE- I TRANSFERED ALL THE TAB HOLES TO THE RIDPLATE BUT THE TWO HOLES CLOSER TO THE CENTER OF THE BOAT-I ONLY DRILLED THE HOLE THAT WAS FORWARD ON THE PLATE-no nut used here-I tapped thru the plate into the fiberglass-
-----on the hole that is closest to the center of the boat-pump 50 yr silicone sealant (home depot) into the hole before threading the bolt thru the ride plate/tab and into the tapped fiberglass.
15) now the tab is on the boat and the strut is attached to the tab only-you need to swing the strut-with its upper pivot on it, up against the transom so you can mark with a sharpie around the upper bracket when the strut is perfectly aligned and place correctly-the correct placement will be when the tab has 1/4" clearance between the reverses gate frame and the tab-see picks
-outline around the bracket on the transom-remove the bracket-place it in the outline and drill three 3/16 holes thru the transom where the mtg holes on the bracket are-also touch the 3/16 bit to the center hole as a place holder.
----drill a 3/8 hole in the place marked center hole for the cable pass thru
16) thread the cable from the strut thru the bracket, thread the grommet over the cable-apply some silicone sealant around all holes in the transom and screw the bracket to the boat
17) Push the top mtg bolt thru the bracket and top of strut & tighten
18) reach inside the boat and pull the slack from the cable into the engine compartment
19) tighten the bottom bracket bolt/nut-you probably will have to remove the 1/4-20 nut from the bracket/ on the nut side of the pivot bolt-then put it back on and tighten all nuts/bolts
DO THE EXACT SAME PROCEEDURE TO THE OTHER SIDE TRIM TAB-CRITICAL THAT THE UP POSITION CLEARANCE IS 1/4" BETWEEN REVERSEGATE FRAME AND CLOSEST POINT ON THE TRIM TAB! POSITION THE STARBORD STRUT WHEN THE REVERSE GATE IS UP!!!!! THIS IS WHEN IT HAS MINIMUM STRUT TO GATE CLEARNCE!!
----WIRING CONNECTIONS-SEE INSTRUCTIONS THEY ARE VERY CLEAR
I removed the throttle/reverse/fwd control cluster to obtain access where I mounted the control switches
-you will need to unscrew the coverplate on the throttle controls-qty 4 Phillips, then lift the coverplate and remove qty 4 allen head metric 3.5mm flat head screws-the entire control cluster will lift out so you can put the nuts on the back of the new switch panel behind the cockpit wall(four nylon-8-32 nuts)
If you remove the rear starboard under seat bucket (two flathead screws) you can feed the wire harness up to the under the cooler area. good idea to pull a string along with the cables so any future runs will be easier!
I put in a long terminal strip with half jumpered to 12vdc and half to DC Ground which made it easy to tie in the harness
ALSO- I had to remove two sacrificial anodes from atop the glideplate for this install-I reinstalled them outboard ontop of the glideplate after the tabs were in by drilling thru the plate & tapping from below and thru 1/4-20 threads-then mounted them above the plate.
only 5 pics allowed per post?? Ill try posting rest in replys