Step by Step Guide on removing your upholstery and reupholstering your seats!

Note: This site contains eBay affiliate links for which SeaDooForum.com may be compensated

cheappc

Active Member
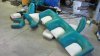
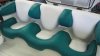
Well ladies and gentleman, since I love this forum and I get so much help on here, I wanted to contribute a picture by picture tutorial and explanation on how to remove your seats and reupholstering them. If someone else had this write up, oops, here is another one.

Getting to the bolts under the seats behind the gasoline tank is torturous, also, I put a fan to get air in there, I believe its dangerous working so many hours in the engine bay and only breathing gasoline.

And questions please ask :)

Here it goes:
First, the bolts are connected here:

rearseats.jpg


Ok there is a bolt under the Starboard side (right hand side) of the boat under the control lever to the rear, is easy to find...


upholstery06.jpg


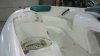
Here is the first bolt right on top of the gasoline tank
upholstery07.jpg


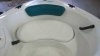
You have to remove the cup holder to get to the bolt (port side - left hand side)
upholstery08.jpg

upholstery09.jpg

upholstery10.jpg


I think Im pretty smart, I attached a electrical wire to my socket wrench so it doesnt fall inside the hull (im always dropping things, it is very convenient in case you drop your socket wrench), I found a old ac adapter that I didnt need anymore and used that wire.

Also when you are removing the bolts be very careful you can drop your bolts under the hull.
upholstery13.jpg

upholstery15.jpg

upholstery16.jpg

upholstery17.jpg

upholstery18.jpg

upholstery19.jpg

upholstery22.jpg

upholstery23.jpg


I recommend a fan blowing air in there I was getting dizzy its hard to be there for so long breathing fumes

upholstery24.jpg

upholstery25.jpg

upholstery26.jpg

upholstery27.jpg

upholstery28.jpg


Ok this is the first round of pictures, next will be applying my new upholstery!
I think Im being a little bit of service! :)
 
Last edited by a moderator:
I removed thousands of staples. Well maybe hundreds. My tool of choice = narrow wood chisel.

Nice I think that was a better choice than I used a little flat head screw driver, but you have to watchout you can put a hole in your beautiful new upholstery so be careful.

Also I got my upholstery at seadooupholstery.com, Keith was such an awesome guy he helped me get the right rivets and right staple gun, and made everything such a breeze. Ill be posting more pictures later on today..
 
not to shabby
do you have a pic of the flat pieces? was it easy getting around the edges? got a little staple happy :)
looks like some good stuff....
 
not to shabby
do you have a pic of the flat pieces? was it easy getting around the edges? got a little staple happy :)
looks like some good stuff....

do you have a pic of the flat pieces?
I do but you cant see the staples, ill post up a picture...

was it easy getting around the edges?
It was pretty easy, for the small bottom cushions I stapled the "four corners" of the "edges" first, then tightened up and stapled around it.

Got staple happy?
I know, I did that on purpose, it would be embarassing going out on the boat and one of them going loosening up on you...
 
I think its very important you give your boat a thorough cleaning job inside of the boat "before" you put your new seats in there, and also before you add your hydro turf:

clean1.jpg

clean2.jpg

clean3.jpg
 
wait till you get the HT put in.
Its going to look newer

Good work and write up :thumbsup:

btw where and $$ was the storage locker in black ??
 
Last edited by a moderator:
wait till you get the HT put in.
Its going to look newer

Good work and write up :thumbsup:

btw where and $$ was the storage locker in black ??

What storage locker? sorry, also sorry about the bow cushion pictures, Ill post some up right now.

Remember on the bow cushions, the way I did it after speaking to Keith at seadooupholstery.com, you have to drill the top rivet just the top part so it can come off.
 
the round thing on the floor of the boat. It's the round thing you pull up to open storage....
Where did you get it in black?? and How$$
Look at my avatar its missing

edit: looking better at first pic maybe its there but angle looks like a hole. I thought you replaced it with all the upgrades your doing.
Guess your keeping it :)
 
Last edited by a moderator:
the round thing on the floor of the boat. It's the round thing you pull up to open storage....
Where did you get it in black?? and How$$
Look at my avatar its missing

edit: looking better at first pic maybe its there but angle looks like a hole. I thought you replaced it with all the upgrades your doing.
Guess your keeping it :)

Sorry OCOD that lock came with my boat lol

here are some more pictures with my new interior and my new 3 gauge sport hood, and Hydro Turf installed


I started my son took over taking out all the staples. There must be close to 1000 in the challenger seats all together. My sons tool of choice was a carpet hook blade to pop the old staples out. With a turn of the wrist it would lift one and start the next. We have the bow back rest and mid seat done and used up four strips of staples. We are using a bostitch upholstery stapler with 22 gauge upholstery staples.

Cheers Don.
 
CheepPC what was the size of rivets you used to put the three small bum cushions back in the rear seat?

Thanks Don.
 
I didn't call him but I did pick up some 3/16th X 5/8 rivets and they worked perfect. On the back three seats at the top on each side there is a small grove there that you can tuck the extra material across the top of each seat into. I used a smooth off piece of maple. I am sure a Popsicle stick will work perfect.

Cheers Don.
 
Son and I just finished ours up today. What do you think? The boy polished her for hours before we put the seats back it.

Cheers Don.
 

Attachments

  • oldseats.jpg
    oldseats.jpg
    41.2 KB · Views: 630
  • dirtunderseats2.jpg
    dirtunderseats2.jpg
    27.1 KB · Views: 614
  • dirtunderseats.jpg
    dirtunderseats.jpg
    32.4 KB · Views: 613
  • newseats.jpg
    newseats.jpg
    28.6 KB · Views: 656
  • newseats3.jpg
    newseats3.jpg
    22.7 KB · Views: 618
Nice job Cheappc - I have to laugh at your ingenuity for a Ratchet Safety cable.... only because it took me dropping my nut driver down the shifter hole to think something like that might be necessary! That damn nut driver is still somewhere in the hull, maybe someday it'll shake itself out where I can get to it... I can't even see it!
 
Last edited by a moderator:
Back
Top