Hi All,
I’m used to boats, and for the last year, I’ve been looking at jet skis just to get a bit of fun alongside the boat for the kids and myself. I found a cheap old Seadoo SPX (787 engine) which apparently needed a starter motor and throttle cable (yeah, right ).
So I got those jobs completed and took it to the launch ramp to test the engine only to find I needed a carb rebuild. Completed that and returned to the ramp again, fired it up and found that the cylinder jugs are severely cracked and damaged. I now have the engine removed and new jugs, head and head cover ordered but have started a bit of a restoration now.
I have 2 issues that I need a little advice on at the moment (will probably be more as I get further). The ski came with the oil pump removed, I know many on here advocate the pump being fitted and working but I have spent too much time and money on this ‘cheap’ project already, so the premix is here to stay. Question is, what should I do with the oil lines on the block for the rotary valve? The original oil tank has been removed so I can’t connect them the way most folk advise on here. When I got the ski, they were blocked up and tied up high at the side of the hull, is that ok?
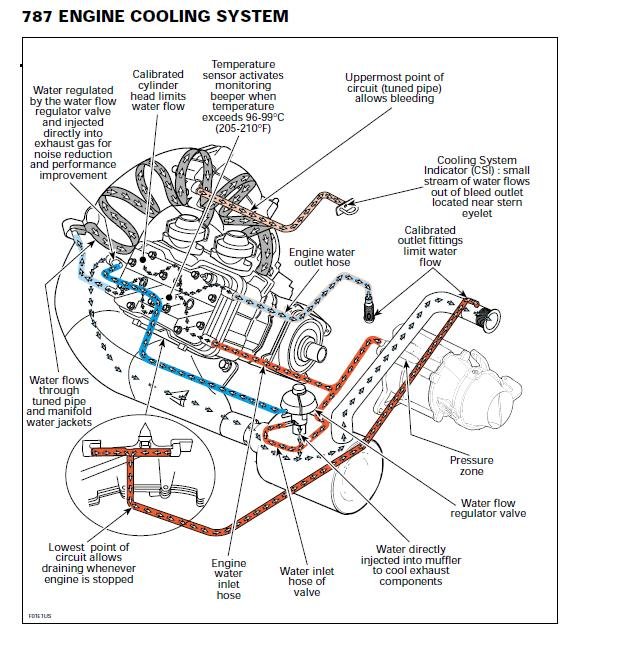
Secondly, the water hose that goes to to head via the water regulator valve... there is three T pieces in it... one goes to the water regulator valve and the other two are either side of the WRV tee with a hose connecting them in a D shape sort of bypassing the WRV. Is that normal or should there only be one T piece going directly to the WRV? It looks like it’s been cobbled together badly.
Thanks in advance,
Gordon.
I’m used to boats, and for the last year, I’ve been looking at jet skis just to get a bit of fun alongside the boat for the kids and myself. I found a cheap old Seadoo SPX (787 engine) which apparently needed a starter motor and throttle cable (yeah, right ).
So I got those jobs completed and took it to the launch ramp to test the engine only to find I needed a carb rebuild. Completed that and returned to the ramp again, fired it up and found that the cylinder jugs are severely cracked and damaged. I now have the engine removed and new jugs, head and head cover ordered but have started a bit of a restoration now.
I have 2 issues that I need a little advice on at the moment (will probably be more as I get further). The ski came with the oil pump removed, I know many on here advocate the pump being fitted and working but I have spent too much time and money on this ‘cheap’ project already, so the premix is here to stay. Question is, what should I do with the oil lines on the block for the rotary valve? The original oil tank has been removed so I can’t connect them the way most folk advise on here. When I got the ski, they were blocked up and tied up high at the side of the hull, is that ok?
Secondly, the water hose that goes to to head via the water regulator valve... there is three T pieces in it... one goes to the water regulator valve and the other two are either side of the WRV tee with a hose connecting them in a D shape sort of bypassing the WRV. Is that normal or should there only be one T piece going directly to the WRV? It looks like it’s been cobbled together badly.
Thanks in advance,
Gordon.