Seadoo 96-97 GTX Repairs

Note: This site contains eBay affiliate links for which SeaDooForum.com may be compensated
Status
Not open for further replies.

etemplet

Premium Member
Premium Member
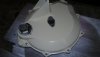
I thought it would be a good idea to give the GTXs their own thread. I have a 1996 GTX and been through the mill on getting it running properly. I purchased the 1997 in which I found the engine to be gar-bage. I am rebuilding the engine presently and I thought I was ready for engine assembly but found a crack in the PTO cylinder. I have already bored a Mag cylinder an assembled the bottom end. Hopefully I'll get the engine assembled over the weekend and installed. I am looking ahead to properly aligning the drive shaft and engine. I will also rebuild the carbs, replace the fuel lines, etc... I will post pictures of the process. Tonight I stripped the peeling paint off the exhaust and engine covers I plan to reuse. A waste of time and much effort but... I can't help myself I like neat and pretty. :)

Is there a special Seadoo primer coat that goes on the exhaust or engine parts? I see it is a dark color. I have the red stuff and plan to use that.
Then engine/drive shaft alignment should be interesting since I have no Seadoo special tools. Being a machinist I have options.
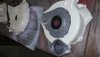
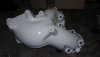
The rotary valve is a concern of mine as I don't see parts nor pictures that show what secures it in position. Did I misplace something?

I have posted pictures on other threads and have had questions answered but I thought putting all this in one place may help.
 
Aligning is tough w/o the tool. I've racked my brain on how to rig up a way to do it, but finally gave in and bought one. I've gone through so many seadoos, that it's paid for itself many times by now. I'll say that before I had the tool, I used to just get it close by bumping the starter with the pump installed and mounts loose. Never ran an engine long enough to see the negative effects of this as I went through many "learning experiences" in those days.

One thing I'd suggest is if you have it all together, do a pressure test at least on the engine. Some do it on the cooling system too. I've found little leaks I wouldn't have ever known about on some of my builds. I built blockoff plates using 1/4" aluminum and 1/8" thick rubber gasket material I found at a gasket supply company in Durham NC. I inflate the motor to about 8-10psi and spray all mating surfaces with soapy water. Ideally, it should hold 10psi indefinitely. Bubbles will readily form wherever you have a leak.

Make sure your battery cables have good, sturdy leads, and that you secure them well with zip-ties. If they vibrate or have room to swing around, they will, and they'll quickly tear themselves off whatever they're bolted to. That goes for hoses too. These things shake and vibrate something fierce!

I'd carefully check your welch plugs on the exhaust expansion pipe, as they're known to leak on the 787s. If you see a little pinhole, grind it down and weld a new plug over it.

If you're going more than .25mm over on your cylinder bore, be sure to clearance your rave valves. Use new O-rings on them. If your valves and housings leak, replace both, as they both wear out. Replacing just the valve will likely not make the problem stop. I've also heard to smear some high-temp grease inside the bellows to stop them from leaking. I'll probably be trying this as mine always seem to leak regardless of new rave/housings.

Be sure all your cooling lines and fittings are clear of obstruction. I had a shell jammed in one of my metered cooling orifices that I never noticed. I had another ski that had sand completely block up the drain line that comes off the T at the rear of the cylinders. This may explain some of the random engine failures I've experienced.

If you're going to replace the wear ring, go solid stainless steel. You will inevitably suck stuff up and it's too easy to damage the plastic wear ring. If you damage the prop, you'll definitely take out the wear ring. The reverse is not true, as often you will suck up a stick that will kill the ring, but not the prop. Essentially, a plastic wear ring doubles the cost of pump maintenance. Use a new neoprene seal to seal the pump to the hull. It's cheap and I keep several on hand in case I need to pull the pump for something.
 
Dude !! A wealth of information !!

What alignment tool did you buy and where from? Looks like ya gotta pull the drive shaft to use one I saw. I have 3 skis and have never worked on the pumps at all. I think I need to familiarize myself with them. :) Great idea to check the lines. Good Stuff !!
 
I think I got mine from SBT. Comes with a huge long rod you stick through a centered plate that bolts on. Works on 2 and 4 stroke seadoos. You can maybe find one on ebay or the classifieds here, but they tend to go quick. I believe I paid $250 for it. You do have to pull the pump, but it's simple, just disconnect the linkages, undo the 4 bolts and pull it off. It may have shims around the 4 main bolts. Pay attention to where and how many. If not, no worries. Once you pull the pump, you can see what state your wear ring is in. I would be surprised if it doesn't need to be replaced. I killed mine in one season (but I do ride A LOT!)
 
An easy way i align engines is: i took a spare pump, removed prop and pump shaft and bolt it to ski. Leave pump bearings in it. I then bought a 3ft aluminum bar
.750 thick since inside diameter of pump bearings is .750 and had both ends machined down to difference thicknesses. One end for good pto splines and other for slightly worn splines. I cant remember the diameter though. I stick that through pump and into pto to align. I bought bar from mcmaster and was rather expensive since i went for the one that had almost zero runout over length of bar. Works really well
 
There is no need to prime the engine unless you take it down to bare aluminum. Just paint it and clear over that.

The rotary valve shaft is held in the cases with a large C-Clip.

@Coastiejoe rents out the alignment tool.
 
Oh man, for $150, it's a no-brainer. I thought SBT shipped free if it was over $50.

The thing that holds the valve in place is the case and rotary cover. It's just sandwiched there right over the gear in a light oil bath.
 
Oh man, for $150, it's a no-brainer. I thought SBT shipped free if it was over $50.

The thing that holds the valve in place is the case and rotary cover. It's just sandwiched there right over the gear in a light oil bath.

I can't get over that they don't secure the rotary valve in position. I guess they know what they are doing. LOL
 
I don't like doing this part but it sure makes for a nice job. :) Gasket surfaces prepped and stoned... I stripped the paint completely off the exhaust and in places where it was flaky due to corrosion. Prime and painted. Is there a product I can use to coat the internals of the exhaust pipes.
 

Attachments

  • Case Cover paint.jpg
    Case Cover paint.jpg
    807.8 KB · Views: 61
  • Case cover PaintB.jpg
    Case cover PaintB.jpg
    674 KB · Views: 62
  • Exhaust Manifold Paint.jpg
    Exhaust Manifold Paint.jpg
    621.9 KB · Views: 56
  • Exhaust Pipe Paint B.jpg
    Exhaust Pipe Paint B.jpg
    647.4 KB · Views: 62
  • Exhaust Pipe Paint.jpg
    Exhaust Pipe Paint.jpg
    647.9 KB · Views: 63
Why would you want to coat the internals of the exhaust? The carbon and oil will do that for you.
Did you check the welch plugs on the headpipe? Also get some clear on that purple mister!
 
Lots of pitting in the exhaust probably from sitting. There are good coatings but don't want to go through all the trouble. I'm sure it will last well enough. Headpipe looks good. Yessir.... I will clear the purple. :)
 
OK, started on the carb rebuilding which is coming along fine. I am cleaning the Rave Valves and I knew one was bad but take a look at the pictures as the valves are not the same LOL Are the grooved type necessary? I don't want to use the valves that have the grooves in the flat area, they were cut down too much by the previous mechanic if one would go so far as to honor him with that title. :) Pay no attention to the pistons... LOL I was a tad confused for a couple minutes..

I went back out tonight to clean the carbs after soaking them and now at 2:00am they are assembled but not painted. I guess I'll work on getting the engine together tomorrow.... err.... later today. :D :D
 

Attachments

  • 20180401_205616.jpg
    20180401_205616.jpg
    295.4 KB · Views: 48
Last edited:
The grooved ones are the newer design. THe flat ones had a problem sticking in the bores.
 
The grooved ones are not usable. The were trimmed too aggressively by the the last engine builder. Should I machine some slots in these?
 
Whew... there are certainly a great many steps to disassembly, finding parts, assembly, finding issues, finding parts and preparing for assembly.... they assembly. :) All prep work is nearly done, I have the case, and cylinders assembled, carbs rebuilt,.

Question, it says to use Loctite 515 then Synthetic Grease. How is the 515 for bolt removal in the future. What do you guys use??
 
Status
Not open for further replies.
Back
Top