


Greetings everyone! I haven't been on here in a long time - and that's probably because I haven't messed with my Seadoo and my two steward Seadoos for roughly about the same time.
We took out the 1996 GSX that I had been banging my head on a couple of years back to get oil-tight and up and running again. As it turns out, after not being under my watch for the year following that, it died again. The solenoid finally let go (it was pretty gnarly after the hull had flooded several times). I was surprised it lasted as long as it did. It was taken to a shop for repairs and a tune and is somehow back up an running.
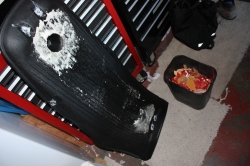
Unfortunately it still had been treated roughly, with the boat exposed to the elements year round. And the nasty seat finally became a torn, nasty seat.
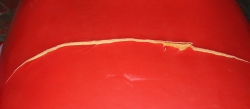
As the vinyl had already hardened up, this tear is really awful to sit on. Not to mention that the water intrusion to the foam now produces a 50 lbs seat.
So I started with the obvious, buy the cheapest seat cover from the internet.....where red means....uh, well, sort of red. More like maroon - but I like to think of it as a more "mature" red. It is not stock, but it looks fine.

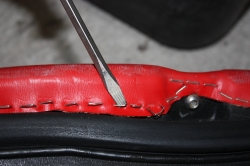
Then remove the gazillion staples off the underside. This only takes a screwdriver and a good 20 minutes if you get a good angle on them. Since I was not planning on keeping the cover at all, I didn't mind mangling the vinyl in the process.
This is the crazy part. Since the foam was soaked and somewhat damaged, I didn't have a problem getting medieval with it.
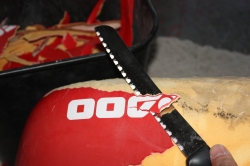
The vinyl is glued to the foam. Which means you can't simply slide or rip the cover off if you intend to re-use the foam. And since I am planning on re-using the foam, I need to slice off the vinyl.

The trick is to not try to cut it all off at once. I used a bread knife to carefully saw bits off.
If you are wondering how this works, try using the same bread knife to take the skin off an apple - you'll see what I mean.
The long blade is good for the sawing effect, but you can't cut too much material off because you take off big hunks of foam in the process. The surface is curved - the blade is straight - and I needed to preserve as much foam as possible.
There is the added bonus of the foam being secured to the seat base. This was not really necessary for a typical recover job. But I wanted to dry out the foam as much as possible before starting the re-cover
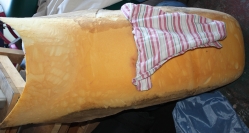
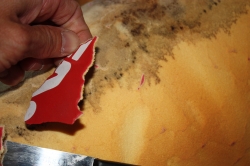
Finally , I got the cover completely sawed off, leaving only the moldy foam in front of a fan to dry. The towel is stuffed into the tear to help wick the moisture out from inside that spot. The foam is so much lighter after an hour after the vinyl was stripped.
Next up - get a THIN sheet of foam to glue to the existing foam. I will do this to "level" out some of the divots I made when sawing off the old cover. I also need to slather some contact cement and foam filler in the big tear to stabilize that part.
Then I can start the grueling task of stapling the new cover on.
More to come!
We took out the 1996 GSX that I had been banging my head on a couple of years back to get oil-tight and up and running again. As it turns out, after not being under my watch for the year following that, it died again. The solenoid finally let go (it was pretty gnarly after the hull had flooded several times). I was surprised it lasted as long as it did. It was taken to a shop for repairs and a tune and is somehow back up an running.
Unfortunately it still had been treated roughly, with the boat exposed to the elements year round. And the nasty seat finally became a torn, nasty seat.

As the vinyl had already hardened up, this tear is really awful to sit on. Not to mention that the water intrusion to the foam now produces a 50 lbs seat.
So I started with the obvious, buy the cheapest seat cover from the internet.....where red means....uh, well, sort of red. More like maroon - but I like to think of it as a more "mature" red. It is not stock, but it looks fine.

Then remove the gazillion staples off the underside. This only takes a screwdriver and a good 20 minutes if you get a good angle on them. Since I was not planning on keeping the cover at all, I didn't mind mangling the vinyl in the process.

This is the crazy part. Since the foam was soaked and somewhat damaged, I didn't have a problem getting medieval with it.

The vinyl is glued to the foam. Which means you can't simply slide or rip the cover off if you intend to re-use the foam. And since I am planning on re-using the foam, I need to slice off the vinyl.

The trick is to not try to cut it all off at once. I used a bread knife to carefully saw bits off.
If you are wondering how this works, try using the same bread knife to take the skin off an apple - you'll see what I mean.
The long blade is good for the sawing effect, but you can't cut too much material off because you take off big hunks of foam in the process. The surface is curved - the blade is straight - and I needed to preserve as much foam as possible.

There is the added bonus of the foam being secured to the seat base. This was not really necessary for a typical recover job. But I wanted to dry out the foam as much as possible before starting the re-cover

Finally , I got the cover completely sawed off, leaving only the moldy foam in front of a fan to dry. The towel is stuffed into the tear to help wick the moisture out from inside that spot. The foam is so much lighter after an hour after the vinyl was stripped.
Next up - get a THIN sheet of foam to glue to the existing foam. I will do this to "level" out some of the divots I made when sawing off the old cover. I also need to slather some contact cement and foam filler in the big tear to stabilize that part.
Then I can start the grueling task of stapling the new cover on.
More to come!
Last edited by a moderator:


")


