Dr Honda
Well-Known Member
Hi Guys,
As most of you know, when someone on this board says "I have cavitation"... the normal response is... "Change your wear ring." But... most of you guys have never done it, and are a little scared to pop the jet pump off of your boat. So what happens?? you take it to a dealer where they say... "You need an impeller, and a pump rebuild. So, Mr Smith... please bend over as we shove this $1000 repair bill up your A-- ! "
This post is to show you that it's very easy to change your wear ring with basic tools. The only special tool you will need is an impeller tool. You can get them on eBay for as little as $15 shipped, or from the site sponsor for a reasonable price. (and it supports this board)
So... Let's get started.
Remove the Pump
I'm not going to give a full pictorial on this because it is simple.
1) Remove the cooling hose from inside the hull. (and bailer hoses if you have them) They are on the transom, and held on with hose clamps.
2) Remove any cables hooked to the pump. (Steering, Reverse, and VTS)
3) Remove the nozzle. (4 bolts)
4) remove the pump. (4 nuts)
NOTES: The pump may be glued on if some hill-billy mechanic worked on it. So carefully pry it away from the hull. Also, there may be shims under the pump studs. Mark them, and their location. It is important to put them back in the proper location to keep your drive shaft aligned.
Now that the pump is out... go to the work bench, and lets start.
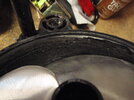
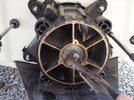
As you can see, the clearance on this ring was still very tight, but the surface is very scared. This ring was only showing cavitation at a full throttle hit, from a dead stop. For most people, it was still acceptable, but I like to be able to mash it after I spin out.
Disassembly
First thing to do is remove the tail cone. There are 3 screws holding it on. Remove them, and give it a little twist to break the seal. Now, before you remove the cone, hold it over the trash can, or a little bowl. There is gear lube in it, and it's going to spill out once you open it. Now... let it drain for a couple minutes. If your pump is in good shape... your oil should be clean and have a Honey color to it. (and be very clear)
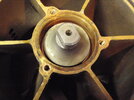
Now, see the flats on the shaft? Put that in a vice. This will hold the shaft, and give you a nice way to work on it.
At this point, you should be looking at the front of the impeller. Remove the rubber cone seal from the front, and install your impeller removal tool. Then, with your favorite wrench... twist it off the pump shaft.
BTW... With the impeller out, there is nothing holding the pump on to the shaft. So if you lift the housing, it will come off the shaft.
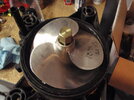
Now we cut the ring. I prefer to use a demolition saw. It make short work of an old ring. But, half of a hack saw blade, with a short handle will work too.
You want to cut, just though the ring. Take your time, and make sure you don't cut the pump. With a factory ring, its easy to tell. As soon as the white dust disapers... stop. (you just went though the fiberglass core)
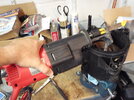
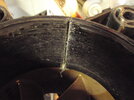
Now, tap a screw driver down both sides, to make sure that the ring is split, and, lift one side over the other. This will relive any pressure holding it in.
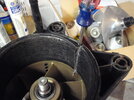
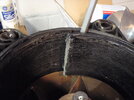
Once you do that... just walk the screw driver around the top, and it will slowly lift out. (some times this will just lift out, after they are split)
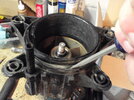
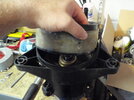
If you have an aluminum housing... you may need to lightly sand away any oxidation. But if you have a plastic pump, just wipe it clean.
Installation
If you buy a factory ring (I recommend it) you will have no issues with it fitting. It should be a light press fit. It should tap in with a rubber mallet, or the rubber grip of a regular hammer. If you only have a metal hammer, use a block of wood to protect the new ring.
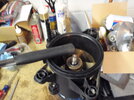
Now, you can put your impeller back in. Clean the shaft, and check the seals. If they look good, put a few drops of RED thread locker on the shaft, and install the impeller. Be careful as you install it. You don't want to gouge the new ring. Also, as you are putting it back in... rock the housing back and forth to make sure it doesn't start to bind as it gets tight. After it's tightened down, you will notice some "in and out" play. This is normal if you don't have a cone with a pushing device in it.
Don't forget to put your cone seal back in the impeller, and make sure that the rubber bumper is in the end of the drive shaft, and not down in the impeller. After that... put a bunch of grease in the impeller splines, and go back out to the boat
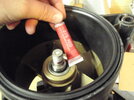
Reinstall the pump
Put the pump back on the boat, the same way you took it off. Be sure to install a new neoprene seal on the pump shoe. Also, since your cone is still off... you can grab it, and twist the impeller to help line up the splines on the drive shaft.
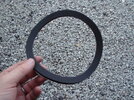
Now install the cone, and top it off with your favorite 75-90 synthetic gear lube.
Now, install the nozzle, VTS, reverse gate, and check for proper operation.
Total time is around an hour.
Hope this helps. :cheers:
Update for the 4-tech pumps
Hi all.
OK... for the majority of the people who will need a pump service... the above info is what you need. But, I have had a few people ask about the newer pumps, and there was a member (stinky) who was nice enough to send some pictures of a absolutely melted 4-tech pump.
So... here are the differences.
The melted pump
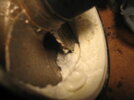
use a 12mm Allen key to hold your pump shaft
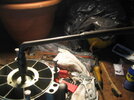
Use grease instead of the 75w-90 gear lube
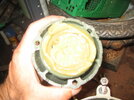
After you get the new ring in... you fill the open spaces with your favorite waterproof grease. Some will squash out.
As most of you know, when someone on this board says "I have cavitation"... the normal response is... "Change your wear ring." But... most of you guys have never done it, and are a little scared to pop the jet pump off of your boat. So what happens?? you take it to a dealer where they say... "You need an impeller, and a pump rebuild. So, Mr Smith... please bend over as we shove this $1000 repair bill up your A-- ! "
This post is to show you that it's very easy to change your wear ring with basic tools. The only special tool you will need is an impeller tool. You can get them on eBay for as little as $15 shipped, or from the site sponsor for a reasonable price. (and it supports this board)
So... Let's get started.
Remove the Pump
I'm not going to give a full pictorial on this because it is simple.
1) Remove the cooling hose from inside the hull. (and bailer hoses if you have them) They are on the transom, and held on with hose clamps.
2) Remove any cables hooked to the pump. (Steering, Reverse, and VTS)
3) Remove the nozzle. (4 bolts)
4) remove the pump. (4 nuts)
NOTES: The pump may be glued on if some hill-billy mechanic worked on it. So carefully pry it away from the hull. Also, there may be shims under the pump studs. Mark them, and their location. It is important to put them back in the proper location to keep your drive shaft aligned.
Now that the pump is out... go to the work bench, and lets start.
As you can see, the clearance on this ring was still very tight, but the surface is very scared. This ring was only showing cavitation at a full throttle hit, from a dead stop. For most people, it was still acceptable, but I like to be able to mash it after I spin out.

Disassembly
First thing to do is remove the tail cone. There are 3 screws holding it on. Remove them, and give it a little twist to break the seal. Now, before you remove the cone, hold it over the trash can, or a little bowl. There is gear lube in it, and it's going to spill out once you open it. Now... let it drain for a couple minutes. If your pump is in good shape... your oil should be clean and have a Honey color to it. (and be very clear)

Now, see the flats on the shaft? Put that in a vice. This will hold the shaft, and give you a nice way to work on it.
At this point, you should be looking at the front of the impeller. Remove the rubber cone seal from the front, and install your impeller removal tool. Then, with your favorite wrench... twist it off the pump shaft.
BTW... With the impeller out, there is nothing holding the pump on to the shaft. So if you lift the housing, it will come off the shaft.

Now we cut the ring. I prefer to use a demolition saw. It make short work of an old ring. But, half of a hack saw blade, with a short handle will work too.
You want to cut, just though the ring. Take your time, and make sure you don't cut the pump. With a factory ring, its easy to tell. As soon as the white dust disapers... stop. (you just went though the fiberglass core)


Now, tap a screw driver down both sides, to make sure that the ring is split, and, lift one side over the other. This will relive any pressure holding it in.


Once you do that... just walk the screw driver around the top, and it will slowly lift out. (some times this will just lift out, after they are split)


If you have an aluminum housing... you may need to lightly sand away any oxidation. But if you have a plastic pump, just wipe it clean.
Installation
If you buy a factory ring (I recommend it) you will have no issues with it fitting. It should be a light press fit. It should tap in with a rubber mallet, or the rubber grip of a regular hammer. If you only have a metal hammer, use a block of wood to protect the new ring.

Now, you can put your impeller back in. Clean the shaft, and check the seals. If they look good, put a few drops of RED thread locker on the shaft, and install the impeller. Be careful as you install it. You don't want to gouge the new ring. Also, as you are putting it back in... rock the housing back and forth to make sure it doesn't start to bind as it gets tight. After it's tightened down, you will notice some "in and out" play. This is normal if you don't have a cone with a pushing device in it.
Don't forget to put your cone seal back in the impeller, and make sure that the rubber bumper is in the end of the drive shaft, and not down in the impeller. After that... put a bunch of grease in the impeller splines, and go back out to the boat

Reinstall the pump
Put the pump back on the boat, the same way you took it off. Be sure to install a new neoprene seal on the pump shoe. Also, since your cone is still off... you can grab it, and twist the impeller to help line up the splines on the drive shaft.


Now install the cone, and top it off with your favorite 75-90 synthetic gear lube.
Now, install the nozzle, VTS, reverse gate, and check for proper operation.
Total time is around an hour.
Hope this helps. :cheers:
Update for the 4-tech pumps
Hi all.
OK... for the majority of the people who will need a pump service... the above info is what you need. But, I have had a few people ask about the newer pumps, and there was a member (stinky) who was nice enough to send some pictures of a absolutely melted 4-tech pump.
So... here are the differences.
The melted pump

use a 12mm Allen key to hold your pump shaft

Use grease instead of the 75w-90 gear lube
After you get the new ring in... you fill the open spaces with your favorite waterproof grease. Some will squash out.

Last edited by a moderator:


