DIY Seat/Upholstery Reconditoning

Note: This site contains eBay affiliate links for which SeaDooForum.com may be compensated

kcr357

Active Member
I bought a 1997 Challenger last summer, good mechanical cond., needed cleaned and new seats. I took them to a local upholsterer after finding out the factory pieces are d/c, they could only tell me that it would be a minimum of 12 hours at $65 an hour, then proceeded to ask me if I could just get pre-cut pieces from Seadoo. Kind of like your accountant asking you if you would be able to just get tax software and do your taxes yourself because the job was too difficult. At this point I decided the hell with it, I'll figure it out myself.
Anyone thinking about the same route, I will share what I have learned so far.

1. After removing all the parts to be recond., remove all the staples and keep all the original parts intact as much as possible.

2. Cut the original stitches (all of them), so you can see how the factory sewed them together. (very tedious, but remember, $65 an hour from a shop)

3. Approximate how much material you will need. Marine nylon ( I use a special type that is extremely flexible, much easier to work with.) comes by the yard. It is 54 inches high by however many yards you order long. I needed 5 yards for my boat @ $19 a yard shipped.

4. Buy a sewing machine and practice. Antiques 1950's and older use all metal gears and stand up to sewing through 3 layers of vinyl, and are cheaper too. Plan on $75 and up.

5. Cut out the patterns and sew them like the factory. Measure twice and sew once...

6. You will need a heavy duty stapler, either elec. or pneumatic. They can cost a lot, but I found one from Surebond for $35 shipped. Use Monel or marine grade staples.


So far I have only done the bottom part of my seats, the top part is going to be MUCH more difficult. I will post more pics and info soon. If all goes will I am going to get licensed and do this to get through school, lots of demand in Ft Laud for this type of work :hurray:

Most importantly, you will need a lot of patience if you are not good with your hands, and if you are not patient you better be good with your hands.

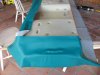
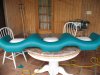
Below are the bottom butt cushions and the part that spans the bottom cushion. The bottom looks like hell because I used a home depot elec stapler. I've since upgraded.
 

Attachments

  • Seat redo 005.jpg
    Seat redo 005.jpg
    307.4 KB · Views: 1,537
  • Seat redo.jpg
    Seat redo.jpg
    232.7 KB · Views: 1,315
Last edited by a moderator:
I personally hate the job, I'd rather hone a cylinder anyday.

I've done a couple of seats on some buds skis, bought kits off of ebay, they included stainless T50 staples. The contours and making them look factory (via even pull & tack) is a knack. Now you also sewed... that's beyond my relm

Upholstery:( 
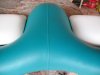
the way I look at it, if you got a factory look (like I did only after hrs of tweaking)... it's a gratifying job that you probably won't want to tackle again.
 
I would rather do motor work as well, but the upholstery isnt too bad. SO far it hasnt turned me off that much. The vinyl I am using makes it much easier, plus I get to buy new power tools to finish the job! It seems there are alot of people on here that have no way of redoing their seats without spending an arm and a leg.
 
Another trick the we used at work was to heat the vinyl with a heat gun or hair dryer to make it easier to work with. Be careful how much heat you use and don't stretch it too much.:cheers:
 
Another trick the we used at work was to heat the vinyl with a heat gun or hair dryer to make it easier to work with. Be careful how much heat you use and don't stretch it too much.:cheers:
Thanks, gunsrunner. I will be tackling the upper part soon and was thinking I would need to do something like that.
Here is a Cooper's back at you. :cheers:
 
Another trick the we used at work was to heat the vinyl with a heat gun or hair dryer to make it easier to work with. Be careful how much heat you use and don't stretch it too much.:cheers:

Yeah I always did my replacements in direct "hot" sunlight (got a nice tan too! :)
 
Today I started on the back rest portion on the top part, dont think it will be as bad as I though. First I laid out the backrest, upper and lower portions of the factory cover, flattened them out as much as possible, and traced them onto the new material as I flattened them out to get the most accurate trace.
Next up I sewed the middle flaps (second pic) together, making sure to line up the sides that meet the main part(you'll notice I rounded on of the corners by accident). Next up, find the middle of the main piece on the bottom, center the top and bottom pieces you just sewed with the OUTER surfaces facing each other, and insert pins into the material to keep it in place around the curves. You will need to "bend" the material into place so both pieces follow the contours. (third pic)
 

Attachments

  • Seat redo 014.jpg
    Seat redo 014.jpg
    280.9 KB · Views: 856
  • Seat redo 007.jpg
    Seat redo 007.jpg
    268.5 KB · Views: 820
  • Seat redo 011.jpg
    Seat redo 011.jpg
    296.4 KB · Views: 801
Last edited by a moderator:
Yeah I always did my replacements in direct "hot" sunlight (got a nice tan too! :)
I wish, looks like we're getting some of that weather you guys had, 30's in Ft Laud 2 nights ago. Im movin farther south if this bs keeps up. I want 90 degrees and enough sun to get a first degree burn in 10 minutes :coolgleam:
Is there a way I can put text into my pictures, BTW?
 
backrest

I had some time today before school and finished the back rest. Sewing around the corners isnt easy, but they came out pretty good. The stitching looks good and they fit well. Next time I am going to make the "wings" that go through the seat frame on each side bigger so I can trim them to fit. I mocked up the cover over the foam and it fit well. I didnt staple it, so it shows much more creases and wrinkles than it will after I finish it.
 

Attachments

  • Seat redo 015.jpg
    Seat redo 015.jpg
    244.9 KB · Views: 678
  • Seat redo 018.jpg
    Seat redo 018.jpg
    285.4 KB · Views: 917
I have had some upholstry guys tell me they will use some glue to help hold problem spots. Watched them and it works. R U going to do more??????
I need to do a seat on my 95.
 
I have had some upholstry guys tell me they will use some glue to help hold problem spots. Watched them and it works. R U going to do more??????
I need to do a seat on my 95.
Yep, its going well enough that I am going to finish my seats my self, and will keep templates in case anyone needs some made. I am using 4 way stretch vinyl that is almost like spandex. The bottom seat has one big piece of fabric, and might be a challenge to get wrinkle free, but so far, its been doable for a first timer with patience. Once I have all the pieces cut correctly, Im going to make templates in case anyone needs seat covers made and dont want to do it themselves. I should have the backrests stapled on in a few days. The arm rests will take a little longer as I have run out of fabric. GIve me a couple days....
 
Bottom section

Today I stapled the large one piece portion of the bottom section on. It came out great, but you need to keep very close attention to the parts of the seat that will and will not be visible once the seat is on the boat, because once you wrap the excess fabric around a side or corner, it will be necessary to fold the fabric over itself. To start, center the two seams over the marks the old cover left, then put 3-5 staples in the two ends(on either side of the long ends of the seat)(pic 1) Next, press down in the hollow area that is made where the white cushions will go, and staple the fabric down(its a u shape, pic 2) the fabric will have some tension on it, so use plenty of staples. This step seems like it will be prone to wrinkle, but its the easiest part. Next up to staple under the seams in the front(the side facing the steering wheel). Then move over and do the two corners that face the steering wheel. Here you will have excess fabric, simply eye up where you wont be able to see it once mounted on the boat, and manipulate the material it that area. Then do the rear side, start at the middle and and work to the corners, again hiding the excess material out of sight. Lastly, go around and remove trimmings and add some staples all around for extra strength.
Dont use a manual stapler unless you are trying for tendonitis, I bought a pneumatic from Amazon.com for 35 shipped. Works great with 3/8 t 50 staples. Next up is the upper part.
 

Attachments

  • Seat redo 019.jpg
    Seat redo 019.jpg
    287.3 KB · Views: 1,059
  • Seat redo 026.jpg
    Seat redo 026.jpg
    529.3 KB · Views: 1,092
  • Seat redo 027.jpg
    Seat redo 027.jpg
    334.7 KB · Views: 1,191
  • Seat redo 031.jpg
    Seat redo 031.jpg
    437.6 KB · Views: 1,114
Look great:agree:I know I did a Baja about a year ago and I ended up take the material and have a shop sew it for me and then I installed it, It can be a pain but so satisfying when its done and you have save some money.
 
Thanks Guns, definitely a lot of work but worth it. I have been busy this week. Sat I want to do the seat backs, then order more material for the armrests.

I am going to make a couple sets for this type of boat and put em on ebay, I figure there needs to be a few people looking for pre-made covers but dont want to sew them. The worst part by far is trying to trace out the formed factory covers onto a flat piece of material, so Im going to trace them onto some canvas paper for future use if anyone on the forum wants to do this and needs some help, I can mail the templates for a couple bucks. Feel free to ask any questions or add comments, suggestions, etc...
 
Look great:agree:I know I did a Baja about a year ago and I ended up take the material and have a shop sew it for me and then I installed it, It can be a pain but so satisfying when its done and you have save some money.

Thanks, I originally went to an upholstery shop myself, they quoted me at least 780-1300. WAAAY too much for me right now. So far I have spent:
Staple gun and staples-40
Vinyl-100
Sewing machine-50
~190 plus alot of time
 
Today I stapled the large one piece portion of the bottom section on. It came out great, but you need to keep very close attention to the parts of the seat that will and will not be visible once the seat is on the boat, because once you wrap the excess fabric around a side or corner, it will be necessary to fold the fabric over itself. To start, center the two seams over the marks the old cover left, then put 3-5 staples in the two ends(on either side of the long ends of the seat)(pic 1) Next, press down in the hollow area that is made where the white cushions will go, and staple the fabric down(its a u shape, pic 2) the fabric will have some tension on it, so use plenty of staples. This step seems like it will be prone to wrinkle, but its the easiest part. Next up to staple under the seams in the front(the side facing the steering wheel). Then move over and do the two corners that face the steering wheel. Here you will have excess fabric, simply eye up where you wont be able to see it once mounted on the boat, and manipulate the material it that area. Then do the rear side, start at the middle and and work to the corners, again hiding the excess material out of sight. Lastly, go around and remove trimmings and add some staples all around for extra strength.
Dont use a manual stapler unless you are trying for tendonitis, I bought a pneumatic from Amazon.com for 35 shipped. Works great with 3/8 t 50 staples. Next up is the upper part.

HI KG looks like you have done a Great job, Im about to ebark on the same project myself in a 95 speedster that possums have made a mess of the bottom section. the Trimmers here in Australia are wanting to charge an arm leg and most other body parts to even look at replacing.

Tell me did you have trouble or is there an easy way of removing the white section from the green on the bottom?

To Clairfy the Sitting section the white seat part from the green surround.

and then on the top section is there an easy to cover just the green areas without messing up the white?


Cheers.

The white bottom part is riveted to the bottom portion. I used a drill, but make sure you only drill the very top of the rivet, dont drill the entire way through or the holes may be too big when you replace the assembly.

The second part-yes, the green sections are separate from the white, there isnt a lot of room to work around in, but you can do it.
 
looks killer, kc......have some back-rest on my Sportster 1800, that needs some attention....what up?:cheers:
Im just about to do my back rests, Ill post pics when its done. I am going to get more material by the end of the week and make more covers. Mind if I ask your opinion on a fair price? I understand why shops charge $$$$ to do a one time job, but since Ive already done mine, most of the hard work is out of the way for doing more pieces...
 
not at all..

get'n ready to roll down to O.C. now with boat, (build'n my own wakeboard tower) I'll stop and ask what i'm look'n at for repair. I've used them, of/on for 10yrs...quads, friends equip., ski's, my other boats'..etc. So, i'll post tonight on $$$.
My recent transaction with them, was for my 96" Sportster, had all seats/backrest, rewrapped with foam, for 600 buks. Front bottom pad, left alone....
Great, let me know what you find out...The season is starting to pic up down here it seems, people starting to gear up for spring. I cant wait.:hurray:
 
Great, let me know what you find out...The season is starting to pic up down here it seems, people starting to gear up for spring. I cant wait.:hurray:

Yah really, been awesome hear for last 2 weeks, until yesterday...:ack:, darn rain, now snow..what gives. Just did ocean/lake the other day.
Get back to ya, in a day/two, on the price...:cheers:
 
Tried to do two of the back rests today and found out the "wings" that feed through the backrest frame did not line up, they are way too high on the cover and wont work, so back to the drawing board. I am going to take them off, resew the wings on, and try again by marking where the wings need to be, then starting the stitch there so they will have to line up..:mad:
 
mellooowww...

:chillpill: man, its not like this crap was second nature to ya. Think the first set came out, awesome. :cheers:
 
Back
Top