Carb Teardown Found Water in FP Diaphgram

Note: This site contains eBay affiliate links for which SeaDooForum.com may be compensated
Status
Not open for further replies.

Sportster-2001-951C-Stock

Well-Known Member
1) Mid throttle lean bog, so tearing down the carbs for a good refreshing and found a couple drops of water on the crankcase side of fuel pump diaphragm.

I haven't seen anyone mention this before so I thought I'd check to see if this is normal or if maybe I've got an issue that needs to be addressed, any thoughts? Maybe an internal leak in the PTO crankcase or normal condensation?

2) Repaired fuel baffle fuel gage fuse mod, but didn't reseal the hole I had to cut to gain access, lean bog doesn't seem related b/c it's there regardless of fuel level seems like, do you guys think it's necessary to reweld/seal up the fuse access hole?

2001 951 Carbed Sportster LE with no mods and new fuel lines.

Thanks for the advice!

The following table contains the Mikuni carburetor pop-off pressure metering spring and needle seat orifice component selection criteria:

The Mikuni SBN OEM carburetor manual can normally be found here:
www.mikuni.com/pdf/sbn_manual.pdf
seadoosource dot com has pretty good instruction on their site. On the downside much of it is verbatim Mikuni's manual and the Japanese to English translation wasn't done by an absolute carburetor expert, more than likely an office flower.
 

Attachments

  • Mikuni BN Spring Pop-Off Calibration.jpg
    Mikuni BN Spring Pop-Off Calibration.jpg
    60.6 KB · Views: 64
  • Mikuni SBN instructioncheckvalveinstalation.pdf
    214.9 KB · Views: 40
Last edited by a moderator:
1) I wouldn't worry about it too much. The engine could have had water in it... and that pushed into the pump while clearing it. As long as the engine has been run, and the compression is good, you should be fine.

Normally... I find a water, oily, fuel mix in the cover side of the pump.

2) Shouldn't make a difference. as long as the internals hoses weren't cut... you should be fine.
 
Thanks Doc, nice to hear from ya!

Yeah, last time I pulled the carbs down a couple years ago the diaphragm had salt water in it and I didn't think much of it b/c I had no way of knowing if maybe the bilge had once filled with too much water.

It's been kept dry since though, so I'm pretty sure no water has entered through the air intakes. Could be condensation, maybe I should torque the head, since it's never been done? No big deal, just haven't torqued it yet cause I like going one step at a time.

Have a great day! ;)
 
All done now, made 2 changes to the factory calibration and the nagging lean bog is completely gone. I may have gone slightly further than necessary but it runs better now than it ever has and pulls like a mule at mid throttle with no hint of a lean condition.

Still plan on retorquing the head, may as well as long as the package shelf is out of the boat and b/c it's never been done.
 
Retorqued head today, the fasteners were plenty tight already, IMO.

Next procedure will be to confirm throttle position sensor is working properly. This engine will only tack to 6k RPM, might be leaving some power on the table.
 
Tested throttle position hall effect switch today, 5V on white/brown wire no matter which position the throttle is moved. Also 12V to switch is present so looks like I need a replacement cable before I will recover my missing 1000 or so RPM.

Without the 80% throttle dynamic ignition advance signal to the MPEM from the throttle cable hall effect switch, the dynamic advance feature doesn't kick in the extra 12* of timing advance.

Wonder how long it's been this way.... Maybe long enough for the motor to have never been dogged, look at the bright-side!
 
Replaced the rear half of throttle cable, the section which contains the throttle position switch. Although a bit tricky to re-adjust to get the advance signal precisely at 80% of throttle position, I'm satisfied now it's close enough and the ignition timing advance signal does come in before the end of WOT throttle travel is reached.

I regained 500 RPM of my missing 1000 RPM, and gained at least 5MPH of boat speed, to 45MPH on the dream-o-meter.

I also corrected a mistake I had made on the idle mixture screw adjustment, I had previously set these to 1.25 turns open to start like I habitually do with all diaphragm carbs but after referencing the service manual realized the suggested position is 1.5 turns out. This still seems to idle without loading up so I probably won't go back and optimize idle mixture until after returning pop-off to specification.

So now at 1.5 turns out, the hot starting(heat soak for longer than 10 minutes) does seem to have notably improved, could be there wasn't an optimal air'fuel mix remaining in the crankcase at shutdown?

I also seem to notice a bit more of four-stroking just off idle at no-wake speeds, which I expect will be corrected by returning to the factory pop-off setting using the 95 gram spring instead of the 80 gram spring I installed while troubleshooting the lean bog.

Always err to the rich side and come back towards lean with a two-stroke, I find works best when tuning the carbs. Fuel carries the lubricant into the crankcase and cylinders so lack of fuel means there could also be a lack of lubricant. Fuel also cools the piston under high output conditions, carbon deposition on the piston crown and even under the dome on the inside of the piston in some cases are indicators the piston temperature may be too high.

As far as regaining my remaining 500 RPM and perhaps 55MPH top speed(GPS, I suppose but unconfirmed if even possible), it will probably require blueprinting the jet pump to gain further improvement. I can see several nicks on leading edges of all three impeller blades and I know plenty of trash like mussel shells have been sucked through there, but she moves with plenty of speed for the time being and the hole shot is most likely improved (grunt is more my focus, for skiing).

The replacement cable p/n was 204390186

I did a post-mortem on the failed sensor and in doing so noticed it was fairly easy to remove the defective sensor assembly from the cable housing without causing damage by simply prying it off the housing. Perhaps b/c whomever glued it on didn't use excessive amounts of adhesive. Not sure if that's the case for a majority of cables using this hall effect assembly but I'm pretty confident I can repair this one and return it to service by replacing the hall effect IC. The bonus would be since the sensor assembly is no longer affixed, I can remount it to any position by just using two tie-wraps. I don't think I would want the ignition advance to come in earlier though, there's no sense in trying to push these engines into detination, IMO.

It might be a consideration for you experimenter sports fans out there to get a cheap extra pound of grunt earlier in the power-band though, in case you really want to take the risk of frying a piston.
 
Finally got around to changing the pump stator oil today and boy was it dirty. Much more than I'd anticipated, not sure why. Just a few drops of water were in there, and it was pressurized, air and oil came out when I removed the fill plug and splashed a bit.

Blew everything out with compressed air to get as much of the dark oil and water drops as possible and it passed a 10min 10psi leak check, so refilled it with Mercruiser high performance gear lube.

Washed out the bilge grease and oil with hot water, looks much better, almost presentable.

I can see one blade of impeller trailing edge is slightly bent, and one of the bronze pump stator vanes as well, is a bit curved over further than it was originally. Something went through the pump this summer, apparently. I think I got too shallow and sucked a rock or two through. Will be pulling jet pump in coming weeks, most likely.

Didn't get a chance to test a next hotter set of plugs yet and haven't looked at the plugs in there for a few months, so it's about time..
 
Last edited by a moderator:
Sportster,

If an engine dies when going from idle to low throttle, is that too rich or too lean?

Yes, this sounds like a lean hesitation or lean bog(same thing to me). Especially if you can recover the engine by applying some choke as it begins to die.

It could also be a rich condition, but in that case adding more fuel by pulling the choke would worsen the symptom.

Too rich:
When you apply throttle and the engine falls on it's face, does it chug a bit, spit out some black smoke, then begin to recover and finally clear out and make normal power? Add choke while the engine is bogging to confirm, if too much fuel then symptom will worsen, if too lean symptom will improve by adding choke(more fuel). If yes it's too rich, then this describes a rich loading up on excess fuel and would happen if for instance the carb was assembled without one of the brass jets installed(too much fuel), or if one had worked loose. Also, if pop-off is too low, too much fuel can puddle in the bottom of crankcase at idle and build up there until you hit the throttle and the velocity of air increases along with engine speed, that puddle of fuel+oil suddenly is slung upwards into the cylinder and a sudden rich condition exists when the throttle is opened. In this case, the fuel could clear out after a few secinds and the engine will begin to run and make power normally. A too rich condition is usually detected by a phenomenon called 4-stroking, where the engine continues to run but sounds like it only fires every other compression stroke. Usually in the case of a lean condition, the engine falls on it's face and doesn't get back up, where a slightly rich condition is usually momentary until the excess fuel puddle in the crankcase clears out of the crankcase and cylinder.

My goal when fine-tuning 2 stroke carbs on the low end around idle and no wake, is to adjust idle mixture (either by the low speed screw or pop-off) so that a small sustainable puddle of fuel forms in the crankcase but isn't so much(unsustainable) that the engine will load up and die while idling for several minutes (too large of a pool of fuel mix) and then when I suddenly open the throttle, that puddle is slung up into the cylinder ports to provide an initial source of fuel while the carb velocity is increasing and fuel flow through the carb is coming on(there is always at least a slight delay). A lean bog can happen if this puddle is too small, or if the carb accelerator pump is misadjusted(assuming the carb has an accelerator pump) This puddle of fuel mix maintaind in the bottom of the crankcase is the same phenomenon and serves the same purpose as an accelerator pump that gives the engine a shot of fuel when the throttle is initially cracked open but is a little trickier to get correct. The accelerator pump is a good idea b/c with oil injection there is almost zero oil being added to the crankcase during idling, so BRP wants to make sure the existing oil in the crankcase isn't washed out of there while idling, so instead of concentrating on maintaining a puddle of fuelmix in the crankcase at idle, they substitute the accelerator pump and then run the idle on the lean side instead of trying to get it sustainably fat. Adjust your accelerator pump linkage so that there's just a hair of perceptable play at throttle idle position and the plunger diaphragm can reach it's full at rest position and refill the accelerator pump chamber completely.

Idle mixture is a balance of fuel in the crankcase fine tuned(once pop-off is set) by adjusting idle mixture low speed screw. Pop-off is the idle mixture macro adjuster, the low speed screw is the micro adjuster.

But if yours is falling on it's face and not recovering as you apply throttle, then assuming your accelerator pump is working properly, my first response is to think there's not enough fuel in the mid range because normally slightly rich condition will only cause some initial 4 stroking and then clear out(assuming the pilot and high speed jets are installed and working properly.

At idle, the idle fuel circuit should be balanced to maintain a smooth idle, then when the throttle is cracked open, the mid range should begin flowing fuel, the amount is controlled by the pilot jet circuit, and the fuel is delivered to the carb bore (to mix with air) through the transition ports (Mikuni's Japanese translation calls these bypass ports).

The bypass ports are responsible for contributing a majority of fuel over a wide range of throttle above idle speeds, it's contribution is still quite significant at 70% of throttle. This is why it's so important to keep these tiny orifices whistle clean, because they are small and flow such a alrge majority of the fuel. You can see these holes are just upstream of the throttle butterfly when it's at idle position, these holes are sitting there ready to flow fuel as the butterfly is opened, exposing them to the engine vacuum.

Your mid range lean condition could also be caused by that mylar check valve held with a single screw onto the metering plate. If it's bent and leaking, then at low speeds air will enter the carb's fuel chamber backwards, from the main venturi. So, try to remember if the little Mylar checkvalve flapper piece was laying flat against the backside of the metering plate, or if it was bent such that there was a gap between it and the plate. Sometimes this happens.

Hopefully I have or have not completely confused you! :)
 
The check valve was flat and sealed. The engine just dies (sometimes) when just starting to push the throttle. There is no hesistation or smoke.. just plain dies. There is no time to pull the choke. It also dies at idle if sitting for about 5 - 10 minutes.
 
The check valve was flat and sealed. The engine just dies (sometimes) when just starting to push the throttle. There is no hesistation or smoke.. just plain dies. There is no time to pull the choke. It also dies at idle if sitting for about 5 - 10 minutes.

Sounds like a lean condition, I would try opening the idle mixture screws a good amount, probably one full turn, and see if it improves. Fatten it up a little or a lot, the screws are handy for diagnostic and fine tuning engine stumbles and stuff like that.

If it improves, then back in 1/2 turn from there and see how that does. Could be you need just a tad more fuel to get the transition from idle to mid range working reliably, and the dieing while idling could be the engine is running out of fuel.

At least it sounds like that's what you're experiencing, give it a shot and see, adding fuel won't harm anything as long as it's not super pig rich and washing the oil out of the crankcase.

Never go from idle to WOT if your engine isn't warmed up for at least a few minutes running a few thousand to 3500 RPM first at no wake, the pistons tend to expand faster than the cylinders so doing this could cause a seizure. Temps need to be stabilized before slamming the throttles to WOT.
 
I was goofing around in my clean(er) bilge yesterday, sure is nice to have a good majority of that grime out of there.

So I disconnected the throttle cable position switch and man, what a little doggy acceleration becomes without that ignition advance signal. 6000RPM max, and it takes much longer to get on plane. The interesting aspect is it's more difficult for me to get up on the slalom ski with the switch connected even though the engine has quite noticeable additional grunt. Must be because the impeller is aerating, ingesting air or perhaps cavitating.

This means I'm going to have to pull the pump off soon and get it all back together before winter or wait till spring.
 
Sounds like a lean condition, I would try opening the idle mixture screws a good amount, probably one full turn, and see if it improves. Fatten it up a little or a lot, the screws are handy for diagnostic and fine tuning engine stumbles and stuff like that.

If it improves, then back in 1/2 turn from there and see how that does. Could be you need just a tad more fuel to get the transition from idle to mid range working reliably, and the dieing while idling could be the engine is running out of fuel.

At least it sounds like that's what you're experiencing, give it a shot and see, adding fuel won't harm anything as long as it's not super pig rich and washing the oil out of the crankcase.

Never go from idle to WOT if your engine isn't warmed up for at least a few minutes running a few thousand to 3500 RPM first at no wake, the pistons tend to expand faster than the cylinders so doing this could cause a seizure. Temps need to be stabilized before slamming the throttles to WOT.

Took it out today.. Opened the low-speed screws a full turn... they are now at 2 1/2. Did not die at idle. Died twice around 3000 RPM when moving upward. If it doesn't die, it stutters. Had to wiggle the throttle forward and backward rapidly in order for it to get past the problem spot @ 3000 RPM. When going from higher RPM to lower, perfectly fine.

So to recap... 1 1/2 turns = die between 1500 and 2000. 2 1/2 turns = die ~3000 RPM. I see a trend here. If I plotted this trend line out, it seems like 1 turn is where it should be. What do you think?

I wouldn't anticipate the actual plot wouldn't be linear but how does 1 turn out work for you? Does it eliminate or aggravate the off idle lean stumble that you noticed during the transition from the idle circuit (Mikuni unfortunately calls this "low speed outlet") over to the mid range circuit (Unfortunately Mikuni calls this "bypass holes")?

For reasons I can't explain, I'll stick with Mikuni's nomenclature for now since the Mikuni carb drawing is labeled this way, and it will help you to visualize:

There are three stages of fuel in the carb depending on the throttle position, and the stages have overlap(unless one stage is malfunctioning, which causes flat spots where mixture is too lean due to a lack of fuel and the throttle response is flat or worse).

1) At idle, all the fuel is flowing from the "low speed outlet". As the throttle is opened off idle, fuel normally begins flowing from the "bypass holes" (See mikuni drawing to verify location of these and visualize based on their location in respect to the throttle butterfly plate)

2) As the throttle position is between 25%~70%, the "bypass holes" flow a majority of the fuel, the idle circuit (the fuel flowing past the "low speed adjuster" and out of the "low speed outlet") beyond 25% throttle has near zero effect anymore. The "bypass holes" flow most of the fuel that's in your fuel tank unless you habitually run at throttle position beyond 70%. I typically run my boat down the lake at about 45%~50% throttle, so this fuel is coming from the "bypass holes" and not from the "inner venturi"

3) Once the throttle reaches about 70% travel, the "inner venturi begins contributing fuel, and beyond 70% throttle, both the "inner venturi" and the "bypass holes" are flowing all the fuel, the more the throttle is opened past 70%, the more of the fuel supplied through the "inner venturi", but the "bypass holes" are still important all the way to 100% throttle, they still flow enough fuel to make a difference.

So we went from discussing an off idle stumble to moving the stumble up past the point where the "low speed adjuster" should no longer have an effect, by 3000rpm all the fuel should be flowing from the "bypass holes" but you describe a lean spot at 3000RPM...... This sounds like your "bypass holes" aren't flowing fuel as they should.

So I dunno if what I just described makes any sense for you but just adjusting carb screws (high or low) isn't going to compensate for a big dead spot caused by gummed up "bypass holes".. Have you verified the "bypass holes" were totally clear when you had the carbs torn down?

Here's the Mikuni manual, refer to the drawing on P.6 which shows the flow path of fuel through the carburetor:
www.mikuni.com/pdf/sbn_manual.pdf

Tell me what you think, did you confirm the "bypass holes" were clean and flowing well with carb solvent by shooting the solvent into the brass pilot jet and watching the fuel come shooting out from the "bypass holes" inside the carburetor bore? This is important, b/c 90% of those 30 gallons of fuel in your tank will need to flow through these tiny holes.
 
If my bypass holes are gummed, why does it work fine at 3000 RPM when coming from a higher RPM?

I sprayed carb cleaner through all the holes and watched it come out to the throat. However, I didn't plug the hole with my finger as suggested by Bills86e on this post: http://www.seadooforum.com/showthread.php?40380-Carburetor-Adjustments
I had already put them back in by the time I read his post.

I did the carb rebuild mainly because the boat is new to me and it's a 99, and I had no idea of the condition. I'm not an experienced mech, but I don't think they needed cleaning or rebuilding. There was no buildup anywhere that I saw, and only a couple of little garbage dots in the filters.

I haven't tried it at 1 turn yet.

The port engine is the worse of the two. It also take more finagling to crank that engine.

Accelerator pumps: I reconnected them following the picture in the manual, but this never made sense to me.. and still doesn't. The picture shows the lower connection hooked to the fuel supply and the upper connection hooked to the throat spigots. But when you push and release the plunger, the lower connection is the one doing the blowing and sucking. Seems like you would want that connection hooked to the throat spigots.?.?.?.?.
 
Last edited by a moderator:
If my bypass holes are gummed, why does it work fine at 3000 RPM when coming from a higher RPM?

I sprayed carb cleaner through all the holes and watched it come out to the throat. However, I didn't plug the hole with my finger as suggested by Bills86e on this post: http://www.seadooforum.com/showthread.php?40380-Carburetor-Adjustments
I had already put them back in by the time I read his post.

I did the carb rebuild mainly because the boat is new to me and it's a 99, and I had no idea of the condition. I'm not an experienced mech, but I don't think they needed cleaning or rebuilding. There was no buildup anywhere that I saw, and only a couple of little garbage dots in the filters.

I haven't tried it at 1 turn yet.

The port engine is the worse of the two. It also take more finagling to crank that engine.

Accelerator pumps: I reconnected them following the picture in the manual, but this never made sense to me.. and still doesn't. The picture shows the lower connection hooked to the fuel supply and the upper connection hooked to the throat spigots. But when you push and release the plunger, the lower connection is the one doing the blowing and sucking. Seems like you would want that connection hooked to the throat spigots.?.?.?.?.

If my bypass holes are gummed, why does it work fine at 3000 RPM when coming from a higher RPM?

This happens b/c the air velocity through the carb bore is already built up and the vacuum signal is well established(strongervacuum signal). Most often a flat throttle response appears during light acceleration conditions light (and sudden acceleration in the case of no acc pump shot), and carbs can be tuned leaner if this weren't the case, thus an accelerator pump is installed to compensate for fuel lag. Just a tiny amount of obstruction in the "bypass holes" will make a huge difference.

I sprayed carb cleaner through all the holes and watched it come out to the throat. However, I didn't plug the hole with my finger as suggested by Bills86e on this post: http://www.seadooforum.com/showthrea...or-Adjustments
I had already put them back in by the time I read his post.

Okay, I don't know exactly which hole he's plugging with his finger while spraying carb cleaner without reading it carefully, and parts of the procedure aren't exactly 100% IMO, but in general I agree with most of it. My concern with the procedure is it's nearly verbatim Mikuni's instruction and something was lost in parts of the Japanese to English translation(terminology is horrible). Perhaps holding a finger over the "Low Speed Outlet" during cleaning is the particular reference here, and I don't see an absolute requirement for doing that except it's not a bad idea and the extra pressure will help to dissolve/purge gum from the "bypass holes". Sometimes; it can be tough to get them ("bypass holes") perfectly clear, and there can even be a slight amount of corrosion in them as well, which carb solvent can't remove. To clear the "bypass holes", I simply spray a good shot of carb solvent through the low speed jet while watching to make sure that solvent shoots out a good stream through the "Low Speed Outlet" and the "bypass holes", not dribble out. Dribbling indicates the hole is partially plugged with gum or corrosion. Then I chase the carb cleaner with compressed air.

All this cleaning stuff may be a moot conversation if the carbs were working just fine before removing them, so if that's the case then we should probably concentrate on what may have happened during the assembly.

Accelerator pumps: I reconnected them following the picture in the manual, but this never made sense to me.. and still doesn't. The picture shows the lower connection hooked to the fuel supply and the upper connection hooked to the throat spigots. But when you push and release the plunger, the lower connection is the one doing the blowing and sucking. Seems like you would want that connection hooked to the throat spigots.?.?.?.?.

I would expect the fuel should enter the acc pump from the bottom and exit from the top, simply b/c that any air trapped inside will tend to rise to the top, so it can be purged out and replaced with fresh fuel from the bottom, easier. On mine, the acc pump fuel supply comes from the carb fuel chamber, the one that contains the metering needle. There are a couple of check valves in this system, which keep the fuel moving toward the carb nozzle, and by actuating the pump plunger you should receive a strong shot of fuel into the carb bore. If not, and assuming it's plumbed correctly, then one of the check valves may be clogged or stuck open, there may be air in the fuel supply, or there may be a hole in the internal acc pump diaphragm. The acc pump is actuated by a cam affixed to the carb throttle shaft, and at throttle idle position there should be just a slightly perceptible amount of play in the plunger lever linkage to allow the acc pump plunger to return to full rest position and fully charge the diaphragm in preparation for the next fuel shot.

Two points from this post today, 1) Primarily is, it sounds like you may not be getting a shot from your accelerator pump, which is a common cause for an off-idle stumble, so maybe we should concentrate on comprehending that a bit. 2) You'd be really an exception to the rule if your '99 carbs didn't have some gum in them assuming they'd never been disassembled and cleaned.

So let's back up a little and consider the recent history if you don't mind..... Perhaps it's safe to assume the carbs were working fine until you removed them for disassembly and cleaning, and in that case then we should be able to get them back working again fairly easily simple by retracing the process?

There could be other phenomenon involved as well and it takes a great deal of paying attention to detail on things such as you may even have holes in your metering needle diaphragms, often caused by exposure to carb cleaner, carb cleaner will destroy many rubber parts in short order if they're exposed to it, including the accelerator pump diaphragm. This is one reason I stay far away from putting cleaning solvents in my fuel system, such as water absorbers or seafoam, I don't want my diaphragms to dissolve or harden, fuel filter strainers can be damaged as well, and if they are partially dissolved then the dissolved bits will no doubt be stuck in the "bypass ports" among other places. The other reason is there could be negative impact when solvents are mixed with a 2 stroke oil that's carefully formulated with surfactants and additive packages, etc.
 
Last edited by a moderator:
I didn't notice a problem before I rebuild them. And I didn't spray anything into the accel pumps. I also replaced the valve body gaskets and diaphragms.

I guess I need to take off the air box and look into the throats while someone pushes the throttle so I can check for shots from the accel pump.

Also, I'll set low-speed to 1 turn to see if that makes a difference.

Okay, that all sounds good. How about metering springs, are they still the originals? So, maybe we just need to overcome an acc pump issue....

I think you can check it urself by mirror/flashlight down the bore and grab the carb linkage at the throttle cable connection then pull it open 25% or so, you should clearly see the fuel shot, and hear it too if geese aren't flying over. If no shot, then we can devise some ideas to test it and isolate any issues.
 
I replaced the springs too and the needles and seats. I tested the pop-offs to all be around 30 - 35 psi.

It'll be this weekend before I can look at it. I'll get back to you then. Thanks for the help.
 
Last edited by a moderator:
I replaced the springs too and the needles and seats. I tested the pop-offs to all be around 30 - 35 psi.

It'll be this weekend before I can look at it. I'll get back to you then. Thanks for the help.

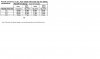
Okay, I'll take a look and see if I can locate the pop-off spec for your application but 30-35 sounds like it's cetainly low enough to avoid a lean transition which would make the throttle response feel flat and lean-die off idle from lack of fuel. One engine is tough starting, so if it's a bit lean then application of choke can help and confirms it's a bit lean but acc pump actuation has a similar effect as priming so if acc pump isn't working then hard starting is a consistent description. I agree we need to confirm your acc pump is working at this point before ripping and tearing anything apart again. As far as pop-off springs go, the correct ones should work just fine as long as the needle seats are the correct size. I dunno exactly which ones you have in there(springs/seats) but keep in in mind there are two different silver springs that cause confusion, silver 95gram and silver 65gram, both the same color but wound in opposite direction, which is the only visible clue between the two aside from physically testing pop off. For instance, the gold 115gram spring +2.0 seat yields 32psi pop and 65gram +1.5 seat also yields the same pop-off pressure.

There's always an obligatory canned response entwined with every troubleshooting session it seems, so we must always pay homage to the spirit. Not that I subscribe to canned solutions or agree it's acceptable to compensate pop pressure with pilot jet size. (Although a pilot jet size increase can eliminate a lean stumble b/c "bypass port" fuel flow is a function of pilot jet orifice size, pop pressure is simply not the same subject and no reasonable amount of pop is gong to have an effect at 50% throttle.):

"POP-OFF PRESSURE AND LOW SPEED JET
How do pop-off pressure and the low speed jet work together?
These two circuits overlap, although the low speed jet continues past 1/4 throttle where pop-off pressure has little to no effect. In general, if your pop-off is slightly too high, you can compensate by increasing the size of the low speed jet. The opposite is also true; if the low speed jet is slightly too small, you can compensate with less pop-off pressure. Once you get to the point where you think each is adjusted correctly, it's best to try varying the two to make certain you have the best combination. For example: If you have pop-off pressure of 30 psi and a 67.5 low speed jet, you should also try a pop-off of say 35 psi and a 70 low speed jet. To verify that you have the correct combination there are two things to test:

1. Throttle response should be crisp, with no hesitation.

2. Ride the boat at a constant 1/4 throttle opening for about 1 minute and then quickly open the throttle fully, there should be no hesitation and the engine should not show signs of being loaded up. If it hesitates, it's lean; if it's loaded up, it's rich. The first test is to check pop-off pressure, the second test is checking the correctness of the low speed jet size. Take the time to ride the boat slowly and thoroughly test your jetting changes. After a jet change, it takes the engine a few minutes of use to completely respond to the change.

When does it become necessary to adjust pop-off?
When personal watercraft come from the factory they have fairly high pop-off due to the fact that they also have somewhat restrictive air intake systems that cause the engine to generate very high manifold pressures; the higher the manifold pressures, the higher the pop-off pressure required to properly regulate the fuel delivery to the engine. As you modify or change your watercraft's flame arrestor to a less restrictive type you will most likely start to experience a lean hesitation caused by a decrease in manifold pressure. This change will require an adjustment in pop-off pressure to regain crisp throttle response. Because most aftermarket flame arrestors are less restrictive than stock, you will need to decrease pop-off to compensate.

The Super BN carbs that come from Mikuni America are already set up for performance applications, and come with pop-off settings lower than the carbs that come as original equipment. Pop-off pressure, (the regulator portion of the Super BN) is a tuneable component of the Super BN and works in conjunction with the low speed jet for good initial throttle response. The components that make up the regulator portion of the Super BN are:

1. Needle Valve, available in 4 sizes, 1.5, 2.0, 2.3 and 2.5 (Note: Some OEM
carbs have 1.2)
2. Arm Spring, available in 4 sizes, 115gr., 95gr., 80gr. And 65 gr.
3. Arm
4. Regulator Diaphragm

The arm has a limited range of adjustment; from the arm being level with the adjacent carb surface to being bent upwards no more than .040" (1mm) above that surface. If the arm is bent upwards too much, it can cause the needle valve to be held open when the diaphragm and cover are installed. If the arm is bent down, its movement becomes limited and may not be enough to allow the needle valve to open fully.

ADJUSTING POP-OFF PRESSURE
Pop-off pressure is adjusted by replacing the arm spring with one of a different gram rating. Sometimes, in order to achieve the desired pop-off pressure, it is also necessary to change the needle valve size; keep in mind that it's always best to use the smallest needle valve size to obtain the correct pop-off pressure.

MEASURING POP-OFF PRESSURE
You can measure pop-off pressure with a "pop-off" pump, available from Mikuni through your dealer.

CHECKING POP-OFF WITH A POP-OFF PUMP
1. Attach the pump to the fuel inlet nipple.
2. Cover, or in some way plug the fuel return nipple.
3. Remove the regulator diaphragm to observe the needle valve.
4. During testing, it is important to obtain consistent readings. To accomplish
this, it is necessary to keep the needle valve wet. Use WD-40 or something
similar to wet the needle valve. Note: Don't use gasoline because of the fire
hazard. Protect your eyes from the spray when the needle pops open.
5. Pressurize the carb with the pump until the needle valve pops open, being
careful to note the indicated pressure. Test the valve 3 times to assure an
accurate reading.

An indication that your pop-off needs to be adjusted is a lean hesitation when you open the throttle from idle; in the extreme, the engine may even die. It is much easier to detect a lean pop-off than it is a rich one, so it is wise to adjust your pop-off until you get it too lean and then back up until the lean hesitation disappears.

Note: It is recommended that you do not use too large a needle valve for your
application. Many tuners recommend using 2.3 or 2.5 needle valve in all cases. Actually, we recommend using the smallest needle valve that gives you the correct pop-off pressure for your engine. A 1.5 needle valve can flow the maximum amount of fuel that the Super BN can pump, so the only reason to use a larger needle valve is to obtain the correct needle valve and arm spring combination (pop-off) for your watercraft."
 
Last weekend was a bust. Had the niece and nephew and we went to the fair. Yea, I got my Gravitron on.

The accel pump ain't squirtin nothin out. Neither one of em. Maybe it's because I haven't run the engines in 2 weeks? The plunger goes in all the way when I pull the throttle linkage. Oh, and 1 of the pumps is brand spankin new, cause I broke the old one while doing my 1st carb rebuilt. So... I don't know... Gonna go crank it then check again. Any ideas?

Yeah, you're gonna need to get the acc pump working for sure, unless you change the pop-off lower and maybe have to install larger pilot jets to recalibrate for no acc pump. These carbs were calibrated a little richer until they began using acc pumps to get over the idle-mid range fuel circuit transition hump.

Possibilities:

I'd look at the acc nozzles themselves, they may be gummed inside. pull the tubing off them and stick straw from a carb cleaner aerosol can in there and give them a few shots of carb cleaner to loosen up any gum.

Connect a piece of tubing to the acc pump inlet and drop it into a jar of fuel. Accuate the acc pump linkage and see if you can get it to draw the fuel up the tubing and shoot it out of the nozzles in the carb bore. This is a simple little diaphragm pump setup, one way check valve on the inlet fuel enters as the diaphragm plunger moves to the relaxed position it draws fuel into the diaphragm chamber through the inlet check valve. Then as the plunger is pushed by the acc lingakge, that fuel is forced out the outlet tube and into the two nozzles, each one of these has an internal one way check valve, the fuel goes in but cannot come back out. So it's just pumping fuel up into the diaphragm chamber and then squirting it back out the two nozzles.

check valve on the inlet, and another checkvalve on the outlet, both facing the same direction of fuel flow.

Be careful not to blow carburetor solvent into the acc pump itself, the rubberized diaphragm will be dissolved by the acetone and develop a hole, then leak and won't pump fuel due to the air leaking through the hole in the diaphragm.
 
2013-09-29 11.44.03.jpg

Can you verify I have the lines correct? Do I have the recharge jet in the correct line? You can see it in the left tube in the pic.
 
Status
Not open for further replies.
Back
Top