2006 Challenger Reconstruction

Note: This site contains eBay affiliate links for which SeaDooForum.com may be compensated
Status
Not open for further replies.

xintersecty

New Member
As most of you know, I blew my engine last spring. Now I have the money and a new engine. This is the get it working thread. Of course with any project like this, when the engine out, it's time to do mods

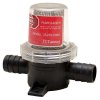
1) Install a new water filter for the Inter-cooler and a tow shut off valve.
2015-08-27 17.35.15.jpg

I got the mount on the boat, I don't have pictures as I was running out of day light.

2) Redo the bilge pump

The old one seen better days and the auto sense had killed my battery more than once
sm_2015-08-19 19.08.09.jpg

Who ever attached did not use the right screws
sm_2015-08-19 19.10.11.jpg

I am replacing the bilge pump with a float switch for auto operations and going from one to two. Pump 1 (1000 GPH) is before the front motor mount where the old one was located. Pump 2 (500 GPH) is going to the right of the drive shaft in a low spot next to the exhaust system
sm_2015-08-27 17.47.50.jpg

I love these pumps, they are small and easily replaced.

For the aft pump, since I am on the hull, I took three small stainless screws and epoxy them in position.
sm_2015-08-27 18.34.54.jpg

Once tested that the screws in the right place for the pump, I then followed up with JB weld to attach them to the boat.
sm_2015-08-27 18.52.17.jpg

Let cure over night.

I will keep my progress updated here.
 
This is going to be a very, very interesting and a must follow thread. I sure hope you are going to keep track of your hours spent in the reconstruction of your Challenger and most important the money you are spending. I hope you are planning to keep the Seadoo a long time because you are going to spend a ton of money and time on this project. Go xintersecty go.
 
Last edited by a moderator:
I got back to my boat. Start with the water filter and tow shut off.
sm_2015-08-31 20.02.58.jpg

I got the front pump mounted. BTW this one runs at 1000 GPH at 2.5 Amps.
sm_2015-08-31 18.59.51.jpg
sm_2015-08-31 18.55.25.jpg
This pump is mounted between the fuel tank and the front engine mount.

I used a small screw driver / drill combo. I highly suggest that this guy is worth the money. Nice and small for working in very very confined spaces. Granted my engine is out but I take up a lot of room :-D

I did not like the way the rear mounts for the secondary pump was going. So I came up with a better idea. I cut a board to form the base. I am going to drill holes and stud from the bottom side screws. Then I can epoxy the base into the bottom of the boat. It's just a bit of fine marine ply. I put epoxy on the outside to protect it in the wet environment.

This is showing the rear pump and float switch.
sm_2015-08-31 20.16.30.jpg

The float switch has a nice 2 inch movement. It's going slight above the level of the front pump
sm_2015-08-31 18.56.37.jpg
 
BIG NEWS the engine came. Bought from the fine people who own this forum.

The box
sm_IMG_2051.JPG

Nice shipping container and support.
sm_IMG_2065.JPG

Brand new super charger. Came with the engine. This winter, I will take my old super charger, rebuild it and put that into my RXT.
sm_IMG_2058.JPG

New intake with new intercooler
sm_IMG_2062.JPG
 
Is that a new engine or a rebuilt and how much did it set you back? It would be nice if you also state how much these items cost. Never know I might be in the same position someday and would like to know the cost of such an endeavor.
 
Nice work man, but keep a eye on that water strainer, they get clogged easily if the water is dirty. You should drop in a external intercooler ;)
 
Nice work man, but keep a eye on that water strainer, they get clogged easily if the water is dirty. You should drop in a external intercooler ;)

Oh I so want to add on an additional intercooler and just slightly more boost. Of course that means, bigger injectors and I will need to start programming the curves on the MPEM and that's even more money.

Maybe next year for the external intercooler. Say about 5 to 10 more HP. I am going for a stable engine and platform first and maybe mod it later.

You're right on the intercooler strainer. that's going on pre-ride and post ride check list. I live up the creek with a shallow spot I have to transverse. I figured in come in handy.
 
Is that a new engine or a rebuilt and how much did it set you back? It would be nice if you also state how much these items cost. Never know I might be in the same position someday and would like to know the cost of such an endeavor.

That engine long block was 5274.99 including shipping to SC. Since you live in Fl, you could have driven across state and picked up the engine yourself from Riva.

The sump pump mods and filter mods is about 100 bucks. The 1000 GPH was from overtons for about 44 dollars. http://www.overtons.com/modperl/product/details.cgi?pdesc=Johnson-Cartridge-Bilge-Pump-1000-GPH&i=27397

It's twice as much as the 500 gph. I will keep everybody apprised of prices.
 
There are a variety of screens available for the water strainers, FWIW. I chose a screen that has ~1/8" holes for mine and it traps mostly organic debris such as sticks and grass. The silt/sand/dirt must be passing through b/c it's not being trapped and has never clogged (I do avoid operating in shallows as a rule but occasionally we all do).
 
There are a variety of screens available for the water strainers, FWIW. I chose a screen that has ~1/8" holes for mine and it traps mostly organic debris such as sticks and grass. The silt/sand/dirt must be passing through b/c it's not being trapped and has never clogged (I do avoid operating in shallows as a rule but occasionally we all do).

Well then, the screen on mine is pretty fine. Once I get going, I will see if it's worth it. I went looking for screens and I could not find any. This is the model I got: http://rivaracing.com/i-17283577-riva-water-filters-strainer.html

I would appreciate any resources for screens.
 
That engine long block was 5274.99 including shipping to SC. Since you live in Fl, you could have driven across state and picked up the engine yourself from Riva.

The sump pump mods and filter mods is about 100 bucks. The 1000 GPH was from overtons for about 44 dollars. http://www.overtons.com/modperl/product/details.cgi?pdesc=Johnson-Cartridge-Bilge-Pump-1000-GPH&i=27397

It's twice as much as the 500 gph. I will keep everybody apprised of prices.

what mods are these?
 
Water strainer - Jabsco 36200-0000 with 3/4" hose nipples - This is the one I installed on my Eliminator jet boat (rigged Berkeley) about 20 years ago. Screen size - I can just slip the fluted end of a 1/16 drill bit through the holes in the screen, it doesn't trap silt or sand. This is the "coarse" screen and there's both "fine" screen and "coarse" replacement screens available, o-ring I think too, on their web site.

Pressure:

The Berkeley is famous for pushing fairly high cooling water pressure and thus known to pop engine gaskets yet I haven't experienced any leakage or damage to this strainer (knock on fiberglass+wood). I can't speak for this application on the 4-tec, of course (knock on fiberglass and foam I guess?).
 

Attachments

  • $T2eC16dHJGkE9no8iPv%28BRW97qOvVg~~60_1.JPG
    $T2eC16dHJGkE9no8iPv%28BRW97qOvVg~~60_1.JPG
    18.7 KB · Views: 18
OK, I had to leave my home to go back to my hometown for work. So nothing boat got done and I did not even saw my mother. That busy. OK updates!

Engine Mounts
I had to buy new mounts. About 120 bucks for three non-Seadoo brand mounts. They look OEM.

Old and new mount plus corroded hardware which got cleaned up.
2015-09-03 19.44.51.jpg

Old mount. You can see the new bilge pump with float switch nearby.
sm_2015-09-12 15.50.17.jpg

I cleaned up the hardware
2015-09-13 12.20.43.jpg

It's in but losey goosey. Once the engine is mounted, then it's aligned, and finally bolted in place with loctite 243
2015-09-13 12.23.27.jpg
 
Last edited by a moderator:
Bilge Pump

Here is a picture of the aft bilge pump. I used epoxy to hold down the board and that did not stick. I got silicone in there to see if that will hold it. I got these johnson pumps as you can just swap out the motors.
2015-09-03 19.02.22.jpg

Here is the work for the second outlet. this is the port side of the boat.
2015-09-06 13.10.32.jpg
2015-09-06 13.11.13.jpg
2015-09-06 19.50.26.jpg
 
Starter and the Air Intake

Starter
I had to buy a new starter (used, 80$) as mine was showing a lot of rust. I will pull it apart and rebuild it. I keep as spare for the boat and ski.
sm_2015-09-13 12.36.19.jpg

Air intake
I got a more complete long block this came with the engine and new intercooler.
2015-09-13 13.19.04.jpg

The business side of an intercooler. Air is forced through the radius into the fins and rounded into the intakes.
2015-09-13 13.19.14.jpg

Attach the oil stick before mounting.
2015-09-13 13.32.02.jpg

Mounted with all the electronic mounting hardware
sm_2015-09-13 16.37.18.jpg
 
Last edited by a moderator:
Throttle Body.

Mine was looking bad from the neglect. Too much time near and in salt water without the needed TLC
sm_2015-09-13 16.27.30.jpg

The old seal
sm_2015-09-13 19.59.05.jpg

One of the mounting nuts before and after
sm_2015-09-13 16.53.44.jpgsm_2015-09-13 16.55.14.jpg

Finally I replaced a couple of screws with hex heads to make it easier to fix.
sm_2015-09-14 12.16.02.jpg
 
Last edited by a moderator:
Last night, got more stuff installed.

Motor lift mounts. Please install before the exhaust header otherwise you will be taking the exhaust header off and back on (opps).
sm_2015-09-14 18.59.13.jpg

Exhaust header. Bought a used one on ebay and cleaned it. About 80 bucks. That was a super cheap one, normally 150+.
sm_2015-09-14 18.59.18.jpg

Throttle Body
sm_2015-09-14 19.42.56.jpg

Oil fill and tops valve. Prior neglect is showing.
sm_2015-09-14 19.43.09.jpg
 
I am behind on work, behind of getting this done, behind on posting pictures, behind on working my other car...behind on everything. Progress jump! Once I get some time I will upload all the recent pictures. The follow video says it all:

[video=youtube;SKYaivdTo9c]https://www.youtube.com/watch?v=SKYaivdTo9c&feature=youtu.be[/video]
 
OK Here is the picture update.

I got impatient and cocky and started to put the engine into the boat. It is really a two person job. You can pull it using one person putting back into the boat really needs two people.
sm_2015-09-23 20.57.42.jpg

While I had it out, I found more missing sensors. Forgot the knock sensor
sm_2015-09-24 07.40.47.jpg

A co-worker came after work and help me get the engine into the boat. You need one person to bring it up and down while the other in the boat maneuvers the engine around. The engine needs to be tilted to even get into the compartment and then level with the floor. After all that with the placement of the engine lift attachments, it tilts to one side.
2015-09-24 17.46.54.jpg

I borrowed an engine alignment tool from the local shop.
sm_2015-09-25 15.47.55.jpg
sm_2015-09-25 16.34.37.jpg
 
Status
Not open for further replies.
Back
Top