2002 GTX 951 Carb Engine Seized

Note: This site contains eBay affiliate links for which SeaDooForum.com may be compensated
Status
Not open for further replies.

etemplet

Premium Member
Premium Member
Gonna be an interesting day. Pulled the engine out of the GTX late yesterday. I was considering doing a top end in the ski. For anyone that might come across this situation the exhaust system can be removed without separating the pipe at the joint.
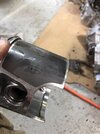
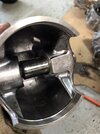
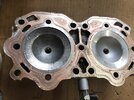
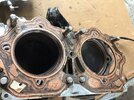
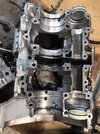
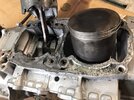
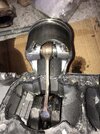
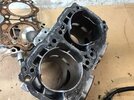
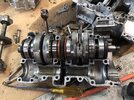
The engine is suppose to be a fairly low hour SBT rebuild (maybe 5 hours run time). I saw some metal jammed in between piston on the Mag cylinder. Found a couple of small chunks of aluminum in the exhaust. I'm kinda excited about what I might find. Cylinder walls don't look that bad from what I can see. I am mulling over what failed that could have locked the engine in such a way. It's a premix so.... we'll see shortly. There is evidence of chicken-shite craftsmenship regarding the install.

I'm not faulting SBT at all. I'll find what happened and as I see with most failures they are operator induced.

GTX 951 Engine Removed (2).JPEG
 
Well it wasn't too difficult to get apart. I'm surprised at the amount of gasket sealant they used and the type. I don't use anything on the head or the cylinder base gaskets. I was told there were only a few hours on this engine. I'm gonna measure the cylinders tomorrow. Mag cylinder skirt is destroyed, mag connecting rod is bent and bearing is destroyed. It needs a crankshaft. I generally don't pull engines down this far but the shop I use is so slow I'm repairing engines "in house."
Here are a few pictures of the carnage. Another one of those... "It was running fine. It has just been rebuilt and onl a few hours on it." Yea Crunch... it's dead.
 

Attachments

  • Engine Disassembly (1).JPEG
    Engine Disassembly (1).JPEG
    130.8 KB · Views: 44
  • Engine Disassembly (2).JPEG
    Engine Disassembly (2).JPEG
    150.9 KB · Views: 42
  • Engine Disassembly (10).JPEG
    Engine Disassembly (10).JPEG
    220.4 KB · Views: 43
  • Engine Disassembly (11).JPEG
    Engine Disassembly (11).JPEG
    234 KB · Views: 44
  • Engine Disassembly (14).JPEG
    Engine Disassembly (14).JPEG
    213.7 KB · Views: 42
  • Engine Disassembly 3 (1).JPEG
    Engine Disassembly 3 (1).JPEG
    251 KB · Views: 42
  • Engine Disassembly 3 (4).JPEG
    Engine Disassembly 3 (4).JPEG
    133.4 KB · Views: 42
  • Engine Disassembly 3 (3).JPEG
    Engine Disassembly 3 (3).JPEG
    229.3 KB · Views: 43
  • Engine Disassembly 3 (5).JPEG
    Engine Disassembly 3 (5).JPEG
    217.8 KB · Views: 40
  • Engine Disassembly 3 (6).JPEG
    Engine Disassembly 3 (6).JPEG
    262.7 KB · Views: 39
Last edited:
Looking forward to seeing final root cause analysis.
Today I'll measure the cylinder bores and piston sizes. I'd hate to accuse SBT of building this engine if they didn't or how old the engine is based on what I was told (only about 5 hours on the engine). Looks like some jackleg did this job.
 
Cylinder bores are (.010") larger than the Pistons and with only 5 hours or so on the engine I'll have to conclude the engine was assembled that way. They used RTV on the engine cases and lip seals. Pitiful. I'm having to dig all of that stuff out of there as I prep for reassembly. They machined the head which looks nice but has not been deburred in the slightest. Cylinder bore is already too large for 1mm over pistons. I have other cylinders but may opt for 1.5mm oversize or resleeve.

So looks like a piston skirt failure. Bore size is hella sloppy and likely contributed to the failure. Connecting rod bent big time. Hopefully it will all be normal from here on out.

I did a good bit of deburring on the head, some stoning, and measuring. Looks good but it didn't look like that when I removed. it.

951 head machined.jpeg
 
I see someone machined the top of the cylinders. At this point... I'm thinking of tossing the whole top end. I have another one that is .25mm over right now but needs boring. Easy enough to bore and have a good engine. Don't want to problems. Once and one.
 
Looks like "they" used permatex copper spray gasket maker on the cylinder head gasket...that didn't work for me, leaked big time. I have a feeling I will be attempting to do what you are doing here soon. It's way more than I ever thought I may go but I'm not too scared to try.
 
Looks like "they" used permatex copper spray gasket maker on the cylinder head gasket...that didn't work for me, leaked big time. I have a feeling I will be attempting to do what you are doing here soon. It's way more than I ever thought I may go but I'm not too scared to try.

That stuff was still SOFT on the head gasket. I guess I'll pony up for the 1.5mm pistons. $125 each. I'll be at $1000 in parts to build this engine. Sad that we can't get a decent shop with a decent lead time.
 
I see someone machined the top of the cylinders. At this point... I'm thinking of tossing the whole top end. I have another one that is .25mm over right now but needs boring. Easy enough to bore and have a good engine. Don't want to problems. Once and one.
"I see someone machined the top of the cylinders." Could this be to correct a large squish gap?
 
Well it wasn't too difficult to get apart. I'm surprised at the amount of gasket sealant they used and the type. I don't use anything on the head or the cylinder base gaskets. I was told there were only a few hours on this engine. I'm gonna measure the cylinders tomorrow. Mag cylinder skirt is destroyed, mag connecting rod is bent and bearing is destroyed. It needs a crankshaft. I generally don't pull engines down this far but the shop I use is so slow I'm repairing engines "in house."
Here are a few pictures of the carnage. Another one of those... "It was running fine. It has just been rebuilt and onl a few hours on it." Yea Crunch... it's dead.
The rear cylinder on the cylinder head has no carbon deposits. Could this mean some water got in?
 
Today I'll measure the cylinder bores and piston sizes. I'd hate to accuse SBT of building this engine if they didn't or how old the engine is based on what I was told (only about 5 hours on the engine). Looks like some jackleg did this job.
"Looks like some jackleg did this job." Sadly that is too common!
 
The rear cylinder on the cylinder head has no carbon deposits. Could this mean some water got in?
Any ideas of the root cause so far? hydro locked from a leaking cylinder head gasket/copper gasket spray combination? I'm really interested in how this rebuild is going..:)
 
Cylinder bores are (.010") larger than the Pistons and with only 5 hours or so on the engine I'll have to conclude the engine was assembled that way. They used RTV on the engine cases and lip seals. Pitiful. I'm having to dig all of that stuff out of there as I prep for reassembly. They machined the head which looks nice but has not been deburred in the slightest. Cylinder bore is already too large for 1mm over pistons. I have other cylinders but may opt for 1.5mm oversize or resleeve.

So looks like a piston skirt failure. Bore size is hella sloppy and likely contributed to the failure. Connecting rod bent big time. Hopefully it will all be normal from here on out.

I did a good bit of deburring on the head, some stoning, and measuring. Looks good but it didn't look like that when I removed. it.

View attachment 60371
That looks better than Group K and Perry Performance Group!
 
I think originally the shop owners are doing the work and they do quality work. Then they hire people and the quality starts going down hill. My cousin has a automotive shop and it is a struggle.
 
Last edited:
Fun fact about SBT if you send them the number on the plate they can tell you when it was shipped out. Their records go back at least through 2011, as I had one I inquired about this morning and they told me it was purchased in April of 2011.
 
Fun fact about SBT if you send them the number on the plate they can tell you when it was shipped out. Their records go back at least through 2011, as I had one I inquired about this morning and they told me it was purchased in April of 2011.
Thats great info I'm gonna give them a call on this engine. I'm curious.
 
Man I had this engine all cleaned up an ready to build and was only holding off to see what I could do for a new crank for the 951. Tom at SES contacted me and said he needed some engines to build so I sent this one and a DI to him. :) I got another 951 back from him so I put it in this ski. Fired it up today..... gently. It said..." put me in the water." So that will be this week. Water levels are really high around here because of all the rain but I'm getting ready for my first ride of the year. Ha ha. I think the temp was around 80 degrees today. I love it in the south. :D

2000 GTX 951 Engine Install (3).JPG
 
Last edited:
Man I had this engine all cleaned up an ready to build and was only holding off to see what I could do for a new crank for the 951. Tom at SES contacted me and said he needed some engines to build so I sent this one and a DI to him. :) I got another 951 back from him so I put it in this ski. Fired it up today..... gently. It said..." put me in the water." So that will be this week. Water levels are really high around here because of all the rain but I'm getting ready for my first ride of the year. Ha ha. I think the temp was around 80 degrees today. I love it in the south. :D

View attachment 61311
You know those water deflector brackets could use a coat of matching silver paint...
Just giving you crap, looks great!
 
You know those water deflector brackets could use a coat of matching silver paint...
Just giving you crap, looks great!

Actually I'm not done yet. LOL I put it in the water today and did the first 1/2 hour break-in. Those 951s are hard to beat in the old style GTX hull. I haven't quite figured out the good way to fog the engine though. Just can't get the oil in the intake like I want to. Any ideas??
 
Actually I'm not done yet. LOL I put it in the water today and did the first 1/2 hour break-in. Those 951s are hard to beat in the old style GTX hull. I haven't quite figured out the good way to fog the engine though. Just can't get the oil in the intake like I want to. Any ideas??
Yes, install the airbox from a Di as it has a fogging port already built in.
 
A DIY option might be to drill a small Hole(s) in the Airbox at the proper location, install a Rubber Grommet(s) and plug it with a removable Nylon Plug(s).Rubber Grommet.jpgNylon Door Panel Retainer.jpg
 
Status
Not open for further replies.
Back
Top