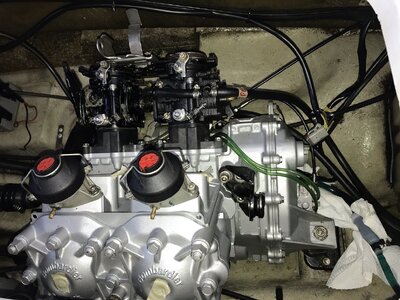
2000 GTX carburetor removal

Note: This site contains eBay affiliate links for which SeaDooForum.com may be compensated
Status
Not open for further replies.

Daniel2500

New Member
Hi all!

New member here.

I have a 2000 GTX millennium edition. Purchased it new. I just finished replacing the fuel lines and need to rebuild the carburetors. Are there any tips, tricks on the procedure to remove them? Or maybe even some pictures of the process? It appears you have to be a contortionist to get them out. Any help/ideas is greatly appreciated!

Thanks!

Dan
 
I found it easier to remove the exhaust pipe and then you have much better access to the carbs. The pipe is a tight fit but once you figure out how it comes out it will go in and out much easier. I recommend taking picture of your carb setup, so you can see which hoses go where and how choke and throttle cables hook back up.
Also make sure you use only a Mikuni rebuild kit, the generic ones never work right.
 
Hi Grim,

Thanks for the information! I was thinking about removing the exhaust. But, I read that it can be difficult to seal completely when reinstalling. Have you had any issues with sealing the exhaust? Thanks again!
 
I remove it as a whole, I don't split it. So take it off at the manifold and where it goes into the baffle (big black rubber section). Then work it out of the engine bay.
 
I have the same ski and 2 1998 GTX limited that I bought. Leave the exhaust I. Place. Take a 1/4 socket and take a 6 mm allen wrench) jI think that’s what fits the carb bolts), cut the Allen wrench off at about 3”. Insert it into the 1/4” socket. You can remove the 4 bolts easily. Of course remove the airbox first. I’ve rebuilt the carbs on all 3. The first was a struggle and pain after removing the exhaust. The second ski went much easier.
 
I have the same ski and 2 1998 GTX limited that I bought. Leave the exhaust I. Place. Take a 1/4 socket and take a 6 mm allen wrench) jI think that’s what fits the carb bolts), cut the Allen wrench off at about 3”. Insert it into the 1/4” socket. You can remove the 4 bolts easily. Of course remove the airbox first. I’ve rebuilt the carbs on all 3. The first was a struggle and pain after removing the exhaust. The second ski went much easier.
I appreciate this! Any tips on getting the airbox out? I started messing with it a couple of weekends ago. It is definitely tight in there! Thanks!
 
Be gentle getting the airbox out. You have to fondle it. :)
I would definitely NOT touch the exhaust. Disconnect the choke cable and remove it first thing. Very small metric allen wrench needed for each carb. Sometimes the set screw can't be seen because of the location but they are there. No needed to loosen the set screws very much just a1/2 turn. Slide the choke rod out. Reach in and disconnect the throttle cable, remove the fuel feed line and return line. Also the pulse line to the fuel pump. As @SIMPLEARKANSAN stated cut allen wrench to fit the carb allen head cap screws. It helps to remove the large rubber o-rings to get the screws/bolts out easier. You're gonna have a bracket bolt to loosen on the exhaust manifold (be gentle with it especially if it has the rubber mount.
This picture might help you visualize where everything is on the carbs. In this picture, I had to remove the carbs to install the exhaust manifold. This was a new engine installation and I thought it would be easier to install the carbs first. I was wrong. :D Good Luck.


GTX Limited Carbs Complete (1).JPEG
 
Last edited:
Be gentle getting the airbox out. You have to fondle it. :)
I would definitely NOT touch the exhaust. Disconnect the choke cable and remove it first thing. Very small metric allen wrench needed for each carb. Sometimes the set screw can't be seen because of the location but they are there. No needed to loosen the set screws very much just a1/2 turn. Slide the choke rod out. Reach in and disconnect the throttle cable, remove the fuel feed line and return line. Also the pulse line to the fuel pump. As @SIMPLEARKANSAN stated cut a socket to fit the carb allen head cap screws. It helps to remove the large rubber o-rings to get the screws/bolts out easier. You're gonna have a bracket bolt to loosen on the exhaust manifold (be gentle with it especially if it has the rubber mount.
This picture might help you visualize where everything is on the carbs. In this picture, I had to remove the carbs to install the exhaust manifold. This was a new engine installation and I thought it would be easier to install the carbs first. I was wrong. :D Good Luck.


View attachment 61505
This really helps! Thanks!
 
I just finished doing this myself on my 951 xp. I can say for sure to leave the exhaust on unless you have the custom tool to tighten the nut in the back. I removed my engine to clean the hull and when I put it back together I made this mistake. I had to remove the carbs, put the exhaust bolt on, and then put the carbs back on. Another thing that helps is once the Allen wrench is on, you can put a 6mm socket on a screwdriver and connect it to the end of the allen wrench so there’s more room to leverage it. I couldn’t have tightened it down without that.
 
Everyone has their way of doing things, pick what best works for you on the exhaust system. I'm a medium size dude but I have big hands, I just cant get in there very well. Taking it off is easier than putting it back on by far. That is why I remove the exhaust. And I was not familiar with all the hoses and cables. Its hard to put those all back in the right spot. You'll figure it out. Whichever way you go tag your lines and take pictures, it will save your butt when you go to put it back together. When you have the carbs off take a few pics of those too, it'll help during the rebuild.
 
Status
Not open for further replies.
Back
Top