Y2k14JK
Member
Hi everyone! I recently picked up a '96 speedster as aforementioned. Overall it's in decent shape, but I knew before I bought it that I would be getting my hands dirty. First time boat owner, so forgive all my newb questions. I've hit that point in my life when I'm ready to leadrn about boats, and I think this will be a fun project. Seats are in pretty good shape except for one little spot, but they will definitely last a season or so. I'm already looking into some hydropturf for the swim deck, and probably the interior itself. For the background, this particular boat had been sitting this year. Owner had changed shifts at work and no longer found time to enjoy it. I picked it up for a good price after some realizing we had met each other previously. Anyway, after charging the battery, I took it out to put it in the water and find out exactly what I will be dealing with. Here are some observations-
1. Post beeped immediately after attaching the lanyard, no pause whatsoever. PO did mention that it would occasionally shut off, so I'm planning on cleaning both the post and lanyard.
2. Engines fired right up after making sure there was gas and oil.
3. Shifted just fine from neutral-forward-reverse.
4. Port engine throttle was completely floppy - more on that later
5. All gauges were haywire except the tachs. Speedo did not work, fuel guage read empty, oil light was on.
6. Boat would accelerate to about 10mph, but rev much farther than that without accelerating anymore. Cavitation if I understand that correctly.
7. It didn't stall on me during the 10 minute test run I used.
8. It has been converted to a full sized battery that looks relatively new.
9. trailer is in good shape.
10. Ready to LEARN, and have already started.
Ok, so now on to the fun part!
Thanks to this great forum, after giving the boat a thorough cleaning except for the engine compartment, I started in with the throttle. Opened it up, found the friction screw, and BAM! First repair is completed.
I also replaced the bulbs on the trailer lights, made sure that the boat lights are working, and familiarized myself with the overall layout. A small added bonus is that the boat did come with the shop manual.
Next thing I did was open up the engine compartment. It's definitely dirty down there, so first question - What do you guys like to use to clean this? Is there a safe spray that can just be rinsed off, or do I need to protect all electrical connections and power wash?
Also noticed that the struts for the cover are shot, so planning on replacing those with the 130lb variety that I came across somewhere here on the forum.
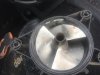
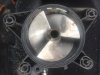
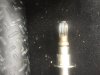
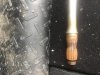
Next thing I did was remove the driveline covers to inspect the carbon seals. It appears as though they are already pushed too far forward, so I want to know exactly what I'm looking at. Does this mean the carbon seals are completely worn out? What do i need to replace?
Next thing I'm going to check is the fuses and then see what I can do about getting the gauges working properly. Any help and guidance is greatly appreciated, and thank you for the forum! Oh, and I'm Adam")


1. Post beeped immediately after attaching the lanyard, no pause whatsoever. PO did mention that it would occasionally shut off, so I'm planning on cleaning both the post and lanyard.
2. Engines fired right up after making sure there was gas and oil.
3. Shifted just fine from neutral-forward-reverse.
4. Port engine throttle was completely floppy - more on that later
5. All gauges were haywire except the tachs. Speedo did not work, fuel guage read empty, oil light was on.
6. Boat would accelerate to about 10mph, but rev much farther than that without accelerating anymore. Cavitation if I understand that correctly.
7. It didn't stall on me during the 10 minute test run I used.
8. It has been converted to a full sized battery that looks relatively new.
9. trailer is in good shape.
10. Ready to LEARN, and have already started.
Ok, so now on to the fun part!
Thanks to this great forum, after giving the boat a thorough cleaning except for the engine compartment, I started in with the throttle. Opened it up, found the friction screw, and BAM! First repair is completed.
I also replaced the bulbs on the trailer lights, made sure that the boat lights are working, and familiarized myself with the overall layout. A small added bonus is that the boat did come with the shop manual.
Next thing I did was open up the engine compartment. It's definitely dirty down there, so first question - What do you guys like to use to clean this? Is there a safe spray that can just be rinsed off, or do I need to protect all electrical connections and power wash?
Also noticed that the struts for the cover are shot, so planning on replacing those with the 130lb variety that I came across somewhere here on the forum.
Next thing I did was remove the driveline covers to inspect the carbon seals. It appears as though they are already pushed too far forward, so I want to know exactly what I'm looking at. Does this mean the carbon seals are completely worn out? What do i need to replace?
Next thing I'm going to check is the fuses and then see what I can do about getting the gauges working properly. Any help and guidance is greatly appreciated, and thank you for the forum! Oh, and I'm Adam