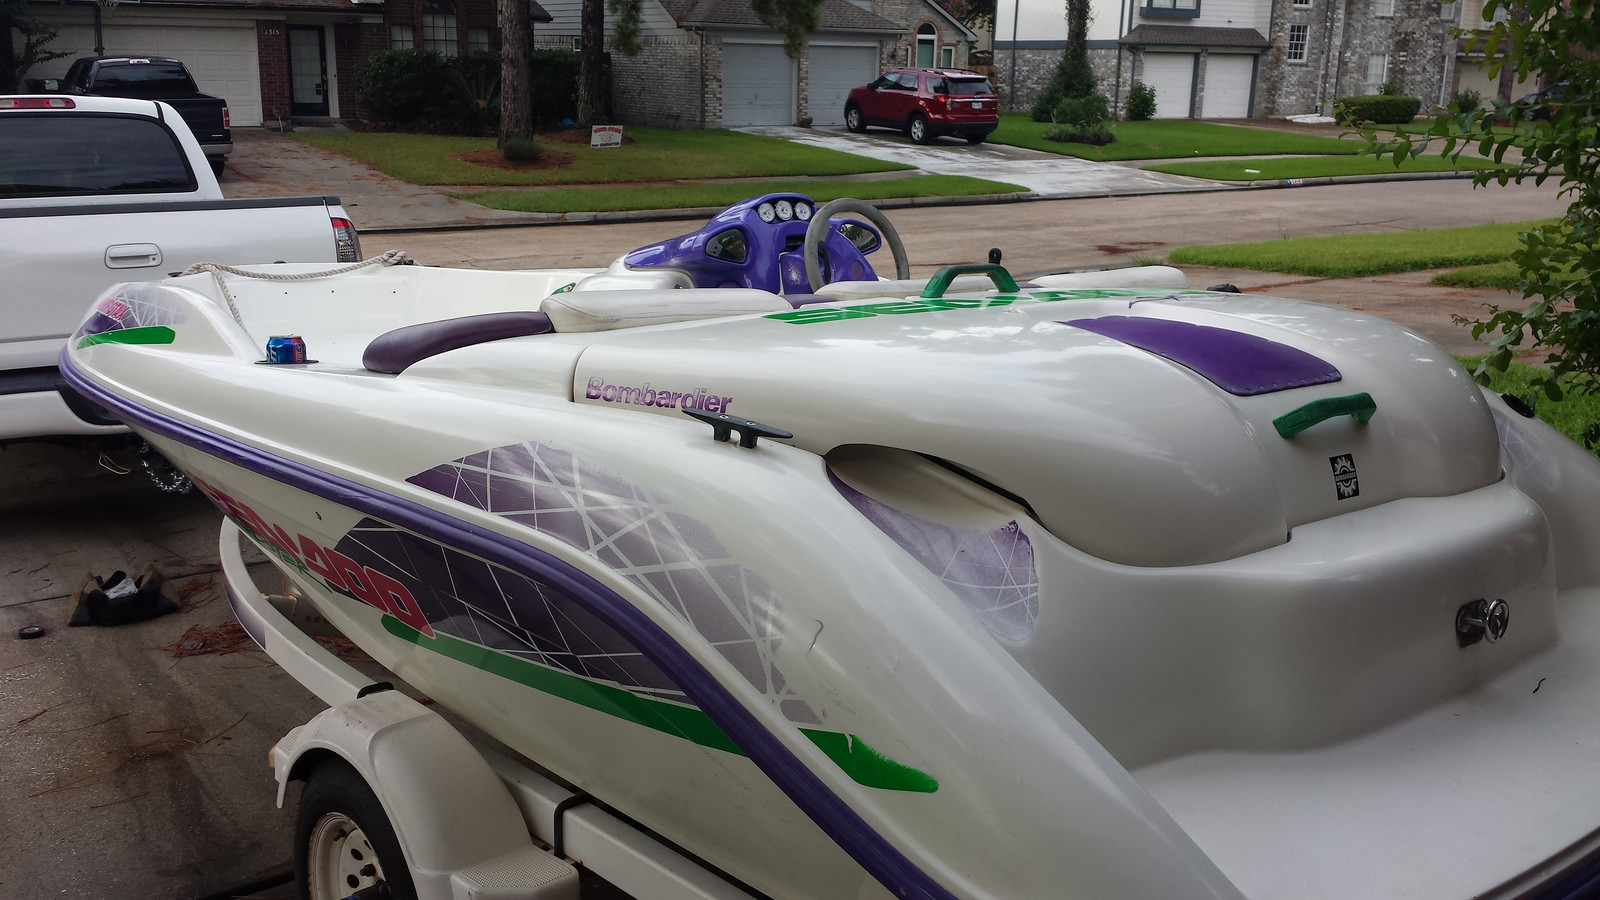
1994 SeaDoo speedster revival build

Note: This site contains eBay affiliate links for which SeaDooForum.com may be compensated
Status
Not open for further replies.
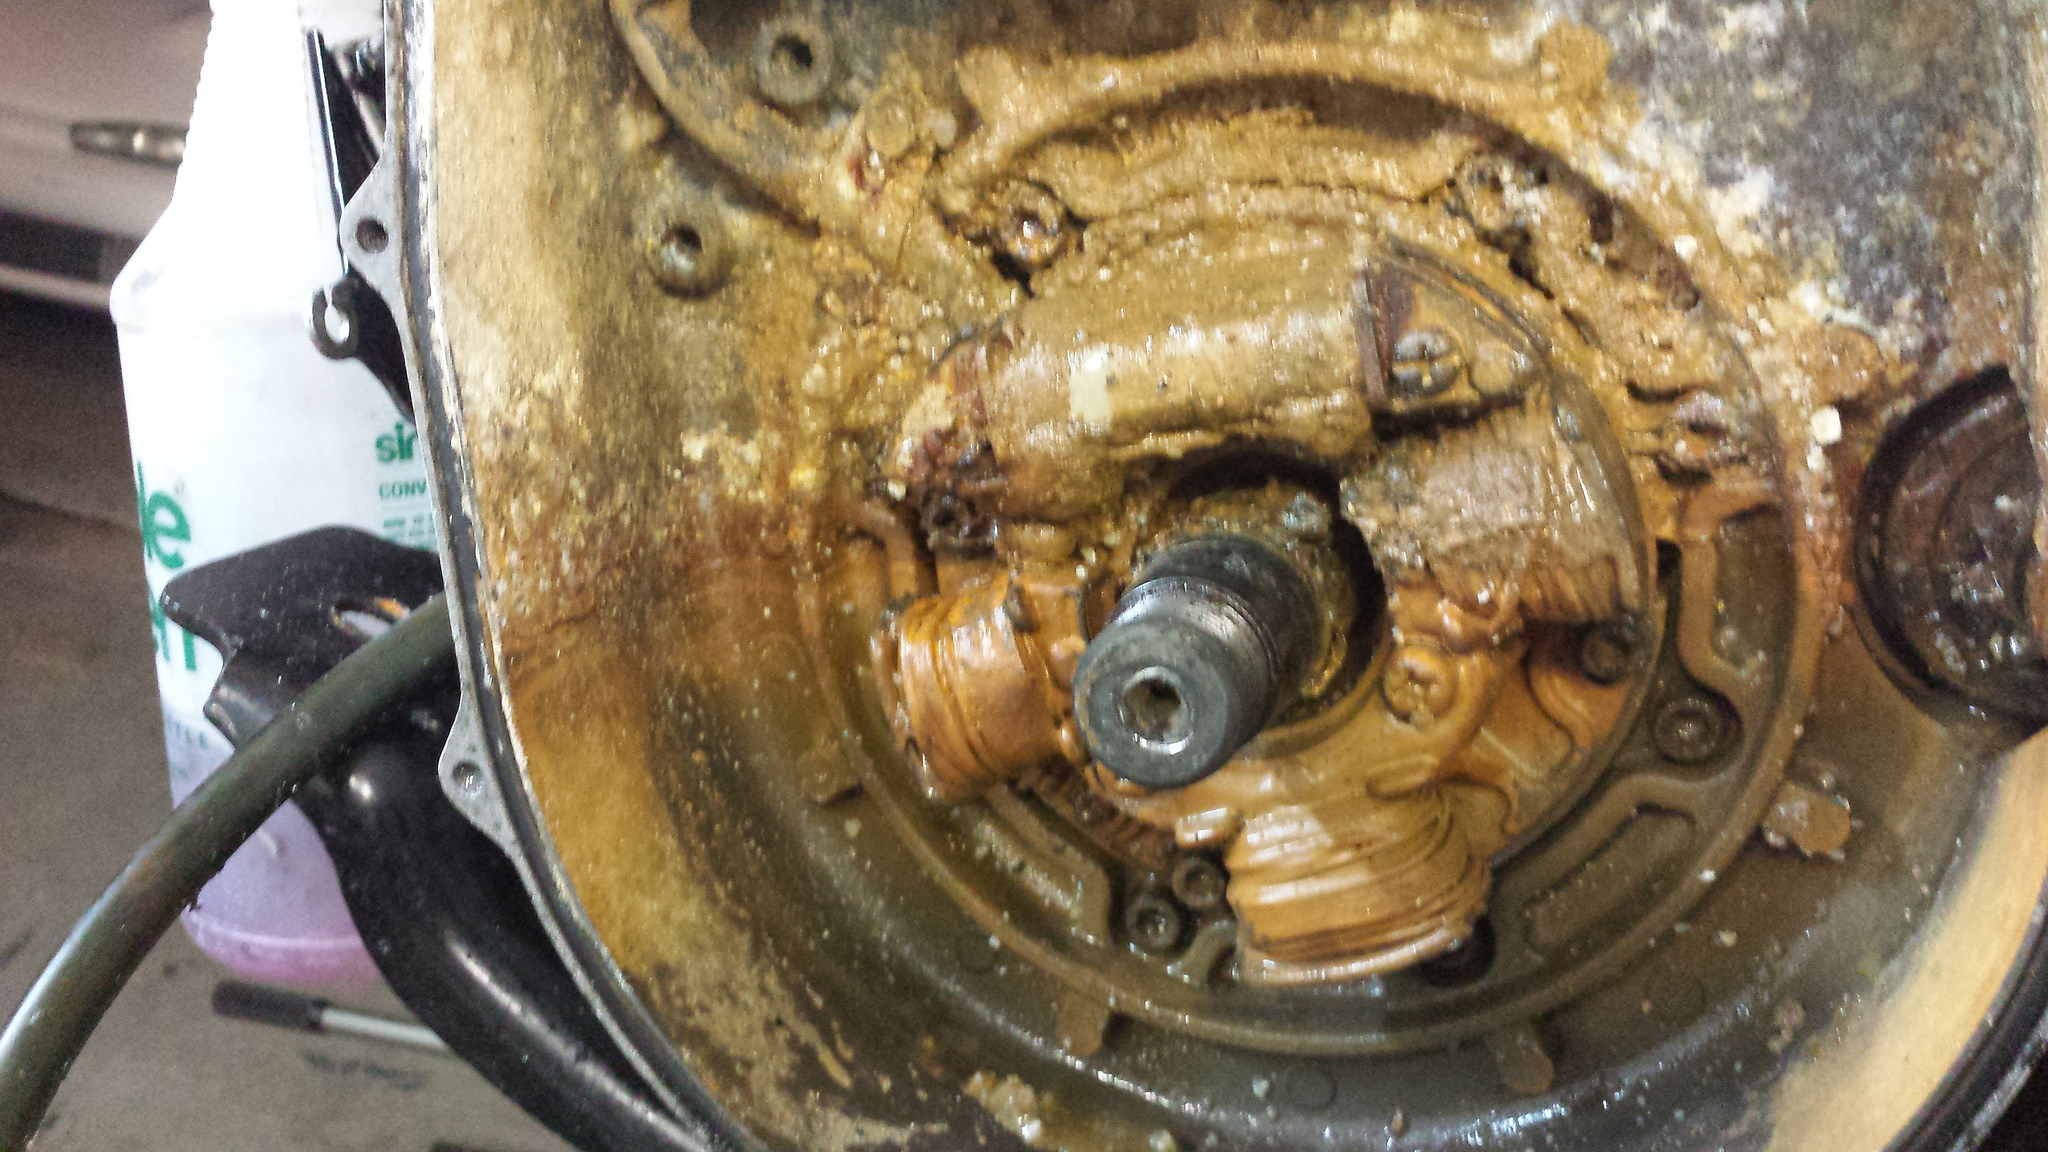
Hi there from Houston! I bought this boat in July. It hasn't run at all this season due to some wiring issues, bad mpem and bad stator. It has twin 657x rotax units. The port side engine has been replaced with a sbt engine, rebuilt carbs and now a new stator. Compression is good at 153 and 148 iirc. I pulled the engine out to replace the stator. Once out I pulled the stator cover and found that it was full of water and had corroded the wiring in the housing and the stator. It tested bad in the boat and needed replaced. I found a loose starter bolt and I think that is where the water got into the case. I pulled the starter and replaced the gasket and a new o ring on the stator housing along with a new stator harness to the e box. All tests good before dropping engine back in.
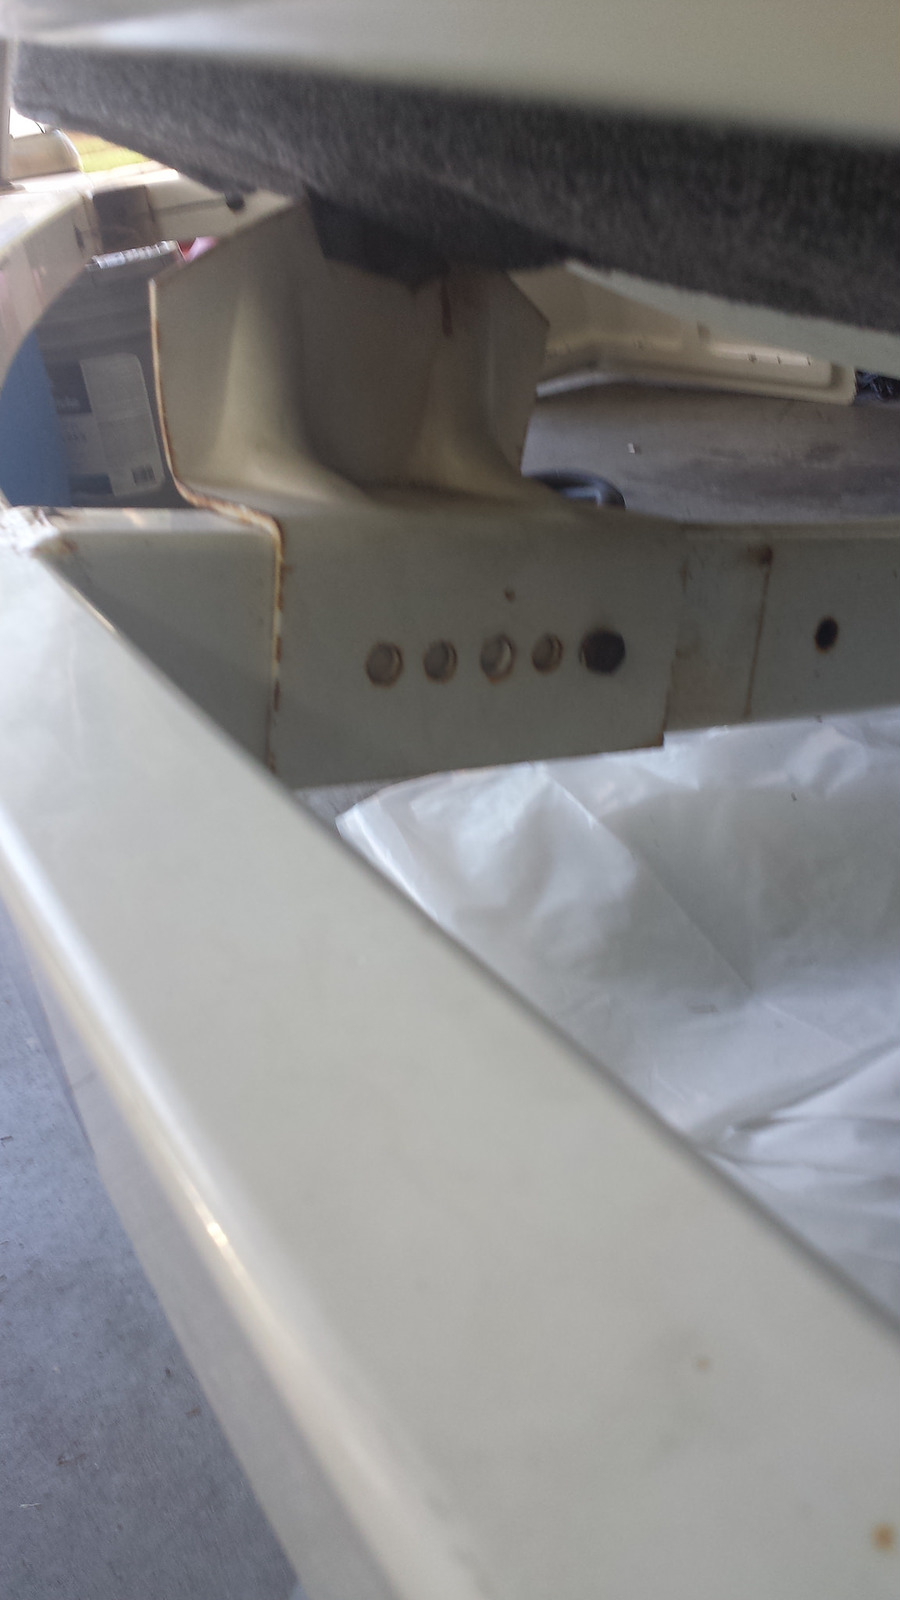
While the engine was out I adjusted the oil pump and checked all bolts for tightness and replaced all hose clamps. I also degreased the entire inside of the engine compartment. It was pretty nasty. The boat appears to have sat outside for the last season.
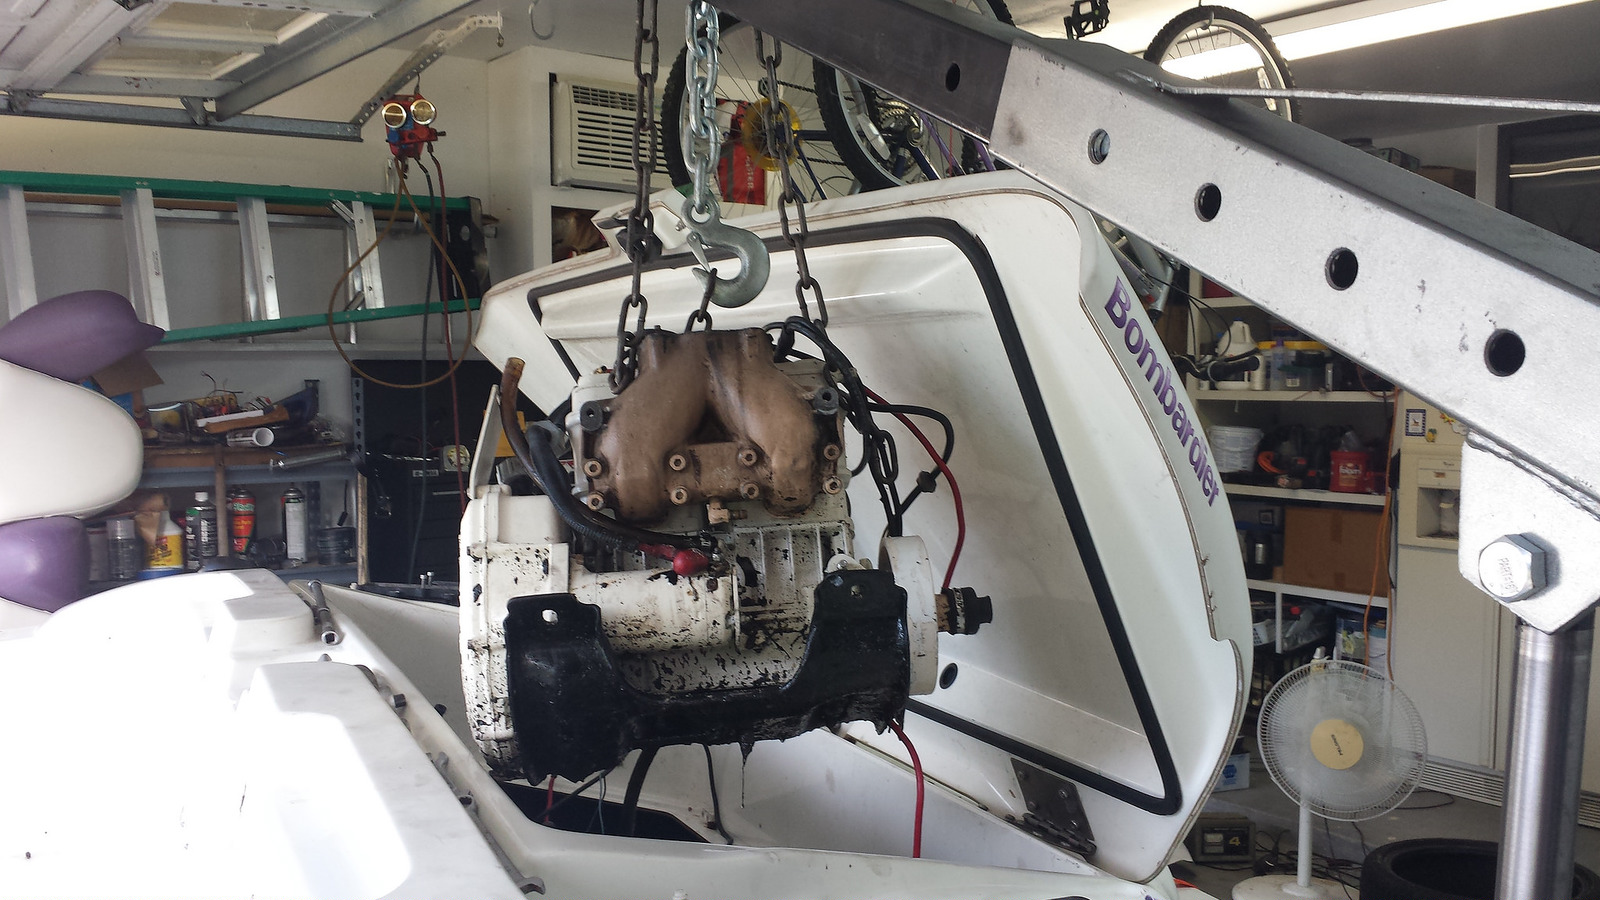
Here's some pics of that project:

43.jpg


44.jpg


I don't have pictures of the new stator but it's on there and timed correctly. I have dropped the engine back in and moved to the starboard engine. This engine had good compression. 153 and 154 iirc. The stator tested good and the carbs were rebuilt on this engine also. I have paperwork on the sbt engine and the carbs. It also appears that the top end had been rebuilt. New, unpainted gaskets lead me to think that. Also the compression is very good. I replaced the hose clamps and checked oil pump operation and adjustments. Pulled the cooling hoses and found no blockages or corrosion. I did find that the exhaust manifold gasket was missing and the 4 bolts on top were loose. This engine hasn't been run without the gasket that I can tell. All the issues I have come across look to be someone ran out of money to diagnose the boats problems. It has all new fuel lines, oil lines, all filters new.

Now to the mpem. This took some research. To start off, the e box was in process of a mpem bypass from what I could see.
51.jpg


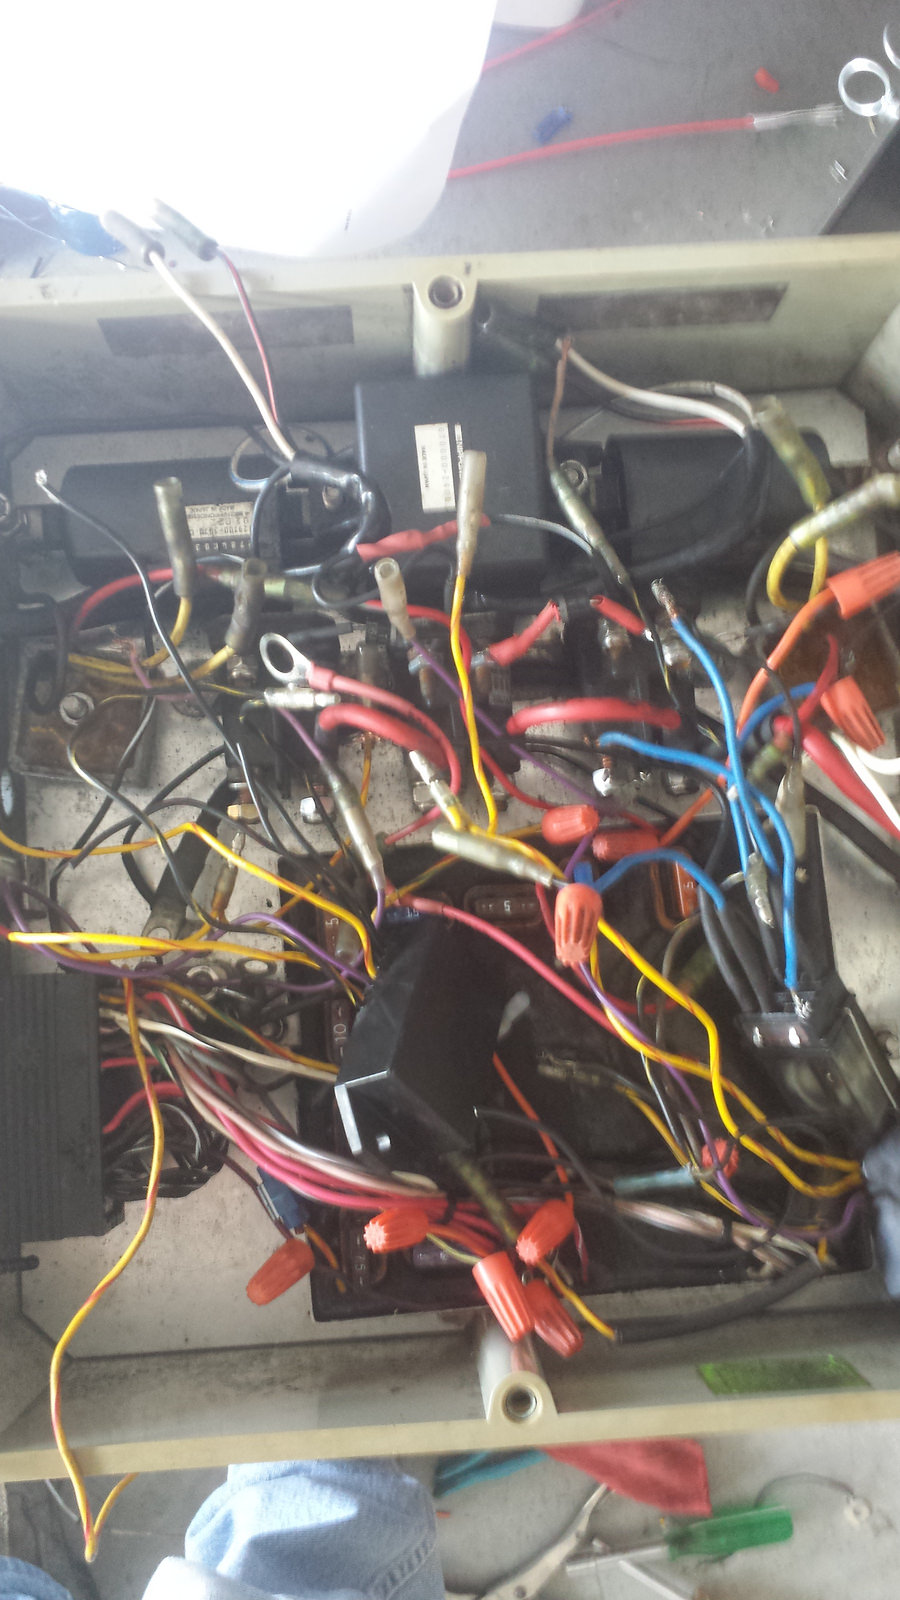
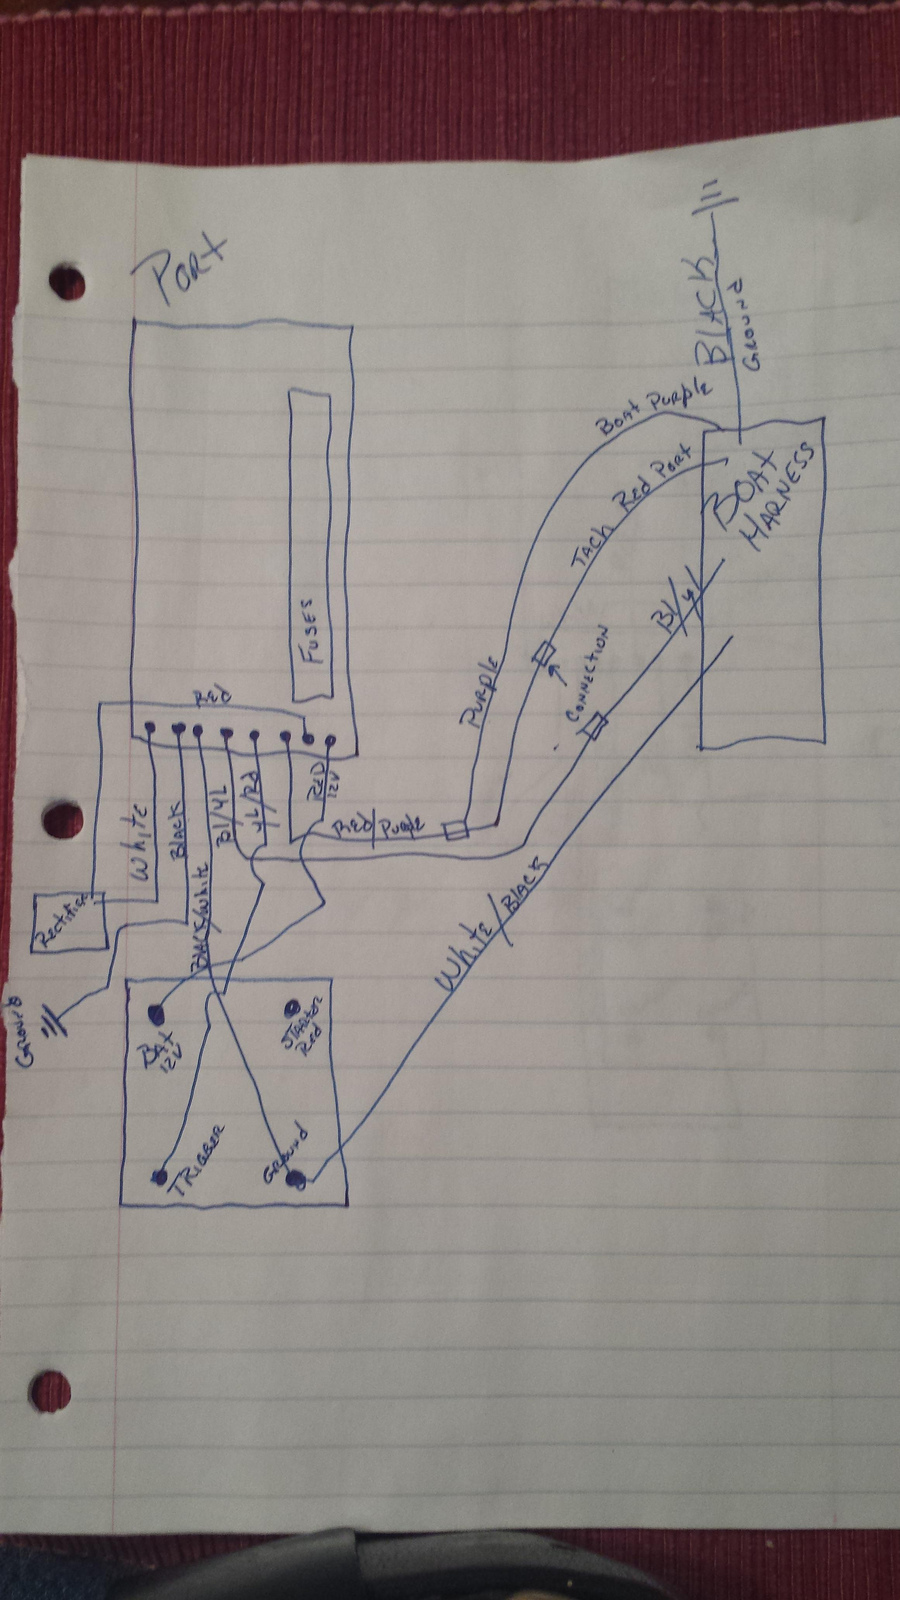
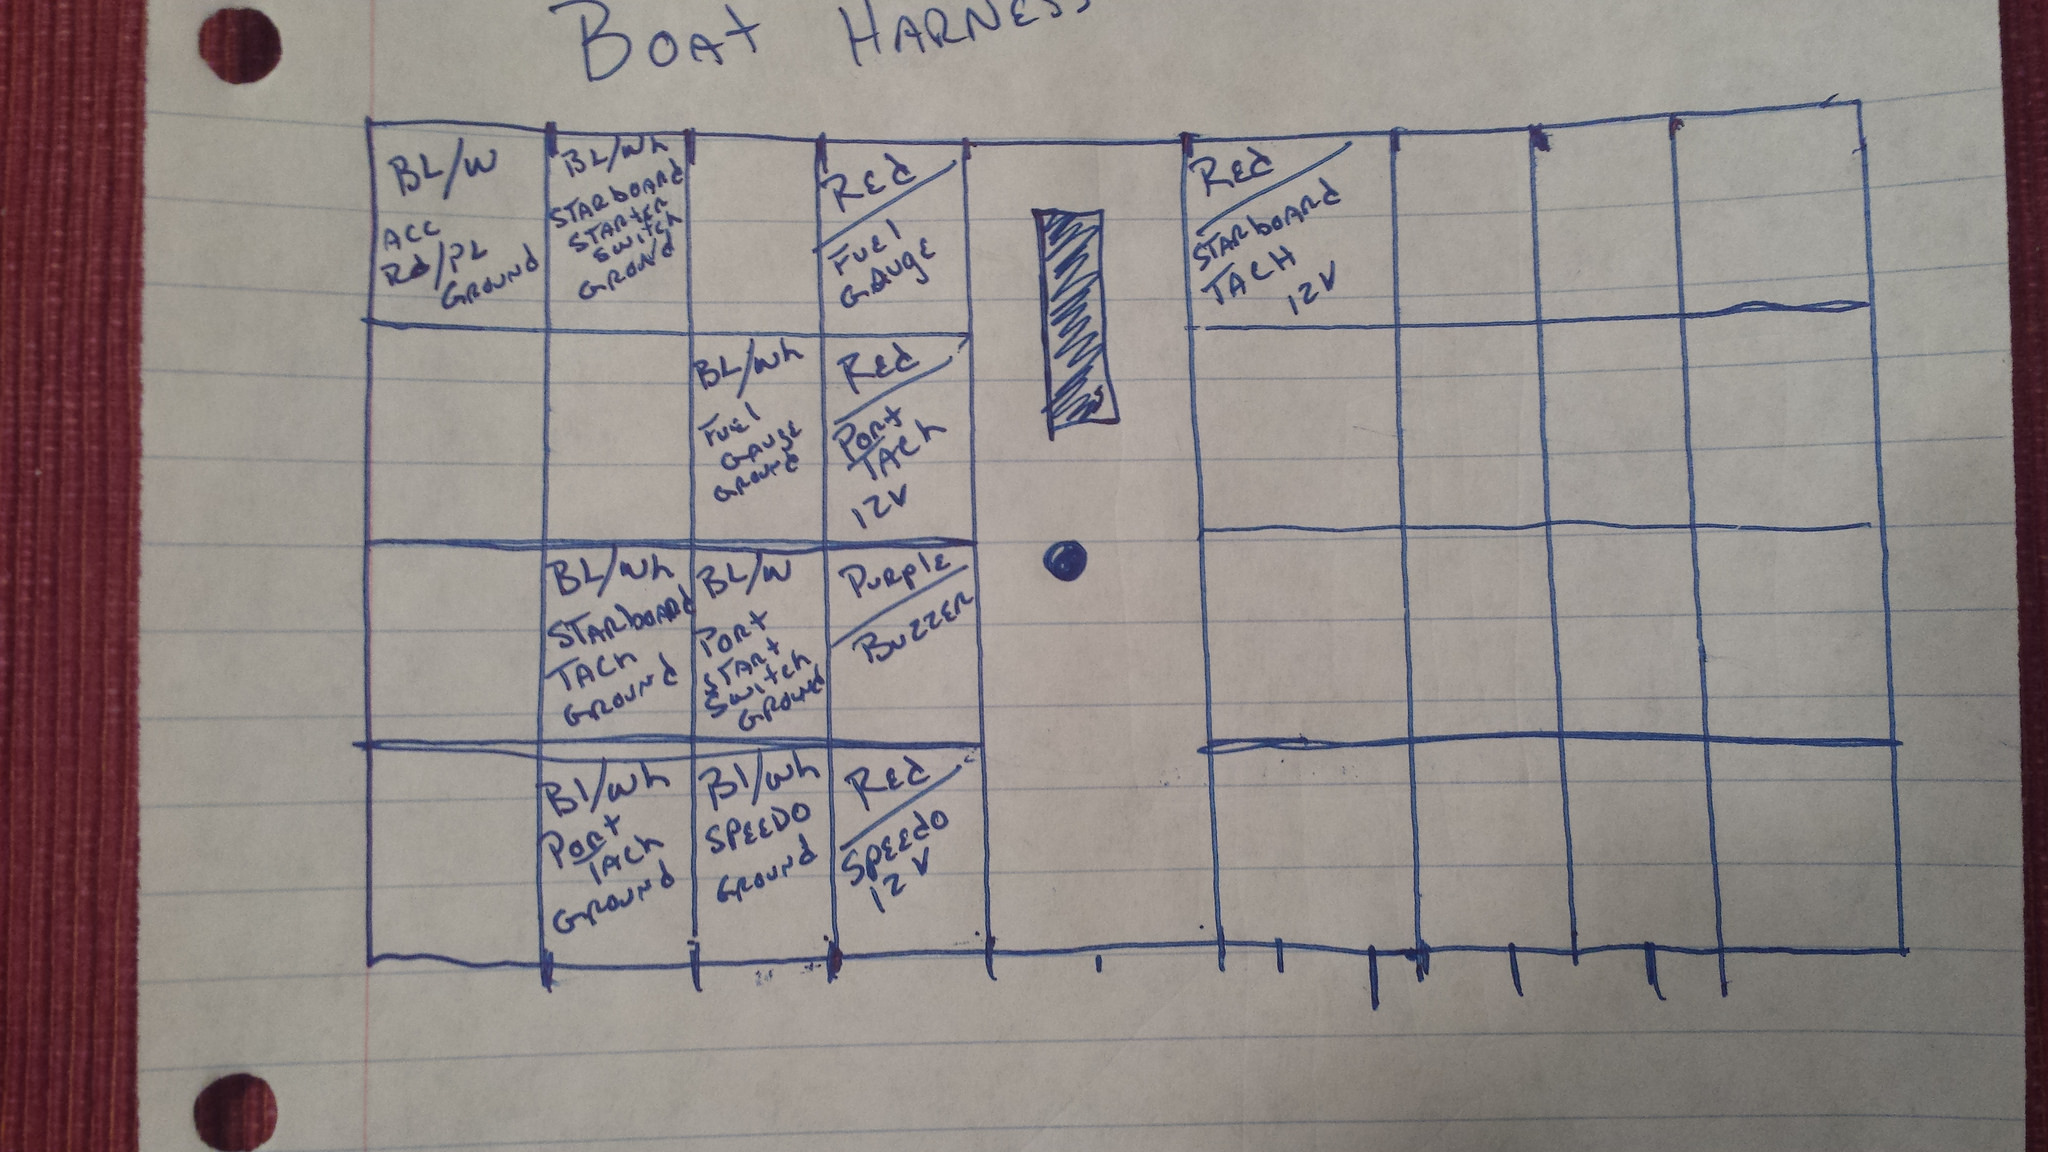
I took all the wiring nuts off and the aftermarket rev limiters off and tested the mpem on the bench. The notorious diode had blown, and I stopped there. With the blown stator and all the attempted bypassing, I decided not to chance it when I need reliability. I searched and searched for a how to do the dual mpem setup. I found freelancers and some companies doing it for 95 and up but nothing for 94 speedster. I bought 2 mpems from 93 94 skis. Part numbers were 278000305 and 278000071. I also got the wiring diagram from a 94 speedster, a 93 ski (with the 5 wire stator and 657x) and a 94.5 speedster (no dess). My boat has the dess post with the 3 wires (black, black/yellow, and white/gray)
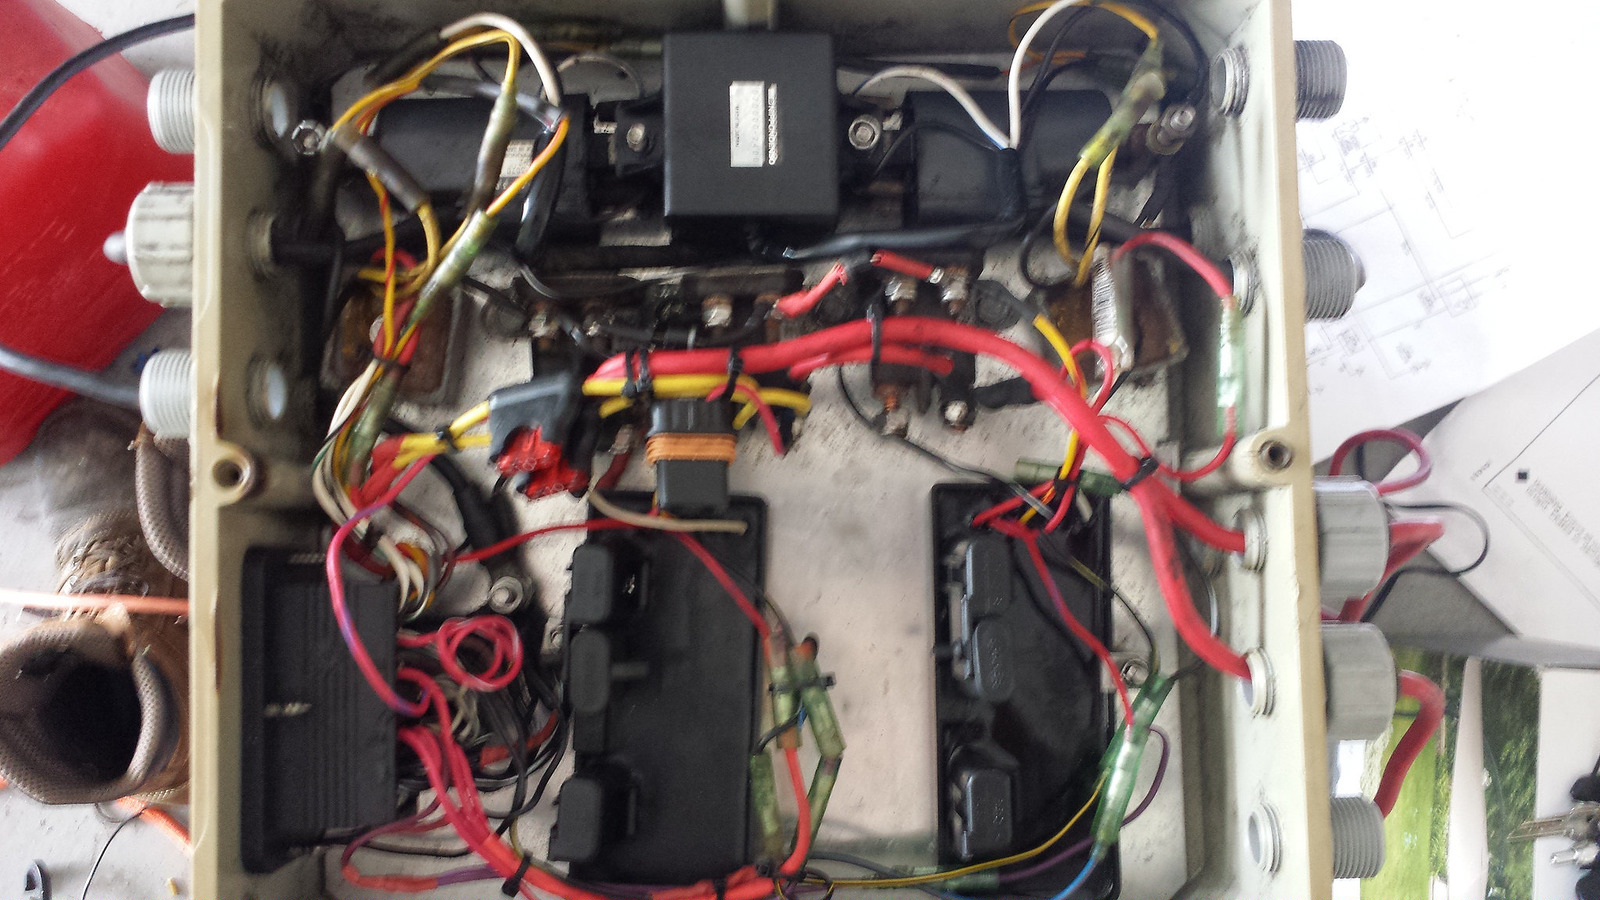
I wired each engine with its own mpem to the 93 ski setup. I used the dess wiring for the ground kill switch. I put the e box temporarily in the boat and hooked up the engines to the box. Switched the fuel on, primed the engines, and put the dess on and hit the port starter, and it fired up first turn. No choke. Idled smooth for about a minute, and I was very happy with the results. Pulled the dess key off the post, engine shut off immediately and cleanly. Just as I had hoped. Same for the starboard engine. I am working on the accessories and gauges atm, and waiting on a gasket also. This is where I stand to date

52.jpg
 
Last edited by a moderator:
Damn mag cover seal.. The older dual MPEMs you can't get no more you just loose some safety stuff with the ski jet ones but keeps the boat going. I am glad you got the bypass to work the info will be good for other people..
 
I will post a wiring diagram from the ski mpem to the boat harness to run the engines when I get a chance. I am chasing a tach problem at the moment. Lightning, fan, and bilge pump wiring is simple enough for anyone willing to tackle this. I can hit the starter button and the gas gauge comes on for the 30 second mpem time out. I tried to test the buzzer and it's shot. I can get one at the electronic store cheap. I found that academy sells the running lights and bilge pump for less then people want for used stock stuff. I did score on a nos mpem. I could incorporate the neutral safety switch with a little more effort in the wiring, but seeing how I got the boat on the 17th, I wanted to see the engines fired up first and make sure I wasn't wasting time.
I do have one question, when power is applied to the tach, does the needle do anything or does it just stay at 0? I really haven't done any investigation into the gauges yet. One system at a time so I don't miss anything.
 
my tacs on my 98 sometimes move when it is idling and sometimes they don't until I apply gas. they do swing back and forth once when I plug in the DESS key..
 
Thanks for that information. I did check the resistor in - line to the tach. It measures at 20k ohms on both yellow/red tach wires. I need to test continuity on the wiring to them next. I didn't know if there was a "power on self test" or not.
 
I traced down the grounds and power supplies for the gauges. They are all red and all black with the white tracer. All the wiring seems to pass the continuity test. I did map out the plug too. Boat side. Now I know where every single wire goes.

I introduced 12 volts to the tachometers and had no response. I also tested the buzzer and it's working. Gas gauge working, oil low light working. Just no movement in the tachs or speedometer. Ground was applied also. Was hoping to see a twitch or a sweep, but nothing.
Wired up the speedometer and the fuel gauge to the dess. Now the will turn on when the dess is placed on the post. I also wired the tachometers to their proper mpem. I got the exhaust gasket to hook up the starboard side pipe. That's it for tonight.

I will post the boat harness pin out when I get finished. I only did the dash gauges and grounds. I will post a picture to show orientation.
We have done this in the car world, and it sure helps out a lot.
 
Just a picture update. I also have the e box mounted and all wiring is complete. Still no movement on the tachometers. I feel that they both may be dead. I tested the power leads and both have power.
197.jpg


Here's a picture of the engine compartment. This is before I put the e box in, so some wiring still needed done. That's all been finished.
198.jpg


I promise I will get the wiring information posted so anyone will have it available. Just need to find the time.
 
Last edited by a moderator:
Dual mpem setup on 1994 seadoo speedster.


Here is the wiring info.....well, most of it. I took pictures of a drawing. I will explain after each drawing. We will start port side first.
246.jpg


Pretty much just wire all the wires to they're proper places.
the mpem---------------->boat harness

white.............................white(from magneto)
black..............................ground to box
black/white......................solenoid ground
black/yellow.....................black/yellow( dess post)
yellow/red........................solenoid trigger post
red/purple........................port side tach
purple(branched off above). purple(buzzer)
red.................................rectifier
red.................................solenoid(battery)

boat harness--------------> e box

white/black......................solenoid ground

this will start the boat's port side engine and run the tach, AS LONG AS THE DESS KEY IS IN PLACE. if you take the dess key off, engine will die. You will also be able to start in drive and reverse. Pay attention!


The starboard side:
247.jpg


Same thing here. EXCEPT>>>>>>>>>
All the wiring goes to the starbord side solenoid AND rectifier.
wire the black and yellow to the SAME black and yellow as the port.
This black/yellow will complete the ground circuit from the dess, and allow the mpems to run the engines. all the mpem black/yellow must be hooked together to the boats black/yellow.

I forgot to draw the white/black/green wire. This wire goes from the starboard start switch to the starboard solenoid GROUND. This completes the start circuit for the starboard side.

Here is the boat side e box harness pin out.


248.jpg


Here you can see where to hook the mpem tach wires to the boat harness.
this view is from the inside of the e box to keep it simple.

wire all the purple wires together.
i soldered and heat shrink tubing all the connections.
I will finish the wiring setup in the next post. there is still more to do to get all the accessories working....lights, bilge, fan, and gauges.

your dess is now only a floating magnet. The white/grey is now a free wire. DO NOT CONNECT To ANYTHING!!!!!
 
I'm working on 2 hours of sleep, so I will finish this up on a good nights sleep. I still need to give the heat sensor wiring, and the speedo, fuel wiring. These will activate when the dess key is put on the post. Bilge, lights, and fan will always be hot......my way.


Stay tuned.........
 
Lil update. ... boat and trailer all tagged and legal. I have decided to do the single battery conversion and will take her out for a water test in the morning. As far as the wiring goes. ..


I hooked up both the heat sensors to the tan wire. I dissected the original mpem, and it was just a on board connection. So hooking both heat sensors to the tan wire is fine. I wired all the external stuff to fuses and made them hot to the battery.

Regarding the fuel gauge and speedometer. ..you will have to probe the speedometer GROUND wire. The fuel gauge ground is obvious. Both wires are under the hood by the steering wheel. I cut the wires (grounds) from each gauge. ..speedometer and fuel...and hooked them up to the black/yellow wire. When this is done, they will operate when the dess key is put on the post. I have confirmed this and works good. If yall have any questions, just pm me and I can help you out. This is easy peasy!

Mpem 278000305 and 278000071 are the ones to get.
My 2 psi.

Maybe some pics on the bay if all goes well tomorrow.
 
It was. I got it all sorted out. Thanks to the wiring diagram. I should post that also. The 94 had 2 systems. One used a dess and one just used a standard lanyard. I have both diagrams. One is hard to read and the other..dess....One is perfect. Shows everything. I did the pin out on the boat side to make things easier. This whole system is basically a switch to ground. Thanks for the kind words. There's a lot of hours in the setup, so I hope it helps someone out. There was nothing on this in a Google search. Now if you search, it comes straight here.
 
Nice work Nova, I like it when data like this is shared to the community for the next guy tackling the project.
 
I did the 1 battery switch this morning. The oil tank fill tube gave me the biggest pain of the whole job. If and when I have to change the battery again, I will take only the top hose clamp off. Not both.
I finally got the boat out on the water, and I must say, my frickin left arm hurts like he'll after 4 hours of non stop wave jumping, wake zones, and moderate chop on the water today. I am trying to run all this gas out since I have no idea how old it is. Had a full tank when I got it, and now it's đown to halfway. Since I think both engines have had some top end work (mostly starboard) port has recent sbt engine, I varied the rpm and kept full blast to short bursts during the plane out. I did hit the Rev limiter during a couple of airborne wave jumps.
All in all, the boat turns on a dime, starts right up any time of the day, doesn't leak ( after half a day, not even a gallon from the plugs) , and is just a blast to drive. Maybe a tube next week?
Oh, and an anchor, and advil for this left arm.
 
I can say I spent the whole weekend on the boat, not necessarily on the water, but on the boat all the same. I got the inside engine compartment 'cover' cleaned up and installed. I washed and rewaxed the entire boat, inside and out, again. I had my greasy fingers all over, and needed to spiff it up for next weekend. I also secured a couple of things in the engine bay I didn't like the looks of. The dual mpem setup works flawlessly and I couldn't be happier. Might get some pictures up now that it's all done.
 
Small update on the speedster. ......
Had the boat out on the lake a few times this last week and for the most part, it was uneventful. Except. ..
I have read on here in a few places to lock tight everything. Ok, well, I ran out when I was doing the port side exhaust and forgot to pull the bolts and redo the lock tite.
So I was out today pulling a tube and having a blast, stopped to pull the tube in and the port side engine died. Popped the hood and everything was wet. The exhaust bolts (4 on top) had loosened up and sprayed water into the carb housing box. Pulled the plugs and flame arrestor and gave it a shot of pre mix and cranked it over a couple of times. While I was waiting on the plugs to dry, I tightened down the exhaust bolts and fished the expansion pipe attachment bolt from the depths of the hull and put it back in. Put the plugs back in and the flame arrestor and carb box back on, choked the engine and it fired right up.
Lesson learned the hard way. I will spend the next couple of days making sure everything I touched will have lock tite put on.

The engine ran just fine after the on lake fix. Still pulled hard and planed out nicely. I checked the compression Sunday cause it rained all day and I had everything else ready. Both engines are still in the 150 range. Might check again on the port side this week and see if that incident caused any damage. Didn't feel like it affected anything.

Moral of the story: use the damned lock tite!
 
Hummmm I just noticed your trailer... How is clearance at the bottom? Mine is set so the trailer arms are closer together and the boat sits higher and was considering moving them how much room do u have on each side of the wheel wells and from the bottom cross members?? I couldn't see myself monopolize the boat launch to 'test-fit' the trailer
 
I will get some pics of that tonight and some measurements also. I just replaced the board on the left side of the trailer. I was going to move the winch closer to the hitch to add a little more tongue weight. That will give me a tad more room in the garage also.
 
Last edited by a moderator:
There's 1 1/2" between the fender and hull.

51.jpg


This is the front "runner" position on the frame. I need to move it to the right by 2 holes. The hull rests on the "cross member" rubber at the moment. The rear runner is set in the same hole as pictured here. Moving it will not change the height by very much.

52.jpg


This picture is of the rear cross member center rubber. There's a good 1/4" gap there.
Both the rear runners are set like the above picture. The front runner bolt needs to go over 2 holes. You can see the blemish where it used to sit. I was in a hurry to get to the lake and that's where it ended up. I will fix this tomorrow.


53.jpg


Hopefully this makes sense.
 
Last edited by a moderator:
Status
Not open for further replies.
Back
Top